How to simplify employee onboarding with the Service Catalog
On this page
- Before you begin
- Check the supplied onboarding item
- Set up the Create Action in the Settings App
- Create the request fulfillment
- Add the onboarding item to the catalog in the Web App
- Make the item visible in the portal
- Order onboarding for the new employee
- Create a work order for each onboarding task
- Complete the onboarding tasks
- Close the onboarding request
- Result
- Related topics
Onboarding a new employee takes work from several teams: computers and phones to prepare, payroll updates, orientation training, and more. With the Service Catalog, the onboarding manager enters the new hire's data once, in one service request, and that request gets a work order for each onboarding task, so every task can be assigned to its team and tracked to completion. An administrator makes the onboarding item available in the catalog, the onboarding manager orders it in the Web App or in the Self Service Portal, and technicians fulfill it.
Default Workflow: The catalog item Employee Hire, its request fulfillment, and the workflow actions and statuses that this article names are those of a new Alloy Navigator 2026.1 database created with the Default Workflow. An upgraded database need not have this content, and an administrator may have changed it. See Default Workflow Configuration.
Before you begin
- In the Web App, the Service Catalog is in the Service Management group of the navigation rail, whose entries need the ITSM license module (see The Web App at a Glance).
- Managing catalog categories in the Web App requires permission to edit Service Catalog items.
- Setting up Create Actions in the Settings App requires the Service Request class's own administrative right, the right that allows managing the class's business logic.
- In the Self Service Portal, the drawer shows Service Catalog only when you are signed in and the service catalog module is enabled for the portal and allowed by the portal's license.
Check the supplied onboarding item
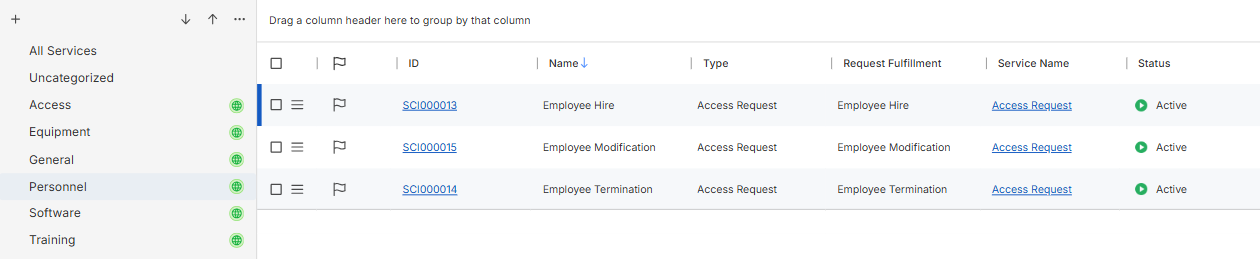
A new 2026.1 database created with the Default Workflow contains the catalog item Employee Hire. It is filed in the public category Personnel and uses the request fulfillment Employee Hire, which names the create action Employee Hire. Ordering the item runs that create action, which creates a new service request with the catalog item already filled in.
If Employee Hire serves your onboarding process, check that the portal offers it (see Make the item visible in the portal) and go on to Order onboarding for the new employee. To build an onboarding offering of your own, set it up as described in the next three sections.
Set up the Create Action in the Settings App
A catalog item becomes orderable only through its request fulfillment: the fulfillment names the Service Request Create Action that creates the request. For a new catalog offering, we recommend a set of three that belong together: a Service Request category for the offering (a category of the Service Request class, not a catalog category), a Create Action whose template sets that category, and a request fulfillment that runs the Create Action and has the same name. A new request fulfillment can also run an existing Create Action.
- In the Settings App, go to Workflow and Business Logic, expand the section that holds the Service Request class, and under that class select Workflow > Actions > Create Actions.
- Create or open the Service Request Create Action that the fulfillment is to run.
- On the General tab, set Name, Caption, Hint, and Description, and select or clear Enabled.
- On the Template tab, choose an existing template or define a custom template to be used only for this action. The template's values are applied when the service request is created.
- On the Form tab, keep the full form or select another form.
- Optionally, on the Programming tab, add the operations that the action runs, from the New menu of the operations list. To have the onboarding work orders created together with the request, add a Create Object operation, which creates a new object and can run its own operations against each created object (see Create Object).
- Save the action.
The Template, Form, and Programming tabs and the action's icon are described in full in Set up the Create Action for a Service Request.
Create the request fulfillment
Request Fulfillments is a classification list of the Service Catalog Item class.
- In the Settings App, go to Workflow and Business Logic > Service Management > Service Catalog Items > Classification, and open the Request Fulfillments page.
- Add a fulfillment.
- Enter the fulfillment's name. The name is not tied to the Create Action; we recommend using the name of the Create Action that the fulfillment runs.
- In Service Request Create Action, select the Create Action to run when an item that uses this fulfillment is submitted.
- Select Active. Clearing Active retires a fulfillment without deleting it.
Request fulfillments can also be edited on the Request Fulfillments page of the Admin Center; see In the Admin Center.
Add the onboarding item to the catalog in the Web App
Catalog items are filed in a category tree of their own. The Categories tab of an item links only categories that already exist, so create the category first.
- On the Service Catalog page, in the category panel, open New and choose New Category, which creates a category beside the selected one, or New Subcategory, which creates one under it.
- Enter the category's name and description. A new category is internal unless you select Public; leave it internal until its items are ready to appear in the portal.
- On the Service Catalog page, click New and choose Service Catalog Item. The form "Create Service Catalog Item" asks, in this order, for the item's name, description, service, type, request fulfillment, and price. Choose the onboarding request fulfillment. The name, service, type, and request fulfillment are mandatory in the Default Workflow; the description and price are not.
- Open the new item, and on its Categories tab, click Add and pick the category in the category tree. The tab links one category at a time.
- Optionally, on the item's General tab, add a picture: drag an image onto the Picture frame, or click the frame to choose an image file.
The item record and its tabs are described in Create or edit a catalog item, and the category commands in Manage categories.
Make the item visible in the portal
The Self Service Portal offers a catalog item only when all of the following are true:
- The item's status is Active. In the Default Workflow, catalog items have the actions Mark Active and Mark Inactive.
- The item is in at least one public category whose parent categories are all public as well.
- The item is linked to a service that is available to the person. A service is available when it is not inactive and it has no SLA, a global SLA that is not inactive, or an SLA that is not inactive and names the person, their organization, or a group they belong to as a receiver.
To publish a category that you created internal, select it in the category panel of the Service Catalog page and choose Mark as Public. In the tree, a public category has an icon of its own.
Order onboarding for the new employee
The onboarding manager orders the item when a new employee is about to join. Both applications run the create action that the item's request fulfillment names.
In the Web App
- On the Service Catalog page, select the item's category (for Employee Hire, Personnel) in the category panel.
- Open the item and click Submit Request on its Actions pane, or select the item in the grid and choose Submit Request from the Actions menu.
- Complete the form of the create action with the new employee's details.
The action creates a new service request with the catalog item filled in. Submit Request is offered only when the item's request fulfillment names a create action that exists, the action is available for the item's type and status and for your roles, and the action's condition passes for the item.
In the Self Service Portal
- In the top bar, open the drawer and click Service Catalog. The catalog opens on All Services.
- Click the item's category in the tree on the left (for Employee Hire, Personnel), or type the item's name in the Filter items (/) box.
- Open the item, and at the bottom of its details, click Submit Request. In the item list, you can also point to the item and click its Submit button.
- In the request form, which already names the catalog item and names you as the requester, enter the new employee's details and submit it.
After the request is created, the portal opens the new service request. If your account cannot view it, the portal shows a message that names the kind of record and the new request's ID.
To follow the request afterward, see Track Your Tickets.
Create a work order for each onboarding task
Unless the create action already created them, the work orders are added in the Web App, on the new service request. Unless the service request is created through the API, auto-assignment runs on it at creation. When it has neither an assignee group nor an assignee, it gets the support group of its service, while the workflow parameter Service Support Group Assignment is on, as it is in the Default Workflow. When it has no assignee, auto-assignment picks one among the active members of the group whose work calendar shows them available for the next 15 minutes, and the service request is Assigned; when no member is available, it is Unassigned with the group.
- Open the service request. If it is Unassigned, or to coordinate the onboarding yourself, run Assign to me: you become the assignee, and the status becomes In Progress.
- Run Create Work Order, which is in the Relationships section of the Action Bar. It is offered in Assigned, In Progress, On Hold, and Approved, to the Administrator (Full), Administrator (Workflow), Service Request Manager, and Service Request Technician roles.
- In the "Create a Work Order" form, describe the task in the summary and the description, which are pre-filled with the service request's, and choose a type. The requester must be a technician and is pre-filled with you.
- Choose the assignee group of the team that does the task and, optionally, the assignee, who can only be a member of the chosen group. You can also set the category, the urgency, the impact, the scheduled start and end dates, and add attachments.
- Submit the form. The work order is created with the service request as its parent; it does not open, and the service request's status does not change.
- Repeat steps 2 to 5 for each onboarding task, such as preparing a computer, a phone, payroll system updates, or orientation training.
Auto-assignment runs on each new work order: it is Assigned, and its assignee is e-mailed, when you set an assignee, and Unassigned when only a group is set. When you leave both empty, it gets the support group of its service and is Unassigned. See Create a work order from a service request.
Complete the onboarding tasks
Each team takes its work order, records its work, and runs Complete Work Order; see Assign, complete, and close a work order.
When the last of the service request's work orders that is not Closed is completed, the service request becomes Completed. This rule is controlled by a workflow parameter, which is turned on in the Default Workflow.
Close the onboarding request
- If the service request is not yet Completed, run Complete Request, which is offered in Assigned, In Progress, On Hold, Approved, and Rejected, fill in the "Complete Request" form, and click Submit. While the workflow parameter for this rule is on, as it is in the Default Workflow, its child work orders that are not Closed are set to Completed.
- Run Close Request, which is offered in Completed, choose a Closure Code, and click Submit. Close Request is not offered to the Service Request Technician role. The status becomes Closed.
A service request that stays Completed without changes is closed automatically after the number of days in its workflow parameter, which is set to 14 in the Default Workflow.
Result
The new employee's onboarding is recorded in one closed service request, raised from the catalog item, with a child work order for each task that its team completed. The item's Request History tab in the Web App lists every service request raised from it.