How to convert standard Alloy Navigator accounts to SSO
On this page
An administrator moves technicians who sign in with a user name and a password to single sign-on through an OpenID Connect provider. You set up the provider, enable it for the applications people sign in to, and then change the login of each account to the value the provider sends. You can keep password sign-in available alongside single sign-on. You do the work in the Admin Center.
Before you begin
- To open the Admin Center, your account must hold the Basic administrative access permission; see Admin Center and Settings App.
- To work with SSO providers in the Admin Center, you need Active Directory integration or security management rights. The Admin Center returns the list of SSO providers only to these administrators.
- The Security Management permission opens the Users & Security pages, among them Accounts and Roles and SSO Providers. The Web App Configuration, API Configuration, and Self Service Portal Configuration permissions open Apps and Portals > Web App, API, and Self Service Portal. Administrative Access opens all of them. See Permissions Reference.
- Single sign-on to the Web App needs HTTPS. When the Sign in page is not opened over HTTPS, its provider buttons are disabled.
Set up the provider
On the provider's own site, register the application people will sign in to.
The redirect address is that application's base URL followed by signin-oidc.
For the mobile apps, the redirect address is http://localhost:4000.
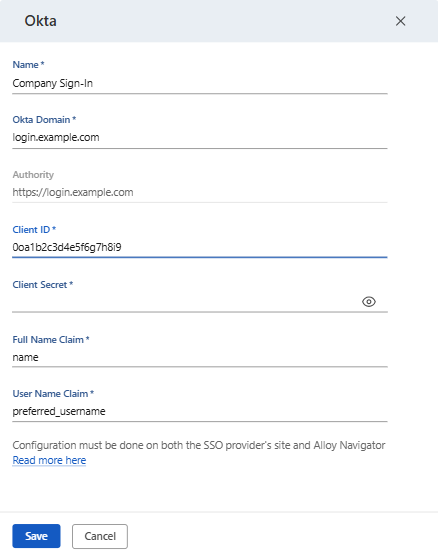
Then create the provider record in the Admin Center, on the SSO Providers page of Users & Security. New offers the provider types Microsoft, ADFS, Okta, and Custom. The record holds the authority, the client ID and the client secret of the application you registered, and the two claims to read from the provider's token: the username claim and the full-name claim. For the settings of each type, see The provider record.
The username claim decides which value Alloy Navigator compares with the
logins of the accounts. Each type starts with its own username claim:
preferred_username for Microsoft and Okta, upn for ADFS, and
emailaddress for Custom.
Enable the provider for the applications
Creating a provider record does not enable it anywhere. Enable the provider on each application where people sign in with it.
For the Web App, on the Web App instance's Authentication tab (Apps and Portals > Web App):
- Under SSO Authentication, Available Single Sign-On services: lists one check box per provider, sorted by name. Select the providers people may sign in with.
- Click Save and Restart. The button is disabled unless Allow password authentication or at least one provider is selected.
IMPORTANT: Saving restarts the Web App instance. The restart closes all active connections and can cause loss of unsaved data.
Select the provider in the same way on the Authentication tab of the API instance and of the Self Service Portal. An API instance that uses Windows authentication has no Authentication tab. For the portal, you also choose the workflow action that creates a portal account for a person who signs in with single sign-on. See Enable providers for the API and Enable providers for the Self Service Portal.
Find the login each account needs
The provider's token is matched to an account by the login, and by nothing else. Alloy Navigator reads the username claim configured on the provider record from the token and compares it, ignoring case, with the logins of the accounts. There is no mapping table and no matching by e-mail address, and an account does not record which provider it uses.
The new login of each account must therefore be exactly the value the provider
sends in the username claim. When a Microsoft or Okta provider keeps
its starting username claim, preferred_username, that value is the user
principal name. When no account matches, the sign-in is refused. The one
exception is a provider marked for accountless sign-in to the Self Service
Portal. For the details, see
How a sign-in is matched to an account.
Decide which accounts keep a password
- An account that keeps a password can sign in with single sign-on and also through the password form of the Web App with its login.
- An account without a password can sign in only by single sign-on. Clearing Allow password authentication removes the account's password when you save. After that, no password sign-in works for the account until you set a new password.
- In the Settings App, a technician signs in with a password or with Windows credentials only: single sign-on is not accepted there. A technician who works in the Settings App keeps a password.
Change the login of each account
In the Admin Center, for each account:
- Go to Users & Security > Accounts and Roles. On the Accounts tab, select the account and click Edit.
- In the account editor, use Modify Login.
- Choose Standard or Single Sign-On and enter, as the username, the value the provider sends. A username that contains a backslash is refused.
- Select Allow password authentication to keep the password, or clear it to remove the password when you save. If password authentication is off and the username is not an e-mail address, a warning offers to turn password authentication on or to continue without it.
- Save the account.
For the full description of Modify Login, see Change the login. The Settings App changes the login with its own Modify Login; see Change the login and the person. A customer account of the Self Service Portal changes its login with Modify Login in the same way; see Create and Maintain Customer Accounts.
What you have now
- In the Admin Center's accounts list, Authentication Type shows SSO for an account without a password and Standard for an account that kept one.
- The Web App's Sign in page shows a Sign in with button, followed by the provider's name, for every provider enabled for the Web App. When password authentication is on, the page also shows the password form.
- A technician who signs in through the provider is matched to the account by the new login. When the token does not contain the username claim, the Web App reports this as its own error, naming the claim it expected.
- To give an account without a password one later, use Set Password in the account editor. If the username is an e-mail address, you are asked first whether the user should also be able to sign in with the username and password.