How to set up and allocate software licenses
On this page
To see whether the software your organization runs is covered by licenses, you record each license in Alloy Navigator and allocate it to the computers, hardware items, or persons that use it. An administrator first checks the licensing policies in the Settings App. In the Web App, you then group the software products that inventory finds under Tracked Software items, record the licenses with their policies and restriction rules, and let each inventory import allocate the licenses automatically. Where automatic allocation leaves an installation without a license, or a license runs short, you allocate, reconcile, or move allocations by hand.
Before you begin
- The entries of the Web App's Software Asset Management group of the navigation rail need an ITAM license (see About Alloy Navigator).
- Software products are not created in Alloy Navigator: the catalog's entries arrive through the AlloyScan and Alloy Discovery synchronizations, and automatic allocation runs when one of these imports loads a computer's software. An administrator sets up the import; see AlloyScan Synchronization or Alloy Discovery Synchronization.
- What your account can view and change on Software Licenses and Tracked Software items is set by the permissions in Software Asset Management permissions. While a form is read-only, Deallocate is unavailable on its allocation tabs, and Allocate on a license's Allocation tab and on a record's Allocated Licenses tab.
- Licensing policies are maintained in the Settings App, by an administrator.
Check the licensing policies
The tracking type of a license's licensing policy decides how the license's usage is counted and how it can be allocated:
- By Device, or no tracking type: usage counts the license's allocations to computers and hardware that are not retired.
- By Device Owner: usage counts the distinct owners of the allocated computers and hardware that are not retired.
- By User: usage counts the license's allocations to persons who are not inactive. Such a license is allocated to persons, not to devices, and automatic allocation never picks it.
- None: every usage count of the license is zero.
When a database is created, it gets five licensing policies that have no tracking type. A new 2026.1 database created with the Default Workflow (see Default Workflow Configuration) contains thirteen policies, each with its tracking type set; they are listed in Policies and tracking. An upgraded database need not have this content, and an administrator may have changed it. Adding a licensing policy sets By Device on every policy that has no tracking type.
To add or change a policy, in the Settings App:
- Open Workflow and Business Logic > Software Asset Management > Software Licenses > Classification > Licensing Policy.
- Choose New to add a policy, or double-click a policy to change it. A new policy opens in the New Software License Policy dialog, an existing one in the Software License Policy dialog.
- In Licensing Policy:, enter the policy's name.
- In Tracking:, choose the tracking type: By Device, By Device Owner, By User, or None. On a new policy, Tracking: is preset to By Device. OK stays disabled while Tracking: is empty, so for no tracking, choose None.
- Click OK.
A change of a policy's tracking type to tracking by user is refused while any license under the policy is allocated to a computer or hardware item that is not in its inactive status. A change to any other tracking type is refused while any license under the policy is allocated to a person who is not in the inactive status. Delete the existing allocations first. For the policy's tags and the rest of the list, see Licensing policies.
Group the software products under Tracked Software
A Tracked Software item is the software your organization decides to manage. It groups software products, and one item can cover several versions or editions of a product. A license is linked to a product only through a Tracked Software item.
In the Web App, create the item from the New menu of the Tracked Software list in the Software Asset Management section, or from the header's New... menu. The list's New menu offers the create actions of the class.
Then link the products the item covers:
- Open the Tracked Software item, and go to the Products tab inside General.
- Use the add button to link the products. You can link several products at once, from the products that are not yet linked to any Tracked Software item.
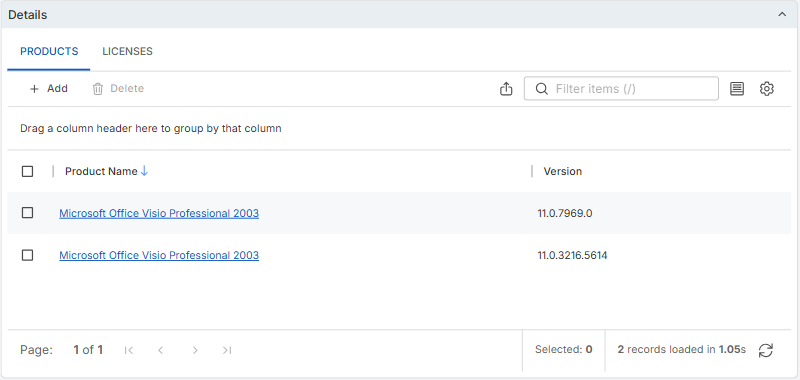
Deleting a product row removes only its link to this item, not the product. A product that no Tracked Software item links and no discovered installation names is removed from the catalog by the next Alloy Discovery or AlloyScan run.
Record the licenses
A Software License is an entitlement that points to no more than one Tracked Software item, and its quantity is the only entitlement figure. When you buy more licenses of the same software, you can record them as another license of the same Tracked Software item.
You record a license in the Web App in either of two ways:
- On the Tracked Software item's Licenses tab, inside General, New creates a license, and the add button links one existing license that is not yet linked to any Tracked Software item. New is hidden while the form is read-only.
- On the Software Licenses list. In a new 2026.1 database created with the Default Workflow, the list's New Software License menu has a Software License item, which opens the Create a Software License form. In its License Compliance Rules section, Policy is set to Per Installation in the Default Workflow and is shown with (Tracking: By Device); that preset applies to this form only. Pick the Tracked Software item in the form's Tracked Software field.
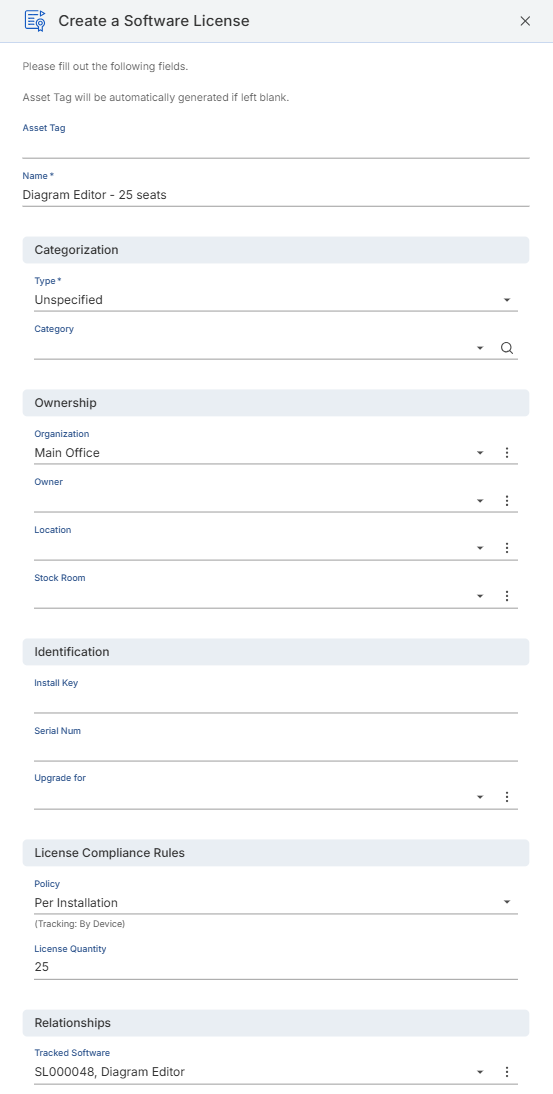
When you fill in the license, keep in mind what each value is used for:
- The Policy decides how usage is counted and which allocation commands the license offers (see Check the licensing policies). Choose a By User policy for a license that lets one person install the software on several of their devices. The Per User policy suits such a license; in a new 2026.1 database created with the Default Workflow, its tracking type is set to By User.
- The license's serial number and install key are the first values automatic allocation compares with a discovered installation.
- The organization and location of the license record are compared with the device's organization and location by automatic allocation and, when the license has an organization or location restriction, by the compliance check.
- A license can name the license it upgrades. The upgrade link counts only between licenses of the same Tracked Software item.
- A license whose expiration date is in the past shows as not compliant, unless its policy is No License Required.
Add restriction rules
Restriction rules are what a policy is enforced by. In the Web App, the Software License form shows the license's restriction rules, and you add, change, and delete them there. There are eight kinds: organization, location, device name, device owner, user, installations per user, allowed CPUs per license, and allowed CPU cores per license.
- A license under the Named Computer policy needs a device name restriction, and a license under the Site License policy needs an organization or a location restriction; without one, the license is not compliant.
- An organization or location restriction decides whether sub-organizations or sub-locations also match the organization or location of the license record.
- Device name, device owner, and user restrictions also steer automatic allocation (see the next section).
- Under a By User policy, the installations per user, allowed CPUs, and allowed CPU cores restrictions are not checked.
How the policy and the restrictions decide compliance is covered in License Compliance.
Let inventory imports allocate the licenses
When an Alloy Discovery or AlloyScan import loads a computer's software, Alloy Navigator allocates licenses to the computer's installations that have no allocation yet. Alloy Discovery does this for computers only, not for Chromebook audits or hardware items. Automatic allocation tries these matches in order, each on the installations the earlier ones left unallocated:
- The installation's serial number and install key against the license's own.
- The device's name against the license's device name restrictions.
- The device's owner against the persons named in the license's device owner or user restrictions.
- The device's organization and location against those of the license, for licenses with no device name restriction.
- The license marked as the Main License of the installation's Tracked Software.
These matches never pick a license whose policy tracks By User. A hardware item can be matched only by serial number or install key, or by the Main License. For the full order of the matches, see Automatic allocation.
To give the remaining installations of a product a license, mark one license of its Tracked Software item as the Main License. A Tracked Software item can have only one: a second Main License is refused with "Only one Main License for a Tracked Software is allowed." A license with no Tracked Software item cannot keep the Main License mark.
Automatic allocation matches only the licenses and Tracked Software items that exist when Alloy Discovery loads a computer. A license or a Tracked Software item created after a synchronization is allocated to the computers already imported the next time Alloy Discovery loads their software, or when you allocate it. To allocate one license now, open it, go to its Allocation tab, click Allocate, and then click Auto-allocate. Automatic allocation then considers only that license, across the devices that have an unallocated installation of its Tracked Software.
Every allocation made by automatic allocation permits automatic removal. Before allocating, an import removes the computer's allocations that permit automatic removal and whose Tracked Software maps at least one product that the import no longer finds.
Allocate licenses by hand
Allocate by hand where automatic allocation does not: a license under a By User policy, which it never picks, and an installation that none of its matches claimed. You can also change the allocations it made. All of this is done in the Web App.
From a Tracked Software item
- Open the Tracked Software item, and go to its Allocation tab.
- Click Allocate and choose whether to allocate to a person, a device, or a computer.
- In the first picker, select one or more licenses.
- In the second picker, select the target person, device, or computer. Each license and target pair is checked and allocated in turn.
Where an allocation would not meet the license's compliance terms, or the target already holds the license, you are asked to confirm.
From a license, a device, or a person
- On a Software License's Allocation tab, Allocate offers only To Person(s)... under a By User policy. Under any other policy, it offers To specific Devices..., To Computers with discovered Installations..., Auto-allocate, and Associate Devices with another License.
- On a computer, the Allocated Licenses sub-tab of the Software tab, and on a hardware item or a person, the Allocated Licenses tab, list the record's allocated licenses. There, Allocate opens a license picker filtered for the kind of record.
Reconcile discovered installations
Reconcile allocates the devices that hold selected discovered installations to a license you pick. It is on the Discovered Installations tab of a computer (under Software), of a Software Product, and of a Tracked Software item.
- On the Discovered Installations tab, select one or more installations.
- Click Reconcile.
- In the license picker, choose a license. The devices of all selected installations are allocated to it.
The license picker is filtered using the first selected installation. On a computer, it offers only licenses of the installation's Tracked Software whose policy does not track By User.
Move devices to a new license
When a license runs short and you add another license of the same Tracked Software, move some of its devices to the new license in one step, without deallocating them and allocating them again. In the Web App:
- Open the license the devices are allocated to, and go to its Allocation tab.
- Select the allocations of the devices you want to move.
- Click Allocate, and then click Associate Devices with another License.
- In Select License, select the license to move the devices to, and then click Select.
The selected devices are allocated to the chosen license and removed from the current one. The move is not checked against the compliance terms first, and no confirmation is asked. Select License lists only the other licenses of the same Tracked Software.
To remove allocations instead, select them on the license's Allocation tab, the Tracked Software item's Allocation tab, or a record's Allocated Licenses tab, and click Deallocate. On a Tracked Software item and on a computer, you are asked to confirm.
What you have now
Your software products are grouped under Tracked Software items, and each license is linked to its item with a policy and the restriction rules it needs. Each inventory import allocates licenses to the installations it loads, and the allocations you made by hand complete the picture. Every allocation that is added or deleted recalculates the license's compliance status and usage figures; see License Compliance.
Related topics
- Software Asset Management - software products, Tracked Software, licenses, and licensing policies.
- Allocate Software Licenses - every way to allocate, deallocate, and reconcile, and how automatic allocation matches.
- License Compliance - how a license's compliance status and usage figures are computed.
- Classification - licensing policies in the Settings App.
- AlloyScan Synchronization and Alloy Discovery Synchronization - the imports that bring in software products and run automatic allocation.