How to configure auto-prioritization of Tickets
On this page
An administrator can have the priority of tickets derived from their impact and urgency instead of chosen by hand. The rule is set per service level: each service level carries a priority matrix with one row per impact and one column per urgency, and every cell names the priority for that pair. A ticket gets its priority from the matrix of the service level that applies to it, when the ticket's workflow calls the calculation. At the end of this scenario, the workflow sets the priority, response date, and due date of tickets that have a service, an impact, and an urgency from the matrix and the targets of their service level, as described under Result.
Before you begin
- Services are a Service Management item of the Web App navigation, available only where the ITSM module is licensed.
- To edit service levels and SLAs in the Web App, your account needs the Modify permission of the Service class and of the SLA class; see Permissions Reference. While a service record is read-only, its service level panel cannot be saved.
- To open the Admin Center or the Settings App, your account needs the Basic Administrative Access permission. A class's pages in the Admin Center, and its nodes in the Settings App, also need that class's business-logic right or Administrative Access; see Admin Center and Settings App.
Check the impact, urgency, and priority values
The matrix uses the impact, urgency, and priority values of the level's class. Each ticket class has its own lists of urgencies, impacts, and priorities, so review the lists of every ticket class you want to prioritize before you fill in the matrices. The Admin Center and the Settings App edit the same stored values.
In the Admin Center
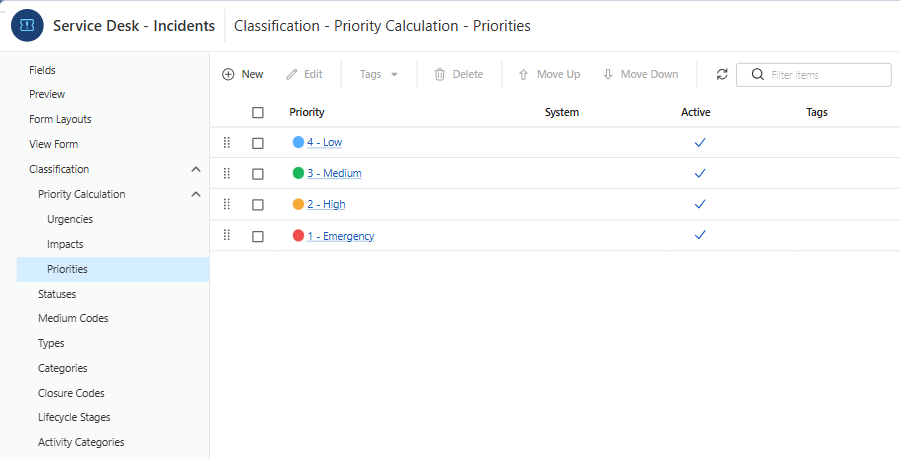
- Under Workflow, open the ticket class from its tile. The class opens on its Fields page, with the class tree beside it.
- In the class tree, choose Urgencies, Impacts, or Priorities.
- Click New, or click a value in the list. Enter the value and set Active; a priority also has an Icon.
- Click Ok to save the value.
For the list commands, such as Move Up and Move Down, see Classification.
In the Settings App
In the Workflow and Business Logic tree, open the ticket class's Classification node. On Incidents, Problems, Change Requests, Work Orders, and Service Requests, the Urgencies, Impacts, and Priorities lists sit in a Priority Calculation folder. To add or edit a value, see Lookup Lists.
NOTE: The calculation does not check whether a value is active. An inactive impact, urgency, or priority still takes part when a matrix entry names it, so retiring a value does not take it out of the matrices that use it.
Fill in the priority matrix of each service level
The matrix is the Priority Calculation table of a service level, which is edited in the Web App on the service. The derived priority is also the priority by which the service level's response and resolution targets are looked up, so both tables of the level are filled in here.
- In the Web App, open the service from Service Management in the navigation.
- On the service's General tab, click New in the levels grid, or open a level.
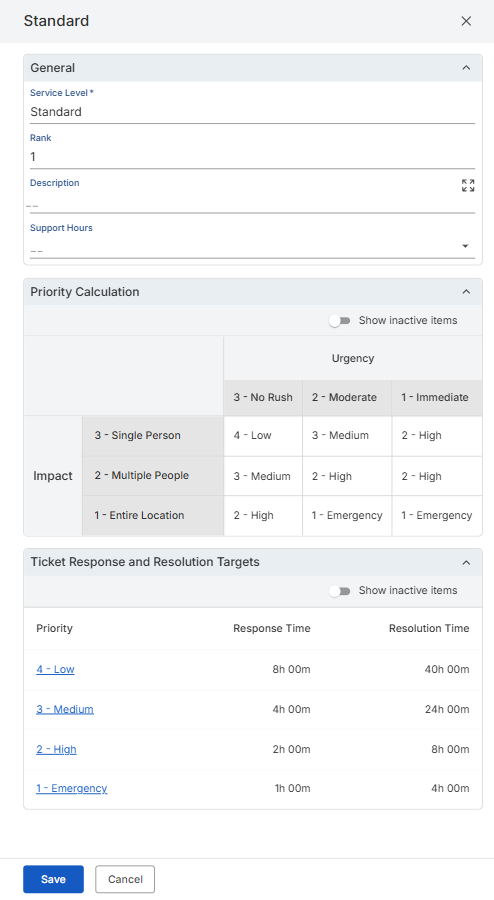
- In the service level panel, fill in the fields: the service level name, rank, description, and support hours. Empty support hours mean the default work calendar.
- In Priority Calculation, choose a priority for each combination of impact (down the side) and urgency (across the top).
- In Ticket Response and Resolution Targets, click or double-click the row of a priority. In the Edit Ticket Response and Resolution Targets dialog, enter the response time and resolution time, and click OK.
- Save the level.
Repeat the procedure for every level of every service whose tickets you want prioritized: each level has its own matrix.
Each of the two tables has its own Show inactive items switch, which is off the first time the panel opens. With the switch off, the Priority Calculation table takes its rows, its columns, and the priorities in every cell from the active values only. The switch changes only what the tables show: saving the panel saves an entry for every pair of impact and urgency, including pairs hidden by the switch.
TIP: A pair that has no stored priority starts with the first priority of the full priority list, inactive priorities included, so an untouched cell carries a priority rather than none. To see every cell before you save, turn Show inactive items on.
For the service level panel in full, see Services and SLAs.
Bring the service level to tickets with an SLA
The priority is taken from the matrix of the service level that applies to the ticket. An SLA binds one service level to one service, either globally or for named receivers: organizations, groups, or people.
In a new 2026.1 database created with the Default Workflow, the Calculate Priority macro passes the ticket's requester as the person, so the service level is resolved for the ticket's requester; see Default Workflow Configuration. An upgraded database need not contain this macro, and an administrator may have changed it. The level is resolved in this order:
- When a person is given: among the service's non-global SLAs, the ones that cover the person through their organization, one of their groups, or directly. Of these, the level with the lowest rank wins; a level with no rank is skipped.
- If that finds no level, or no person is given, and the service has exactly one service level, that level.
- Otherwise, the level of the service's global SLA.
The General tab of an SLA holds the service level under SLA Terms, the service under Service Information, and the Global check box under SLA Scope. To give the SLA its receivers, in the Web App:
- Open the SLA's Receivers tab.
- Click Add receivers and choose Add Organization, Add Group, or Add Person.
- In the picker, select one record. The receiver is added when exactly one record is selected.
The database enforces these rules:
- A service can have only one global SLA.
- A global SLA has no individual receivers.
- An organization, group, or person receives a service through only one non-global SLA.
An organization receiver covers the people whose own organization it is. The SLA of a parent organization does not reach the people of its sub-organizations. For the SLA record in full, see Services and SLAs.
Check the workflow triggers
The calculation runs when a workflow macro calls it; the database does not run it on its own. If the workflow does not call it, the matrix is not applied.
A new 2026.1 database created with the Default Workflow contains workflow triggers that apply the priority matrix to tickets; see Default Workflow Configuration. An upgraded database need not contain them, and an administrator may have changed them. Incidents, problems, change requests, service requests, and work orders each have a trigger named Set Priority Calculation, of the kind On Created/Modified. The five triggers are enabled in the supplied configuration.
To check a trigger in the Settings App:
- In the Workflow and Business Logic group, open the ticket class under its business area, and open the class's Workflow node.
- Select Triggers > On Created/Modified, and find Set Priority Calculation.
- If the trigger is disabled, right-click it and click Enable. A disabled Trigger on Created/Modified does not run.
To open a trigger's condition and program, or to create a trigger of your own, see Triggers.
Give tickets a service, an impact, and an urgency
The Set Priority Calculation trigger fires only when Service, Impact, and Urgency are all filled in on the ticket and at least one of Service, Requester, Impact, Urgency, Priority, or Submit Date has been changed. On service requests, the trigger checks Organization in place of Requester.
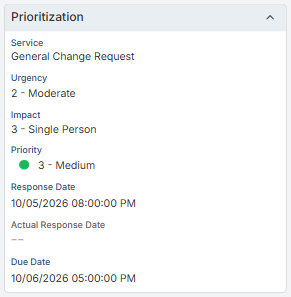
A ticket's service field in the Web App offers the active services offered to that ticket's class. On a service request, a change request, or a problem, the Prioritization panel of the General tab holds the service, urgency, impact, priority, response date, actual response date, and due date; see Work on a Ticket.
Result
When the trigger fires, it does one of two things:
- If Priority has not been changed, it sets Priority from the Calculate Priority macro, which reads the priority matrix, and then sets Response Date and Due Date from the Calculate Response Date and Calculate Due Date macros.
- If Priority has been changed, it keeps the new priority and sets only Response Date and Due Date, from that priority.
On incidents, both branches then run Set Response Overdue and Set Resolution Overdue.
If the service level that applies to the ticket has no entry for the pair of the ticket's impact and urgency, the calculation returns no priority. To change how tickets are prioritized later, edit the matrices of the service levels.