How to set up one-click workflows via the API
On this page
A one-click action link is a link in an e-mail notification that runs a workflow action on a record when the recipient opens it: an approver approves or rejects a request, or a requester rates a ticket with a single click. An administrator sets the links up in the Settings App, and in the Admin Center where this article says so. When you finish, the notification carries links that run the action on the record, with the person named in the link as the acting person, and show a result page.
There are two ways to the goal:
- Turn on the approval links of the supplied configuration; see Turn on the supplied approval links.
- Build links of your own for another action. The product supplies no ready-made action-link component: you build the link from three parts, a SQL-type macro per link that builds it, an HTML-type macro that holds the links for the message body, and a task action that receives the link and runs. The stages from Build the receiving action on describe them in working order.
Before you begin
- The links run through the REST API, so the API must be installed and working; see Install the API.
- One-click links work only when the API uses token authentication. With Windows authentication, a link carries no identity. See Authentication Methods.
- The link starts with the API's base address, which the API Link system macro holds; the link falls back to it when no address is given. In the Settings App it is set at Workflow and Business Logic > Advanced > System Macros, in the API Link: box, which requires the administrative right System Macros. The Admin Center shows the API instance's URL on its General tab, with two buttons that set the URL and the system macro to the same value when they differ; see API Settings.
- In the Settings App, Workflow and Business Logic > Macros requires the administrative right Macros. A class's own Macros and Workflow nodes require that class's own administrative right, the one that allows managing the class's business logic. See Permissions Reference.
Turn on the supplied approval links
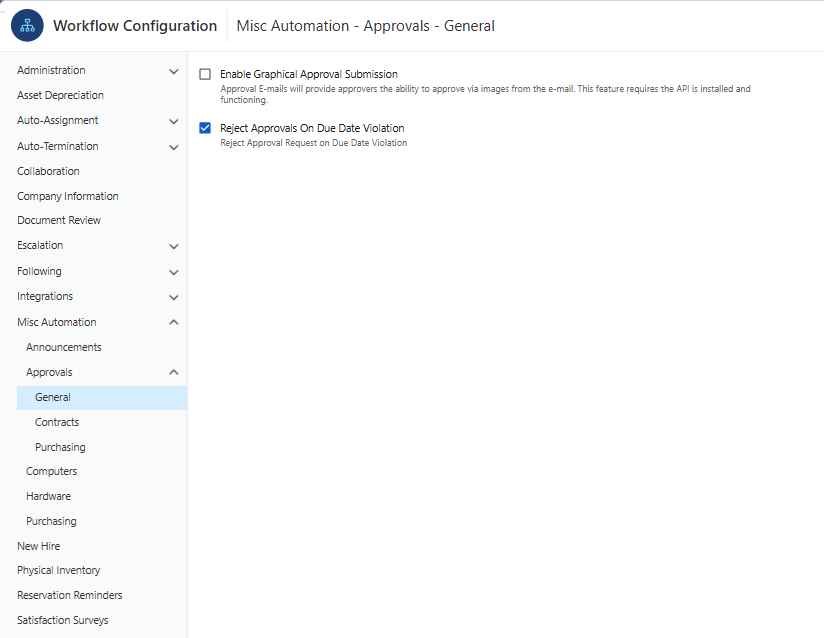
A new 2026.1 database created with the Default Workflow contains one-click links for approval requests: one to approve the request and one to reject it. A database upgraded from an earlier version need not contain them, and an administrator may have changed them; see Default Workflow Configuration. The approval e-mails carry the links only when the workflow parameter Enable Graphical Approval Submission is on, and it is set to off in the supplied configuration.
In the Admin Center:
- Go to Workflow and Business Logic > Workflow Configuration.
- In the category tree, open Misc Automation > Approvals > General. The page shows one control per parameter.
- Turn on Enable Graphical Approval Submission. Save and Cancel appear once a field has changed.
- Click Save.
Leaving the page with unsaved changes asks "You should save you changes before leaving this page. Do you want to leave this page?"
From then on, the approval e-mails carry the two links. The links of the supplied configuration run the action API Approval on the approval request and pass "approved" or "rejected" under Response. For how an approver records a decision in the Self Service Portal instead, see Approve Requests. The satisfaction survey rating links of the supplied configuration have a switch of their own; see Customer Satisfaction Survey.
If the supplied approval links are all you need, you are done. To let recipients run another action, continue with the stages below.
Build the receiving action
The receiving action is the action the link runs. It is an ordinary task action on an existing record: a link cannot run a create action. Create it in the Settings App as a Step Action of the class whose records the link acts on.
- Open Workflow and Business Logic > module > object class > Workflow > Actions > Step Actions, and click New.
- On the General tab, enter a Name.
- On the Form tab, choose the form whose fields receive the values the link passes. Form-only (virtual) fields can receive them.
- On the Programming tab, configure the operations that perform the action's work. See Operations Reference.
- To tell a run through the API from any other run, open the Condition
tab and set Additional criteria with Edit... to a condition that
compares
%[SYS Initiator.Type]%(or%[SYS Initiator]%) withAPI. Every run made through the API has the initiatorAPI. When a condition compares the initiator's Type, its value list offers API. - Click OK. The window is saved and closes.
- Select the action and click Edit. The window title reads
[<ID>] <Name>: note the action's ID, which the link needs.
For the rest of the window, see Create or edit a Step Action and Bind a form to an action.
How the action takes the link's values:
- Every
name=valuepair of the link becomes a field value, except the values the link carries for itself:personId,objectId,actionId,expirationDate, andsuccessMessage. The name is matched against the fields of the action's form, by field name, caption, or label, including form-only fields, and then against the fields of the record and of its activity by caption. A name that matches no field fails the run with "field is unknown". - A value for a field with a lookup may be given as a name, which the API
resolves; a value that resolves to nothing fails the run with "object does
not exist in database". A value for a Boolean field counts as true when it
is
1,true, oryes, and as false otherwise. - Form fields that the link does not send get their default values. A field that is mandatory on the form, or that the database does not allow to be empty, fails the run when it ends up empty, and the failure names the field's caption.
The REST API rereads workflow changes at most every minute, so an edited action can still run in its old form for up to one minute.
Create the SQL macro that builds the link
Create one SQL macro per link, in the Settings App.
- Open Workflow and Business Logic > Macros, or the Macros node of a class under Workflow and Business Logic > module > object class.
- Click New. The New Macro window opens.
- Enter Name:. The read-only Placeholder: box shows the macro's
placeholder,
%[USR <name>]%, as you type. - Set Type: to SQL Script and Output: to Plain Text. The list shows the macro as SQL script.
- Enter the content: a script that selects the result of
dbo.GenerateActionURLParams, called with the seven arguments listed below. The placeholders in the script are replaced before it runs, so an argument can be an object field such as%[DBF ID]%or a parameter the notification declares,%[PAR <name>]%. The macro yields the first column of the first row of the last result set the script returns. - Click OK.
The function dbo.GenerateActionURLParams takes these seven arguments, in
this order:
- The API's base address, for example the
%[SYS API Link]%system macro. An empty value falls back to the configured API Link. - The ID of the receiving action.
- The ID of the person the action runs as.
- The ID of the record the action runs on, for example
%[DBF ID]%. - The expiration date of the link, for example
DATEADD(DAY,3,GETDATE())for three days after the link is built. - The values to pass to the action, as
name=valuepairs joined with&, for exampleVote=1¬es=Your Note. An empty or null value passes nothing. - The success message shown on the result page. An empty or null value gives no message.
The function returns the API address followed by ExecuteAction?params= and
an encrypted string that carries the other six values.
The Macros tile in the Workflow section of the Admin Center lists the same user macros. To edit the macro there, set Type to SQL script and Output to Plain text in the macro's drawer, and enter the script in Text Content. See One-Click Action Links.
Create the HTML macro that holds the links
The HTML macro puts the links into the message body. One HTML macro can hold several links, for example one per answer. In the Settings App:
- In the same macro list, click New.
- Enter Name:, set Type: to Text and Output: to HTML. The list shows the macro as Text (HTML).
- Choose All objects, or Object class: and the notification's class. The notification editor offers only the macros that belong to no class, to the notification's class, or to its general class.
- The content is an HTML editor that opens in Design mode. Switch it to
HTML Code with its first toolbar button, and add one
<a href>element per link, each pointing to the placeholder of one SQL macro,%[USR <name>]%. - Click OK.
In the Admin Center, the same macro is edited in the Macros tile with
Type set to Text and Output to HTML, the <a href> elements in
Text Content, and All objects, or Object class: and the
notification's class, chosen under This macro available for:.
Place the links in the notification
In the Settings App:
- Open the class's e-mail notifications at Workflow and Business Logic > module > object class > Workflow > Components > E-mail Notifications, or the global ones at Workflow and Business Logic > Global Components > E-mail Notifications.
- Create or open the notification.
- Give it an HTML body: choose HTML text, or choose HTML template and put the links in a section whose value is HTML.
- For an HTML text body, click Insert Placeholder... and, under
User Macros in Select Placeholder, choose the HTML macro. For a
section, enter the HTML macro's placeholder,
%[USR <name>]%, in the section's value. A plain-text body offers no HTML macro.
The notification editor does not check that the link is well formed. If the SQL macro reads a notification parameter, such as the person or the expiration date, declare it on the notification's Parameters tab; see Declare parameters.
Send the notification from a workflow step
A notification is sent by an E-mail Notification step in the program of a workflow item or of a function. The step's Select offers the notifications of the step's own workflow object and those of Global Workflow. In the step's Parameters grid, give each parameter of the notification a value, for example the person whose ID the link carries. See Add the notification to a workflow step and Give parameters their values.
What the recipient sees
Opening a link runs the action named in the link on the record named in the link, with the person named in the link as the acting person. Instead of a JSON response, the API returns an HTML result page:
- The success page, with the link's success message if it has one. This page is shown in every case that the error page does not cover. A workflow abort in the action raises no error, so an aborted run still shows the success page.
- The error page, with "The link has expired." after the link's expiration date, "Invalid Link" when the link lacks the record, the action, or the person, or the error message when the action is refused or running it raises an error. The action is refused before it runs when it is not available, when the record does not exist, when the action's condition does not admit the run, or when a name the link passes matches no field or a mandatory field is empty.
A link that names a create action shows the error page with "Cannot process the request. Requested action id is of unexpected type."
The two pages are the HTML files ExecuteActionSuccessTemplate.html and
ExecuteActionErrorTemplate.html in the HtmlTemplates folder of the API's
application folder. The files are read each time a result is rendered, so
editing them on the server, for example to show your own logo, changes the
pages without a rebuild. See
Create Records and Run Actions.
Result
The notification now carries one-click links. Each link runs the receiving action on the record as the person it names, until its expiration date, and the recipient sees the success page or the error page.
Related topics
- One-Click Action Links - the three parts of a link, the supplied links, and the approval switch.
- Approve Requests - approving a request in the Self Service Portal, and voting from an e-mail.
- Author E-mail Notifications - the notification that carries the link, its parameters, and the step that sends it.
- Actions - creating the Step Action that receives the link.
- Macros Reference - macro types, placeholders, and the link macros.
- Create Records and Run Actions - the result pages of a one-click link.
- Customer Satisfaction Survey - the supplied survey rating links and their switch.
- Default Workflow Configuration - the configuration a new database is created with.