How to integrate Alloy Navigator with Microsoft 365 mailboxes
On this page
- Before you begin
- Choose the application the job signs in with
- Register an application in Microsoft Entra ID
- Create the job and sign in to the mailbox
- Set how often the mailbox is checked
- Choose what happens to senders and messages
- Select preprocessing rules
- Test and save the job
- Run the job and check the results
- What you have now
- Related topics
An administrator can have Alloy Navigator turn the e-mail that arrives in a Microsoft 365 mailbox into tickets. The Mail Connector does the work: you set up a Mail Connector job that signs in to the mailbox through Exchange Online, and the Automation Server runs the job on its schedule. Its processing operations decide how messages create or update tickets.
One job serves one mailbox. To process several Microsoft 365 mailboxes, create one job for each. A new 2026.1 database created with the Default Workflow (see Default Workflow Configuration) has no Mail Connector job, so you start with a new one.
Before you begin
- The Automation Server must be set up and running: a job runs only while it is. See Automation Server.
- Mail Connector jobs need the Notifications permission of your role ("Allows managing Notifications"). A role with Administrative Access has it. See What each administrative permission opens.
- To open the Admin Center and to sign in to the Settings App, you need the Basic Administrative Access permission. See Admin Center and Settings App.
- The operations that a new job starts with create an incident from a new message when the ITSM module is licensed. With only the ITAM module licensed, they create nothing.
- You need a Microsoft 365 work account with a mailbox for the job to sign in to. It can be a mailbox you create for this purpose or an existing one.
- In the Admin Center, Microsoft sign-in to a mailbox fails with an error when the Admin Center is opened over an HTTP connection.
Choose the application the job signs in with
A job of the type Exchange Online with OAuth authentication signs in to the mailbox with Microsoft OAuth. Its Client setting names the application registration it signs in with:
- Alloy Mail Connector (admin consent required): the pre-registered application, a multi-tenant application registered by Alloy Software. It is selected for a new job in the Settings App. In the Admin Center this choice is unavailable, so a job that uses it is set up in the Settings App.
- Custom application registered in your Azure portal: an application you register yourself in Microsoft Entra ID. It is available in both applications, and it is the only choice in the Admin Center.
As its name says, the Alloy Mail Connector application needs admin consent in your organization: a Microsoft Entra administrator who may consent on behalf of the organization grants it tenant-wide admin consent. See Microsoft's Grant tenant-wide admin consent to an application.
If you use the Alloy Mail Connector application, go on to Create the job and sign in to the mailbox.
Register an application in Microsoft Entra ID
For a custom application, register the application in Microsoft Entra ID to obtain its Client ID and Tenant ID. You enter both on the job; leave the Tenant ID empty for a multi-tenant application.
To register the application, in the Microsoft Entra admin center:
- Create a new app registration and give it a name. Under the supported account types, choose a single tenant or multiple Microsoft Entra tenants. For the screens, see Microsoft's How to register an app in Microsoft Entra ID.
- Add the platform Mobile and desktop applications to the registration,
with two custom redirect URIs: the address of the Admin Center, which is
the Web App address followed by
admin-center/(for example,https://example.com/wp/admin-center/), which the Admin Center sign-in uses, andhttp://localhost. See Microsoft's How to add a redirect URI to your application. - Copy the Application (client) ID of the registration. It goes into the job's Client ID.
- For a single-tenant application, also copy the tenant ID of your organization. It goes into the job's Tenant ID. See Microsoft's How to find your tenant ID.
When you sign in to the mailbox in the Admin Center, the sign-in requests these permissions, depending on how the job reaches the mailbox:
- Microsoft Graph:
Mail.ReadWrite,Mail.Send,openid,profile, andoffline_access. - Exchange Web Services (EWS):
EWS.AccessAsUser.All,openid,profile, andoffline_access.
In the Admin Center, a Microsoft Graph grant must include both
Mail.ReadWrite and Mail.Send, and an EWS grant must include
EWS.AccessAsUser.All. When the access is missing, the job's Account field
shows "Authorization failed. The requested access to
{scope} was not granted. Please sign in again." and keeps its previous value.
If your organization uses Microsoft Cloud for US Government, the job has a
check box for it, available with a custom application. In the Admin Center,
sign-in for the government cloud goes to login.microsoftonline.us.
A job run uses the settings stored with the job, so the job keeps its own Client ID and Tenant ID. The Tenant ID and Client ID on the Admin Center's Microsoft 365 Integration page are the ones the Web App calendars use for Outlook Calendar; see Microsoft 365 Integration.
Create the job and sign in to the mailbox
The Admin Center and the Settings App edit the same jobs. Use either one; for the Alloy Mail Connector application, use the Settings App.
In the Admin Center
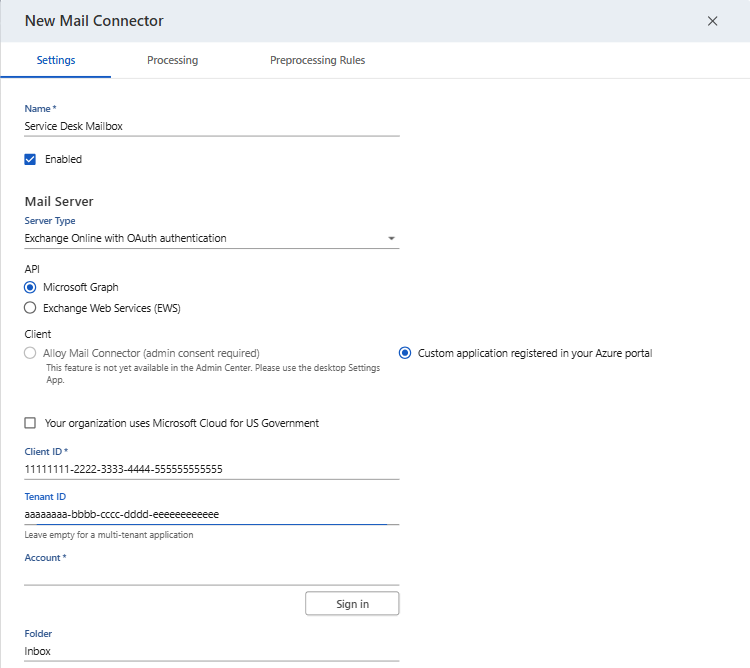
- Go to E-mail Processing > Mail Connector and start a new job.
- On the Settings tab, enter the job's name, and in Server Type choose Exchange Online with OAuth authentication.
- In API, keep Microsoft Graph, which is selected for a new job, or choose Exchange Web Services (EWS).
- Under Client, Custom application registered in your Azure portal is selected. If your organization uses Microsoft Cloud for US Government, select Your organization uses Microsoft Cloud for US Government.
- Enter the Client ID of your registration, and its Tenant ID unless the application is multi-tenant.
- Next to Account, click Sign in, and in the Microsoft sign-in window select the mailbox account. After sign-in, the field shows the user name of the signed-in account, and the button reads Change.
- In Folder, enter
Inbox, or the path of another folder, as described at the end of this stage.
Keep the job open for the next stages. For the other settings of the form, see Set up a job in the Admin Center.
In the Settings App
- Go to E-mail Processing > Mail Connector and click New. The job opens in a window titled Mail Connector.
- On the Settings tab, enter the Name: and keep Enabled selected.
- In the Mail Server group, in Server Type:, choose Exchange Online with OAuth authentication.
- In API:, keep Microsoft Graph, which is selected for a new job, or choose Exchange Web Services (EWS).
- In Client:, keep Alloy Mail Connector (admin consent required), or choose Custom application registered in your Azure portal and fill in Client ID:, and Tenant ID: unless the application is multi-tenant. For the government cloud, also select Your organization uses Microsoft Cloud for US Government.
- Click Sign in.... The Microsoft sign-in page opens in a web browser, and the Settings App shows the Sign in window.
- In the browser, sign in with the mailbox account and grant the permissions. The Sign in window closes, and Account: shows the name of the signed-in account.
- In Folder:, enter
Inbox, or the path of another folder, as described at the end of this stage.
Keep the window open for the next stages. For the other settings of the window, see Set up a job in the Settings App.
For a job that reaches the mailbox over Microsoft Graph, Inbox in any letter
case reads the Inbox, and any other folder is a path split at each /; for
example, Inbox/Support is the folder Support inside the Inbox. A job over
Microsoft Graph reads only the unread messages of the folder. For a job over
EWS, an empty folder or Inbox in any letter case reads the Inbox, and any
other folder is a path from the root of the mailbox, split at each /. See
The mailbox folder.
Set how often the mailbox is checked
Each run of the job signs in to the mailbox, processes the messages it finds, signs out, and ends, so the job's schedule sets how often the mailbox is checked.
- In the Admin Center, the schedule is on the Settings tab. A new job starts with a monthly schedule, on day 1 of every month at 00:00, so change it to the interval you want.
- In the Settings App, the Schedule group of the Settings tab shows the schedule in words; click Change to set it. A new job runs every minute, or every 5 minutes in Alloy Navigator Cloud.
In Alloy Navigator Cloud, a schedule shorter than 5 minutes is not accepted; see Schedule in Cloud. For the parts of a schedule, see Schedules.
Choose what happens to senders and messages
On the Processing tab of the job:
- In Create Persons, choose the action that runs for a sender who matches no person. In the Admin Center, the field is under Unmatched sender workflow. The field is required.
- Set what happens to a message after processing. In the Admin Center, set the Incoming email handling and End of session options. In the Settings App, use the Incoming e-mail handling group, as described below.
In the Settings App, the Incoming e-mail handling group has two parts:
- When an object is created or modified successfully: choose Mark the message as read or Mark the message as deleted. To purge the deleted messages, select Purge the deleted messages at the end of session.
- When a workflow item rejects the message: select Mark the message as read, Mark the message as deleted, or both. Mark the message as read is selected for a new job.
In a new 2026.1 database created with the Default Workflow, the action supplied for Create Persons is New Person (Mail Connector), which fills the person's full name from the sender's name and the primary e-mail address from the sender's e-mail address. An upgraded database need not have this action, and an administrator may have changed it. See Default Workflow Configuration.
A processed message is always marked as read, and is also deleted when Mark the message as deleted is chosen. For a job over Microsoft Graph, the purge option decides for each deleted message whether it is deleted permanently.
The Operations tree of a new job is filled in for you. With the ITSM module licensed, a message that refers to an existing ticket runs the update branch for that ticket's class, and any other message creates an incident. The Admin Center shows the tree for information only; to change it, use the Settings App. The tab also has Attach original e-mail message to object/activity (in the Admin Center, under Email attachment), which attaches the original message to the record. See Build processing operations.
Select preprocessing rules
Preprocessing rules trim the body of a reply before it reaches the ticket. A new 2026.1 database created with the Default Workflow (see Default Workflow Configuration) supplies three preprocessing rules, which are not selected for any job. To use them, on the Preprocessing Rules tab of the job:
- In the Admin Center, select a rule's check box to apply it, and drag the rows into the order the rules apply in.
- In the Settings App, select a rule's check box, and use Move Up and Move Down to set the order.
For the rules themselves, see Preprocessing rules.
Test and save the job
- Click Test Connection. The test uses the settings in the form, including changes you have not saved. In the Settings App, the button is available once an account is signed in.
- Check the result. A successful test reports "Connection test completed successfully." A failed test reports "Connection to the mail server failed."; in the Admin Center the message links to the job's log, and in the Settings App the error text is in an extended view.
- Click Ok in the Admin Center, or OK in the Settings App.
Saving is refused with The "<field>" field is mandatory, it can't be left blank.
when a required field is empty: the name, the Create Persons
action, or Account. In the Admin Center, Client ID is also required;
in the Settings App, the schedule is.
Run the job and check the results
While the job is enabled and the Automation Server is running, the job runs on its schedule. To run it out of schedule, select the job on the Mail Connector page and click Run. A run started this way ignores the schedule and does not change the next run date. See Run, terminate, enable, and disable jobs and Run a job now.
To see what a run did, open the job's Sessions tab. Each run records five counters: objects created, objects updated, messages, messages in the mailbox, and errors. In the Admin Center, click a session's run date to open its log. The same log for all jobs is E-mail Processing > Logs. See Check the results.
What you have now
The Automation Server checks the Microsoft 365 mailbox on the job's schedule. For each message, the Mail Connector matches the sender to a person, or creates one, and then, with the operations of a new job and the ITSM module licensed:
- A message that refers to no existing record creates an incident.
- A reply to a ticket whose status is not a closed one updates that ticket.
A reply is recognized by the
MessageID tag in its subject, or by its
ReferencesandIn-Reply-Toheaders. See Replies.
In a new 2026.1 database created with the Default Workflow (see Default Workflow Configuration), a new incident is created by New Incident (Mail Connector), which fills the summary from the subject, the description from the message body, and the requester from the sender, and adds the activity "New Incident created via the Mail Connector". An update adds an activity whose details are the text of the incoming message; for an incident, its category is Communication. See Mail Connector actions in the supplied configuration.
In that configuration, the acknowledgement that a requester receives is sent by an e-mail notification operation within the create action, not by the Mail Connector itself. For the mail service that sends notifications, see Outgoing E-mail Settings.
Related topics
- Mail Connector - how the Mail Connector reads a mailbox and creates or updates records.
- Set Up Mail Connector Jobs - every setting of a job in the Admin Center and in the Settings App.
- Microsoft 365 Integration - the Microsoft 365 registration that the Web App calendars use.
- Incoming E-mail Processing Rules - the MessageID tag, parsing and preprocessing rules, and processing operations.
- Jobs and Schedules - schedules and runs of Automation Server jobs.