How to control user access to IT-managed content in the Self Service Portal
On this page
Different portal users often need different content: Finance may need services and updates for its daily work, while HR has resources meant only for its own staff. In the Self Service Portal, the content that IT publishes (Service Catalog items, Knowledge Base articles, announcements, and equipment library items) can be limited to an audience through a service. In the Web App, you create a service for the audience, give it an SLA whose receivers are the organizations, groups, or people of that audience, and link the content to the service. In the Admin Center, you make sure the portal offers the module that shows the content.
Before you begin
- In the Web App, services, SLAs, and the Service Catalog are in the Service Management group of the navigation rail, whose entries need the ITSM license module. The Knowledge Base and announcements are in the Service Desk group, and the Equipment Lending Library in the Asset Management group (ITAM); see The Web App at a Glance.
- The Announcements entry appears only when the Announcements form is among the forms visible to you and your license covers it.
- In the Admin Center, the Self Service Portal entry requires the permission to configure the Self Service Portal.
Create a service for the audience
In the Web App, create a service in the Service Management group, named after the audience or the content it scopes, for example "HR Announcements". The New menu of a list offers the create actions of its class; see Create a record with New.
A service is offered to one ticket class, which you set on its General tab. If the service is to scope Service Catalog items, make it a service offered to the Service Request class: a catalog item's service field offers only the services offered to that class. The service field of an announcement, a Knowledge Base article, or a library item is not limited to one ticket class. For the fields of a service, see The service record.
Create an SLA for the service
- In the Web App, create an SLA in the Service Management group.
- On the SLA's General tab, under Service Information, choose the service you created.
- Under SLA Scope, leave Global cleared.
- Save the SLA.
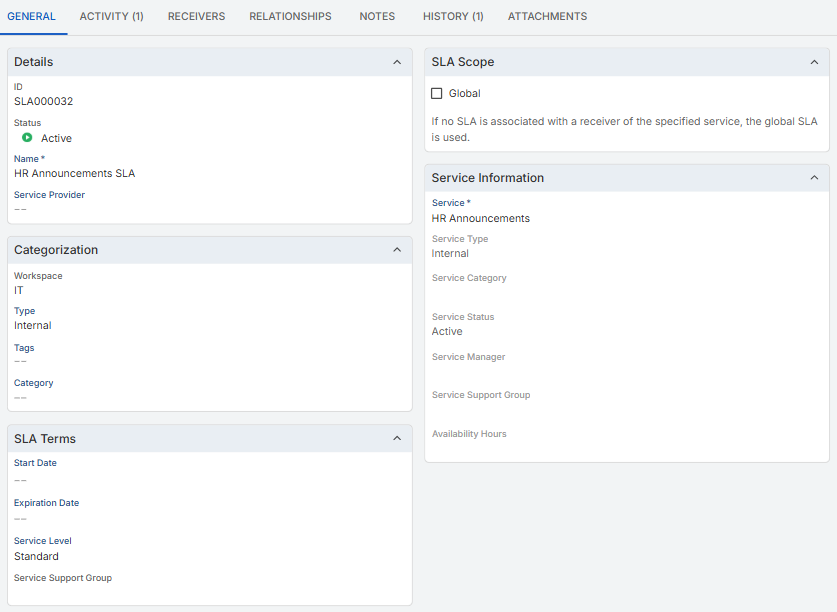
A global SLA has no individual receivers: checking Global on an SLA that has receivers is refused when you save, and a service can have only one global SLA. An SLA also binds one service level of the service, set under SLA Terms; see The SLA record, Create or edit a service level, and, for how the SLA clock uses the level, How the SLA clock runs.
The service's SLA tab then lists the new SLA.
Add the audience as receivers
- Open the SLA's Receivers tab.
- Click Add receivers and choose Add Organization, Add Group, or Add Person.
- In the picker, select one record. The receiver is added when exactly one record is selected, and the tab's list and counter are refreshed.
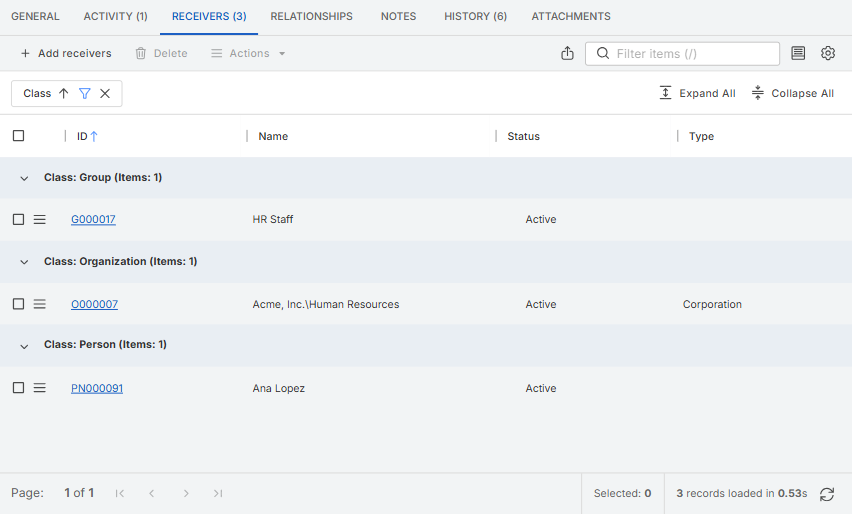
Repeat the steps for each organization, group, or person of the audience. Keep these rules in mind:
- An organization receiver covers the people whose own organization it is. The SLA of a parent organization does not reach the people of its sub-organizations, so to reach a department that is a sub-organization, add the department itself.
- An organization, group, or person receives a service through only one non-global SLA. When Add receivers is refused, the refusal is shown in an alert.
You can also add an organization from its own record: on the organization's SLA tab, click Add and select one existing SLA; see Give an organization an SLA from its record.
The service's Receivers tab lists the receivers of every SLA of the service, without inactive ones.
Link the content to the service
Open each item that the audience should see, and choose the service in the item's service field:
- Service Catalog item: the service is in the Details section of the item's General tab; see Create or edit a catalog item. The portal also requires the item to be active and filed in a public category whose parent categories are public as well.
- Knowledge Base article: the service is among the article's details on the article form; see The article form. The portal also requires the article to be public and in the Live status, and its rights check still applies; see Make an article visible in the Self Service Portal.
- Announcement: the service is on the announcement form; see Create or edit an announcement. The announcement must also have the Self Service Portal users flag set and a status other than Inactive, and the current time must be inside the window of its start date and end date.
- Library item: a library item names an asset and, optionally, a service; see Equipment Lending Library. A library item's service does not limit which items technicians see in the Web App.
Each item takes one service. Content that should stay open to every portal user keeps an empty service field, except Service Catalog items, which need a service to be offered at all; give those a service with no SLA or with a global SLA.
Make sure the portal offers the module
The portal shows a kind of content only when the module that holds it is offered.
- In the Admin Center, go to Apps and Portals > Self Service Portal, and select the instance. When only one instance exists, the menu goes straight to that instance's tabs.
- On the Modules tab, check Service Catalog, Knowledge Base, Announcements, or Equipment Lending Library, as the content needs.
- Save the settings.
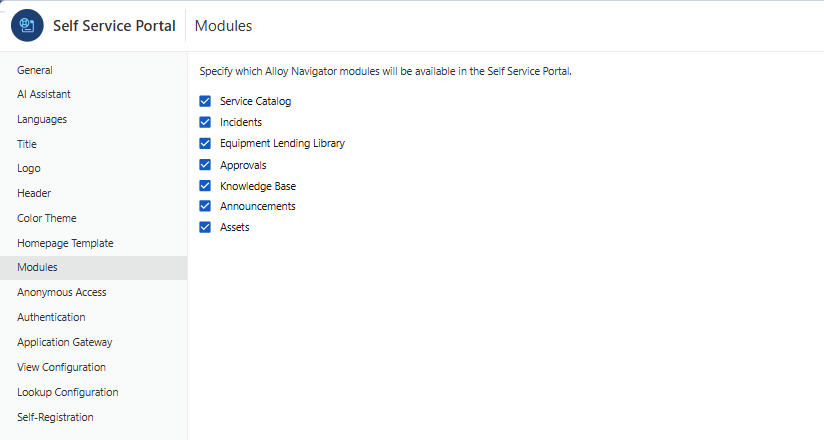
The instance offers a checked module only when your license allows it: ITSM covers Service Catalog, Knowledge Base, and Announcements, and ITAM covers Announcements and Equipment Lending Library. A settings change reaches the running portal without a restart; the portal checks for changed settings every few minutes. See Modules.
Check what each user sees
In the Self Service Portal, a user who is a receiver of the SLA, directly, through the user's organization, or through one of the user's groups, sees the linked content when the item meets its other conditions; any other signed-in user does not. The Service Catalog appears in the drawer only to a signed-in user. A change to an announcement can take up to a minute to appear in the portal. For what each area shows a user, see:
- Which items the portal offers you
- Knowledge Base
- Which announcements you see
- Equipment offered to you
How the portal decides who sees an item
The portal offers a service to a user when the service is not inactive and one of the following is true:
- The service has no SLA.
- The service has an SLA that is not inactive and is global.
- The service has an SLA that is not inactive and names the user, the user's organization, or one of the user's groups as a receiver.
A Knowledge Base article, an announcement, or a library item is offered when it has no service or its service is one the user receives. A Service Catalog item is offered only when its service is one the user receives, so a catalog item with no service is not offered at all.
To limit content to an audience, the service therefore needs an SLA that is not global, with the audience as its receivers. A service without an SLA, or with a global SLA, is offered to every portal user.
Result
The service and its SLA now decide who sees the linked content: the portal offers it to the SLA's receivers and does not offer it to other signed-in users. To widen or narrow the audience later, add or remove receivers on the SLA's Receivers tab. Removing a receiver with Delete takes it off the SLA's receivers and deletes nothing else; see Add or remove the receivers of an SLA.