Adding On Condition Triggers
To add a Trigger based on a condition, follow the steps below.
INFO: For information on Triggers, see Triggers.
IMPORTANT: On Condition Triggers do not run on inactive objects (objects having Closed, Retired, or Inactive status).
- From the Sidebar, navigate to Workflow and Business Logic > [Module] > [Object Class] > Workflow > Actions > Triggers > On Condition.
- Click New. The Trigger on Condition [ID] dialog box opens.
NOTE: Note the unique auto-generated ID value. You can use this ID to quickly access the corresponding Trigger. For details, see Accessing Workflow Items or Components by ID.
- On the General tab, specify the following properties of the Trigger:
- Type the Trigger name in the Name field.
- Optional: Enter a description of the Trigger in the Description field.
NOTE: Keep the Enabled check box selected. Otherwise, this Trigger will not fire.
- Under Check Condition, specify when the system must check the condition:
- To check the condition after the user saves a newly-created or modified object, click After the object has been saved. Then specify the conditions on the Conditions tab.
- To regularly check the condition, select one of these options:
- To check the condition at fixed time intervals, click Every ... minute(s) and specify the interval in minutes.
- To check the condition on a schedule, click Use advanced schedule, click Change and specify the schedule.
Then proceed to the next step.
- Under Repeat Actuation, specify whether the Trigger will run repeatedly on the same object:
- If you want the Trigger to fire only once on the same object, click Do not repeat. Then go to the Conditions tab to specify the conditions.
- If you want the Trigger to fire repeatedly on the same object, select one of these options under Repeat Actuation:
- To fire the Trigger each time the system checks the condition and the condition is true, click Each time the condition is checked.
- To repeat the Trigger with a limited frequency, click No more than once in and specify the time interval in hours, days, or months. Alloy Navigator will not fire the Trigger on the same object if this time interval has not yet elapsed since the previous actuation.
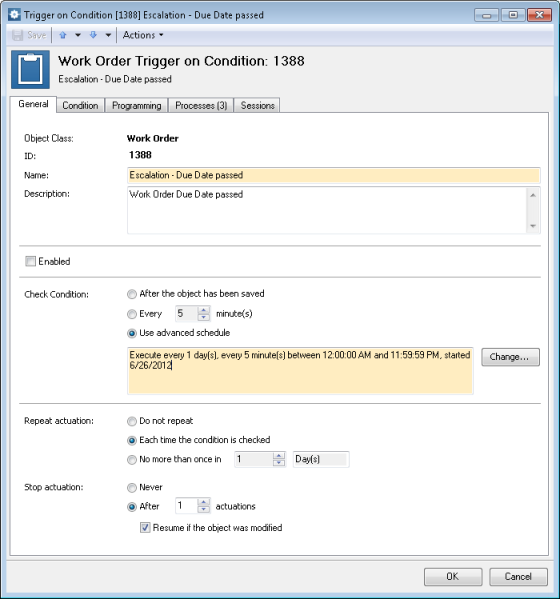
- Under Stop Actuation, specify when the Trigger’s actuation will stop:
- If you want the Trigger to fire repeatedly as long as the condition remains true, click Never.
- To limit the number of times the Trigger can repeat, click After... actuations and specify the limit. You can control whether to clear the repeat counter on object change. If you select the Resume if the object was modified check box, Alloy Navigator will automatically resume the Trigger on every target object when the object is changed.
- Click the Condition tab and specify the conditions that control when the Trigger must fire:
- Click Edit and configure conditions in the Criteria dialog box.
INFO: For details, see Building Criteria.
- Click the Programming tab and specify the operations to execute directly within the Trigger or select an existing Function.
- Under Operations, click New > [Operation] and specify the operation details.
INFO: For details, see Adding Operations.
- Repeat this step to add other operations as needed.
- By default, all operations are executed unconditionally. If needed, you can enclose your operation in conditional blocks.
INFO: For details, see Building Conditional Statements.
IMPORTANT: Any workflow operation within a Function, Action, or Trigger can be enabled or disabled. Only enabled operations will be executed. For details, see Disabling and Enabling Operations.
- Under Operations, click New > [Operation] and specify the operation details.
- If you want to categorize the Trigger by assigning it to one or more Processes, click the Processes tab and follow the instructions on assigning Triggers to Processes. For details.
INFO: For instructions, see Assigning Workflow Items to Processes.
- When done, click OK.
NOTE: On Condition Triggers that check their condition regularly, i.e. those that have the Every ... minutes or Use advanced schedule check condition option selected, are run by the Automation Server, just as all other types of Automation Server scheduled jobs. You can view the log data on all completed sessions of such a Trigger on the Session tab of the Trigger on Condition dialog box. You can also view the log data for all these Triggers in the On Condition Triggers Log.
INFO: For details on Automation Server jobs, see What the job list displays.
INFO: For details on the On Condition Triggers Log, see Alloy Navigator Logs.