Create Object
To configure how to create objects, you should first choose which objects to create, then configure how to create them, and then optionally add operations that will be invoked on newly created objects:
- In the Select Object Class dialog box, double-click an object class. The Create Object dialog box opens.
- In the Relationship list, choose the relation between the current object and the target (new) one:
- If the target object has a direct relation with the current object via one of current object’s attributes, select that relation under An attribute of the current object. For example, a Person has a direct relation to an Incident when this Person is selected as the Incident Assignee. To choose such a Person for the Incident, select An attribute of the current object > Assignee.
- If the target object is related to the current object through an indirect reference (created via "Add Relation" action on the "Related Objects" tab), select the relationship type under A related object (shown on the Related Objects tab). For example, see the Copy Consumable action. This action creates a new consumable record by cloning an existing Consumable and establishes a "Copied to" relationship between the original and the new record. In order to establish such relationship, select the Consumable - Copied to - Consumable.
INFO: For details, see Configuring Object Relationship.
- If your target object has no relation with the current object, select No relationship.
- If you want to assign initial values to the target object’s fields, under Template, click Select and choose a Template.
INFO: For details, see Creating Templates.
- By default, the operation creates a single object. If you want to create multiple objects at once, specify their number in the Object Count field.
If you need the number of created objects to be determined at runtime, click the Expression Builder button to bring up the Build Expression dialog box. Specify an expression which returns an integer value.
INFO: For details, see Using the Expression Builder.
- If this Action is going to be used interactively (in a Create Action or a Step Action), you may want to allow the user to view the automatically created object. To open newly created object (or multiple objects) after the user completes the Action, select the Open created object when action is executed interactively check box.
- You can control whether the Triggers on the related object are fired when the object is created. If the Execute triggers on created objects check box is selected, Triggers will fire.
- Keep the Enable operation check box selected. Otherwise, this operation will be ignored.
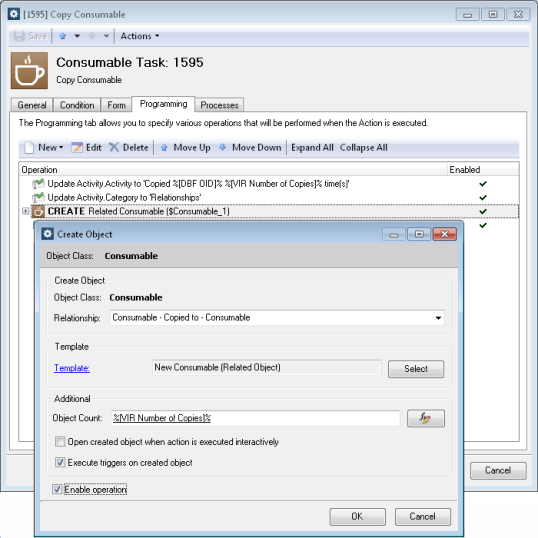
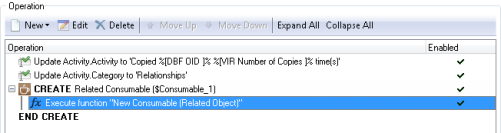
- Click OK to close the Create Object dialog box. The new operation appears in the Operation list as a section consisting of an opening and closing elements, CREATE and END CREATE, respectively. Any operations that you put inside the CREATE section will be applied to each object identified by the CREATE statement.

If you want to invoke workflow operations on newly created objects, you can add any other operations into the CREATE section: Execute Function, Relate To, Execute SQL, Create Object, etc. These will be executed on the newly created object.
INFO: For details and instructions on adding operations, see Adding Operations. For details and instructions on enclosing your operations in conditional blocks, see Building Conditional Statements.
For example, to invoke a Function on the created object, proceed as follows:
- Keep the CREATE item selected and click New > Execute Function.
- Double-click a Function. The Execute Function dialog box opens.
- Under Parameters, specify parameter values that are passed to the Function. Default parameter values will display <Default> in red color. Mandatory parameters that haven’t been assigned yet will display <Double-click to assign value> in red color.
IMPORTANT: You can invoke a Function only when it’s parameter values are assigned. If some parameter values are missing, Alloy Navigator does not allow you to generate such Function.
You can assign a value to a parameter as follows:
- Assign one of predefined values:
- Right-click a parameter row and choose a value from the pop-up list, which contains the following items:
<Empty>— the placeholder for an empty value.- When the Create Object operation is invoked from an Action: If the invoker Action Form has virtual fields, the list displays virtual fields of the same data type as the target parameter.
INFO: For details on Forms, see Creating Forms.
- When the Create Object operation is invoked from another Function: If the invoker Function has its own parameters, the list contains parameters of the same data type as the target parameter.
INFO: For details on Functions, see Creating Functions.
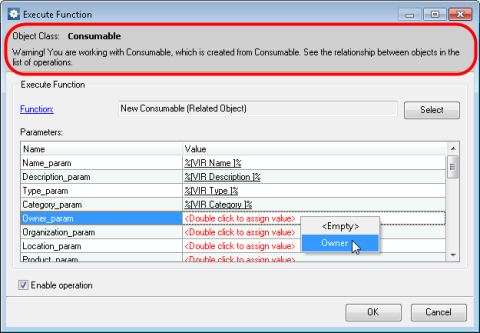
NOTE: The warning at the top is there to remind you that you are configuring this operation on an object which will be created in the course of running a step action on another (primary) object. In our example, both of them are Consumables, but they are two different Consumable objects.
- Right-click a parameter row and choose a value from the pop-up list, which contains the following items:
- If the pop-up list does not contain the value which you need, proceed as follows:
- Double-click a parameter row to bring up the Assign Parameter dialog box.
- Next to the Value field, click the Build Expression button to bring up the Build Expression dialog box, then specify a static value or a runtime expression.
INFO: For details, see Using the Expression Builder.
- Assign one of predefined values:
- Once you assigned all parameter values, click OK to close the Execute Function dialog box. The new Execute Function operation appears under the CREATE item.