Performing workflow actions
A workflow is a sequence of steps that support a business process. In Alloy Navigator, these steps follow the lifecycle of an object: creation, updates, and completion. Each phase of the lifecycle usually corresponds to a particular object status.
Workflow actions can apply templates, request user input through forms or wizards, update data, and send notifications.
There are two types of interactive actions:
-
-
NOTE: Workflow actions are configured by your Alloy Navigator administrator.
Actions menu and Action Bar
Workflow actions appear under Actions in the Module menu. This menu is contextual: Alloy Navigator updates the list based on the record selected in the data view or the object you have open.
You can also access actions by clicking the Actions icon ![]() in the leftmost column of the data view.
in the leftmost column of the data view.
When you open an object record, actions are also available on the Action Bar. The Action Bar displays only the actions that apply to the current status or lifecycle stage. Actions that are not valid at this point are automatically hidden.
To run an action from an open record:
-
Open the object record.
-
In the Action Bar on the right, click the action you want. Actions are usually grouped by category, such as General, Communications, Relationships, or Integrations.
Alternatively, click Actions on the Module menu and select the desired action from the drop-down menu. The Module menu is always available, while the Action Bar may be hidden.
-
Follow the on-screen instructions.
If a
TIP: Required fields are marked with an asterisk (*). You must fill them in before submitting.
To run an action from the data view:
-
Open the target record in the data view.
-
On the Module menu, click the Actions sub-menu, then select the action you want. Actions are usually grouped by category, such as General, Communications, Relationships, or Integrations.
Alternatively, right-click the target object record in the data view and select Actions > [Action Group] > [Action] from the pop-up menu.
-
Follow the on-screen instructions.
If a
TIP: Required fields are marked with an asterisk (*). You must fill them in before submitting.
Perform actions on multiple records
Some workflow actions can be applied to several records at once.
To run an action on multiple records:
-
Select multiple records in the data view. For details, see Selecting multiple records.
-
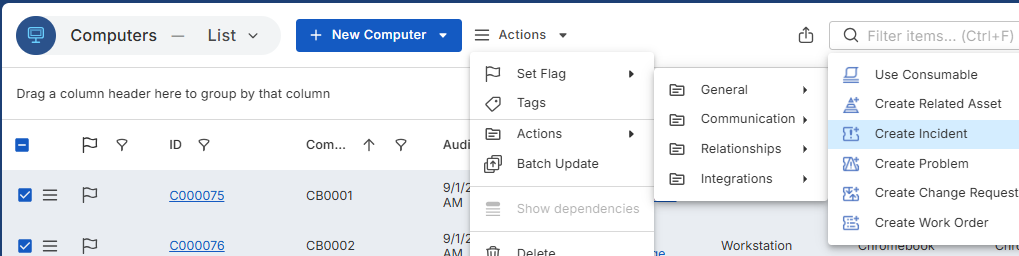
On the Module menu, click the Actions sub-menu, then select the action you want. Actions are usually grouped by category, such as General, Communications, Relationships, or Integrations.
NOTE: Alternatively, right-click the selected records in the data view, then click Actions > [Action Group] > [Action].
-
If a
When an action applies to multiple records,
A green check mark
 next to a field indicates that the value you entered will be applied to all selected records. If the check mark is not shown, existing values will remain unchanged.
 -
To set the same value for all records, enter it. After you move to the next field, the check mark appears.
-
To clear a field in all records, type any value and then delete it. The check mark remains.
TIP: To cancel your changes for all selected records, hover over the green check mark. It will turn into an orange “reset” icon . Click it to clear the field and remove the check mark.
-
To keep existing values, simply leave the field blank. No check mark will appear.
NOTE: Some fields are always updated because they are required by business logic. These fields always display the check mark and cannot be cleared.
-