What's new in version 2026
May 2026
Welcome to the Spring 2026
Dashboards: Powered by analytics
Users can now create, edit, and manage dashboard widgets themselves, without relying on administrators for configuration. In addition, interactive analytics from Reports > Analytics can now be added directly as dashboard widgets, bringing real-time customizable insights into everyday workflows.
-
Full widget management: Widgets can now be created, edited, deleted, exported, and imported directly from within dashboards
-
Enhanced widget types: All widget types have been upgraded and are now fully user-controlled:
-
Analytics widgets (Charts, Counters, Tables, Latest Activities): Upgraded to interactive analytics with filtering and customization; fully configurable through the analytics editor directly from dashboards.
-
Standard widgets (Announcements, Create Actions, Links, Report Lists, Views): Now created and managed directly on dashboards.
-
-
Flexible access control: Widget access is now managed through sharing with specific users and teams rather than through roles.
-
Dashboard-level data visibility control: Because analytics can bypass traditional role-based access restrictions, data visibility is now governed at the dashboard level. If the Bypass role-based access option is enabled for a dashboard (requires administrator permissions), all data displayed in its widgets becomes visible to any users the dashboard is shared with.
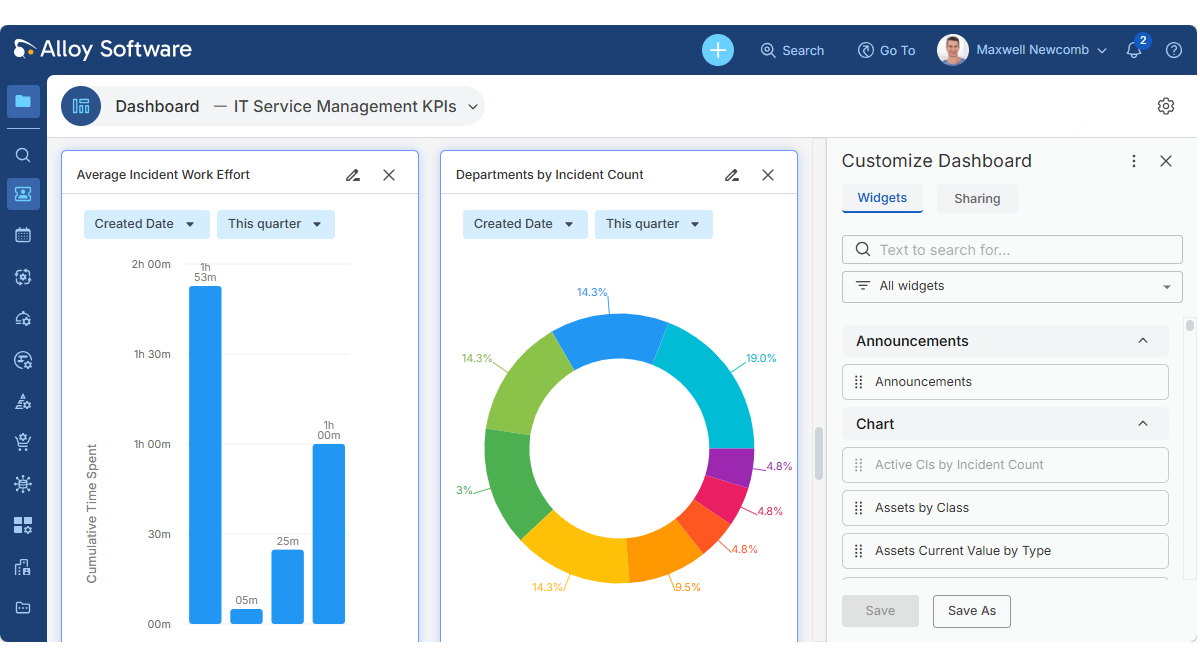
Dashboards are now dynamic, personalized views that reflect what matters most to your team. Larger widget sizes take full advantage of modern wide-screen displays, improving layout flexibility and readability.
To get started:
-
Navigate to My Work > Dashboard to access your existing dashboards, all of which are preserved after the upgrade.
-
To begin using the new functionality:
-
Click the gear icon in the top-right corner to access the Customize Dashboard pane
-
Replace legacy widgets with new pre-built ones, or create new widgets as needed.
As before, managing and sharing dashboards requires the appropriate Analytics and Dashboard Management permissions.
-
For details, see Upgrade considerations: Transition from administrator-managed to user-managed widgets.
Expanded analytics
Building on the analytics capabilities introduced in the Winter 2025 release, this update significantly expands what you can track, visualize, and customize.
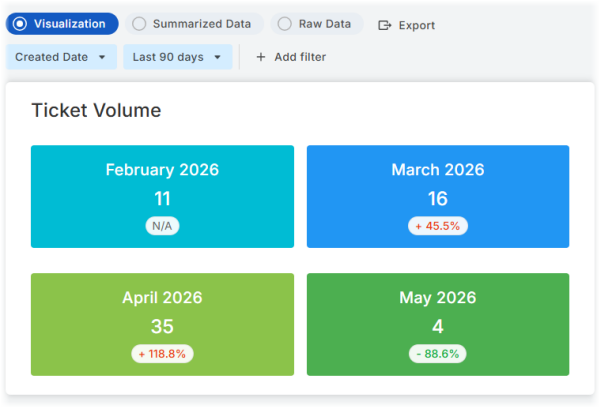
Counter chartsIntroducing a new chart type: Counter. Track any key metric at a glance, either as a simple value of as a comparison across time periods
|
|
|
|
Activity analytics: See what's happeningTable charts now support activity data, providing a fully configurable replacement for legacy Latest Activities widgets. Track activity across any combination of object classes to get a complete, real-time view of what’s happening. You control the level of detail, whether it's system-generated updates (Activity), user-added information (Details), or both. Use the built-in "My Ticket Activity" table chart to monitor updates across all ticket classes or create your own tailored activity views. |
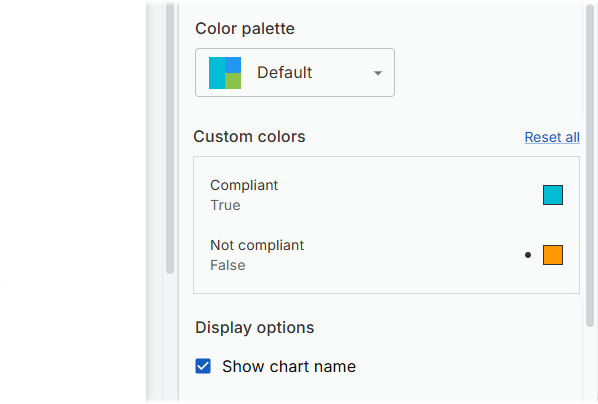
More customizationNow you can make every chart your own. Customize colors and captions for individual chart elements, define axis labels, and fine-tune presentation details so your analytics are both visually clear and aligned with your team's needs. Customizations are indicated by a black dot and can be reset either individually or all at once using Reset all. |
|
|
|
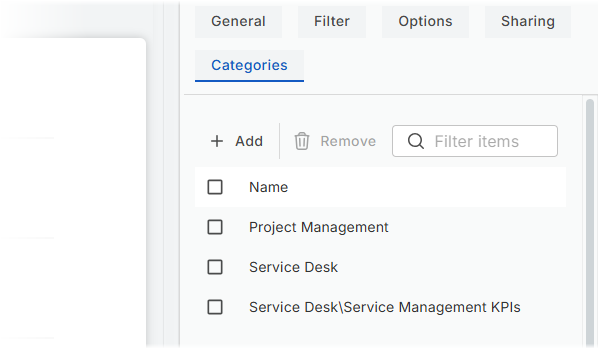
Categorized navigationAnalytics are now organized by category, similar to the Knowledge Base. Create a hierarchy of categories and subcategories, and assign analytics directly from the editor to keep everything structured and easy to navigate. |
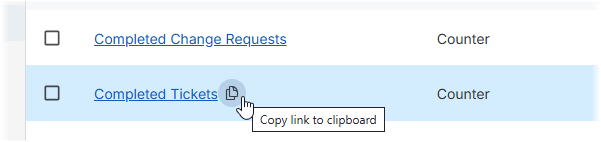
Shareable links to analyticsSharing analytics is now simple and direct. Copy a link to any chart and send it to a colleague. Each link includes the chart title, such as Competed Tickets, so recipients immediately know what to expect. |
|
|
|
Visibility indicatorWhen analytics bypass role-based access control and may expose data beyond a user’s standard permissions, an open lock icon |
Refreshed visualsAnalytics now feature updated icons and a refined color palette delivering a cleaner, more modern, and professional look. |
|


 is displayed both in the analytics list and on dashboard widgets. This makes it easy to identify analytics with expanded visibility.
Analytics are now more flexible than ever. Build exactly what you need or start with an expanded library of ready-made charts. To help you get started, a quick-access help button is available at the top of the analytics window. For details and instructions, see Help: Analytics.
To get started:
-
Go to Reports > Analytics to explore a library of over 100 pre-built charts, including equivalents for all default widgets used across default dashboards in previous versions. Adjust them as needed to fit your organization's needs.
-
Create your own analytics based on existing ones (using the Save as option) or from scratch if needed.
-
Share your new analytics charts with specific people and groups and place them on dashboards as widgets.
As before, creating, managing, and sharing analytics requires Analytics and Dashboard Management permissions.
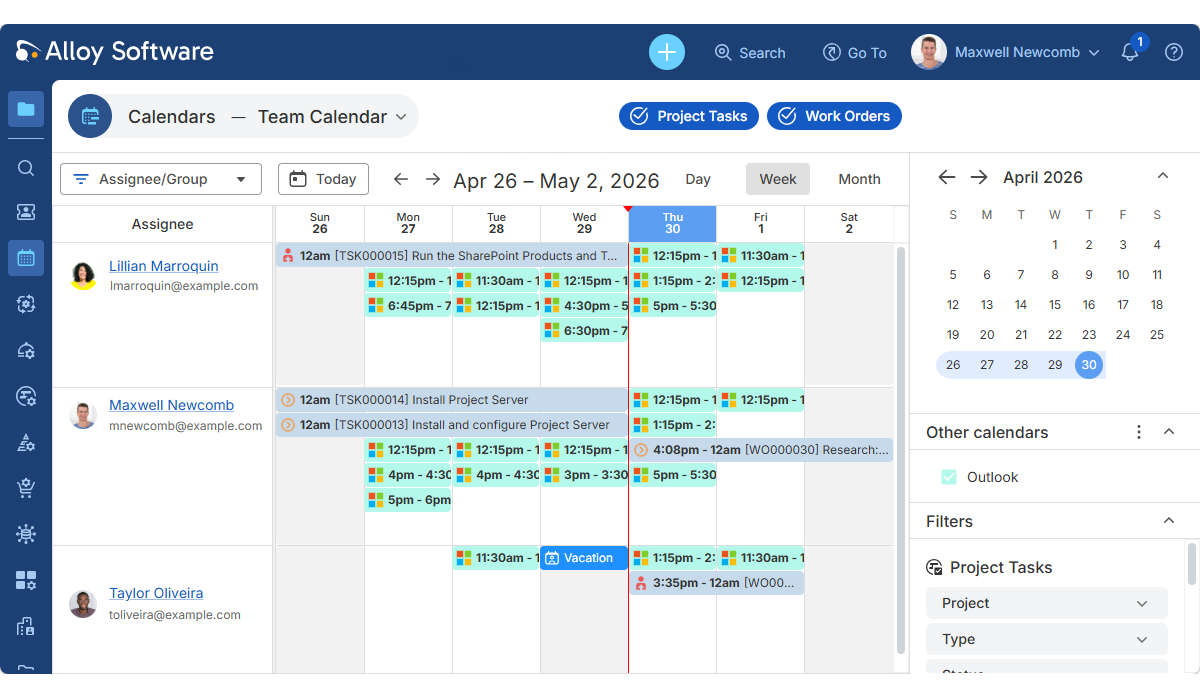
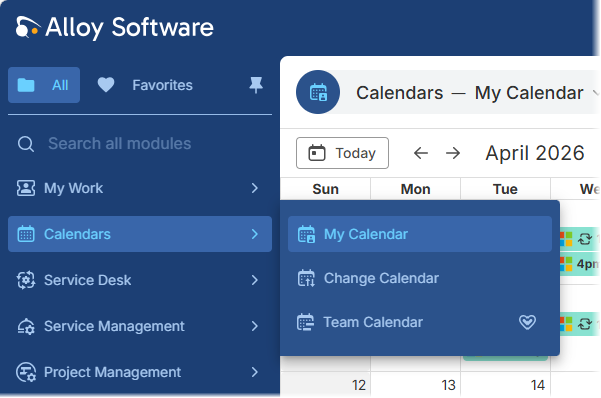
Team Calendar: Now with Outlook integration
Task Calendar has been renamed Team Calendar to better reflect its expanded capabilities. It now integrates with Microsoft Outlook, giving managers a centralized, real-time view of team availability. Busy and tentative time slots from Outlook are displayed alongside your work orders and project tasks, making it easy to plan resources and avoid scheduling conflicts without leaving Alloy Navigator. To protect privacy, only availability status is shown, event details remain hidden.
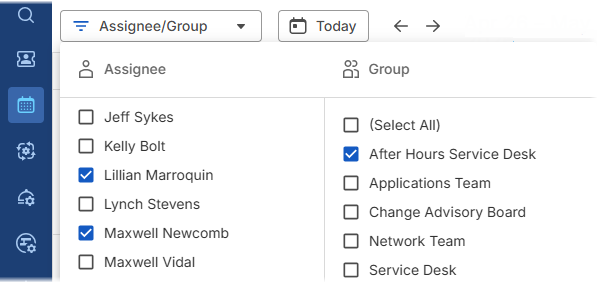
Flexible calendar viewsTeam Calendar shows your teammates' working schedules, with three modes to control what else appears:
|
|
|
Improved team selectionSelecting whose schedules to display is now more flexible. Groups are available across all calendar views, not just work orders, allowing you to select the right people by assignee or group in any context. |
To get started:
-
Go to Calendars > Team Calendar.
-
Add your organization's Outlook calendar (you will be asked to sign in to your Microsoft 365 account).
To display a team member's availability, ensure their Microsoft 365 email address is specified in their Person record as the primary email.
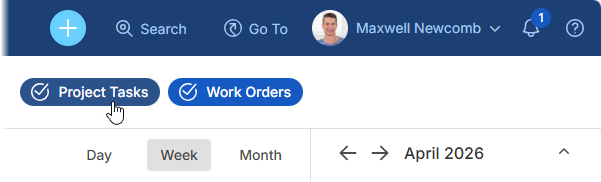
- To show or hide assigned tickets, use the Project Tasks and Work Orders buttons in the top-right corner of the calendar.
Prerequisite: To enable Outlook synchronization, an administrator must configure Microsoft 365 integration in the Admin Center under Services and Integrations > Microsoft 365 Integration. If integration is already set up for My Calendar, no additional setup is required. For details, see Admin Center Help: Configuring integration with Microsoft 365.
Calendars: Now in one placeAll calendars are now grouped under a new Calendars section, making them easier to find and access from a single location.
By bringing all scheduling and planning tools together under one entry point, navigation becomes simpler and more intuitive, helping users quickly access the calendars they need. |
|
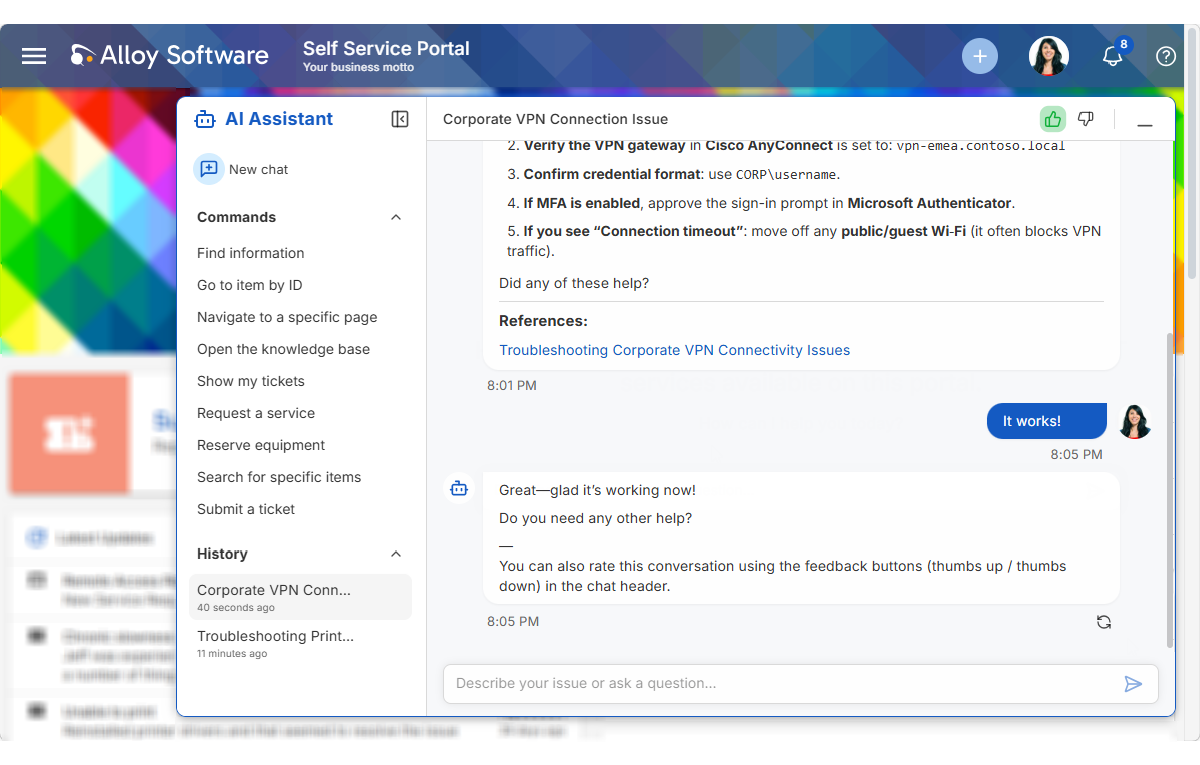
AI Assistant for Self-Service Portal: Smarter and more customizable
The AI assistant for the Self-Service Portal is now more powerful and significantly more configurable. It delivers strong results out of the box, while giving administrators full control to tailor it to their organization’s workflow and tone.
What's new for portal users
-
Smarter responses: More accurate and relevant answers, powered by the latest AI models
-
Multiple chats: Create separate conversations for different topics and switch between them with ease
-
Feedback: Rate responses to help improve the assistant's accuracy over time
-
Redesigned interface: A wider chat window provides a more comfortable experience, while commands are now organized in a dedicated side panel for quick access
Once enabled, the AI Assistant appears in the Self-Service Portal and is ready to assist all users with questions and requests.
What's new for administrators
-
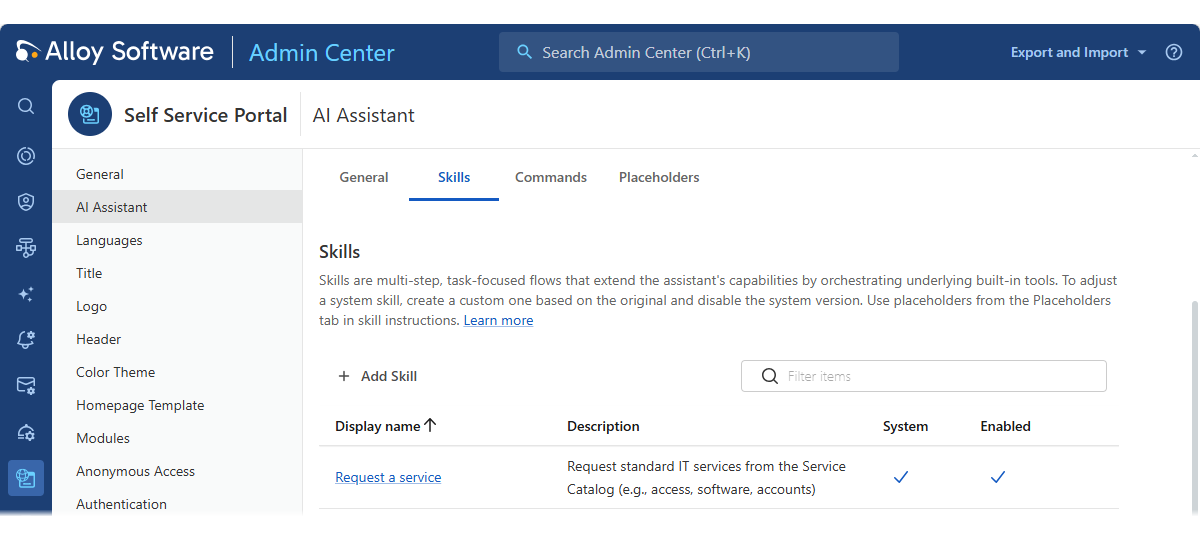
Advanced customization: The assistant works out of the box, but now you have full control over how it behaves: define the assistant’s scope, customize the greeting and tone, configure and manage quick commands, adjust the system prompt that shapes responses, fine-tune AI skills for multi-step, task-specific workflows, and more.
-
Chat logging and insights: The enhanced SSP AI Assistant Log provides full visibility into all conversations, helping you analyze usage patterns and continuously improve internal knowledge quality and response accuracy.
-
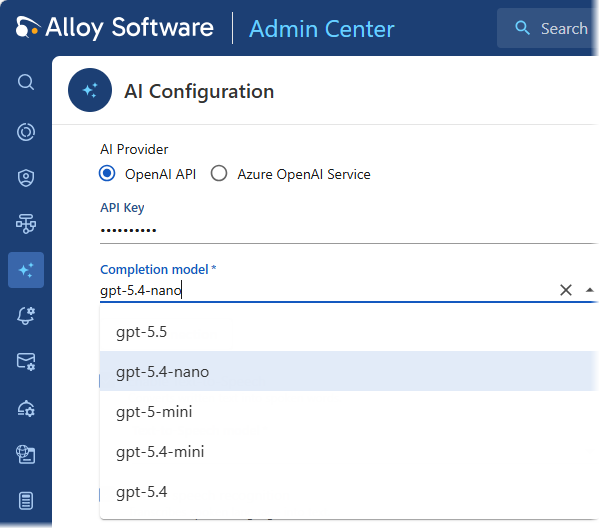
Updated AI model: The recommended AI model has been updated to reflect the latest advances. If you are already using the assistant, review your model selection after upgrading. The new default is GPT-5.4-nano. For additional details, see AI Integration: Updated models and connection testing.
These enhancements transform the AI Assistant into a fully configurable solution that adapts to your support processes.
To get started:
-
Access the Admin Center.
-
Go to Apps and Portals > Self Service Portal, open the AI Assistant page, and explore the available customization options.
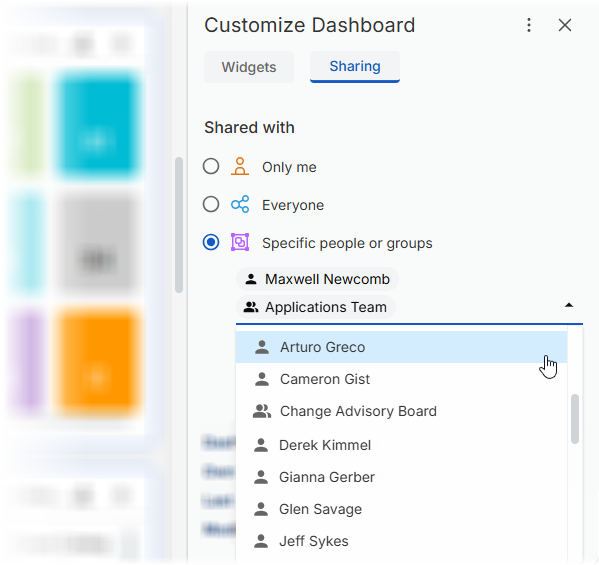
Granular sharing and advanced data handling
This release introduces enhanced data management capabilities, including granular sharing permissions, advanced field-to-field filtering, and native Excel export support.
Multi-user and multi-group sharingSharing is now more flexible and precise. Data views, boards, analytics, and dashboard widgets are no longer limited to sharing with everyone or a single team. You can now share them with any combination of individual users and teams, giving you full control over who has access. This enhanced sharing model ensures consistent access control across the platform. To get started:
|
|
|
|
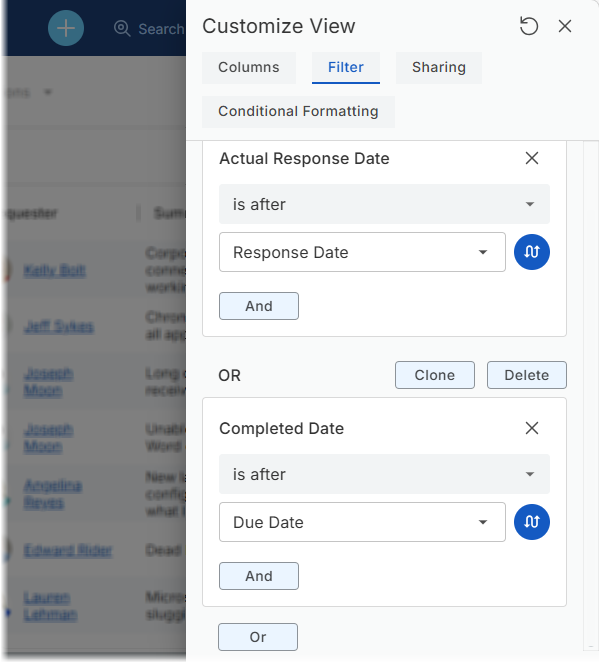
Field-to-field filteringData filtering is now more powerful with support for dynamic field-to-field comparisons. Instead of comparing a field to a fixed value, you can now compare directly to another field of the same type. This makes it easy to identify patterns, inconsistencies, and expectations, without exporting data for manual analysis. For example, you can now easily compare:
Field-to-field comparison is supported in tabular data views (including conditional formatting), boards, and analytics. To get started:
|
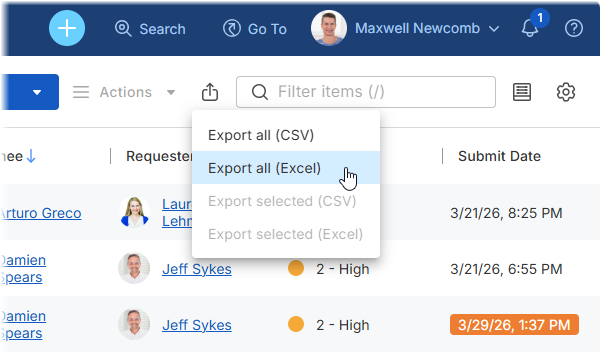
Native Excel exportYou can now export data from tabular data views directly to native Excel (.xlsx) files, making it easier to work with your data outside Alloy Navigator. Exported files preserve data types, allowing you to sort, filter, and perform calculations without additional conversion or formatting. Where supported, conditional formatting from the data view, such as colors and highlights, is also retained, helping you maintain visual context and quickly interpret data in Excel. |
|
Enhanced Activity logs
Activity logs provide a complete history of everything that happens on a ticket
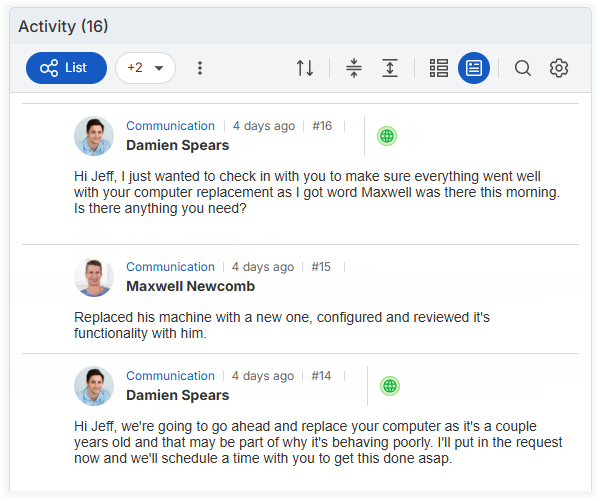
Published indicator in Cards modeThe Published status is now visible directly in Cards mode for activities. There is no need to open a record or switch to Table mode to check visibility. A green globe icon We've also standardized the Published indicator across the system: Knowledge Base articles, their categories, and activities now all use the same consistent icon , making publication status easier to recognize at a glance. |
|
|
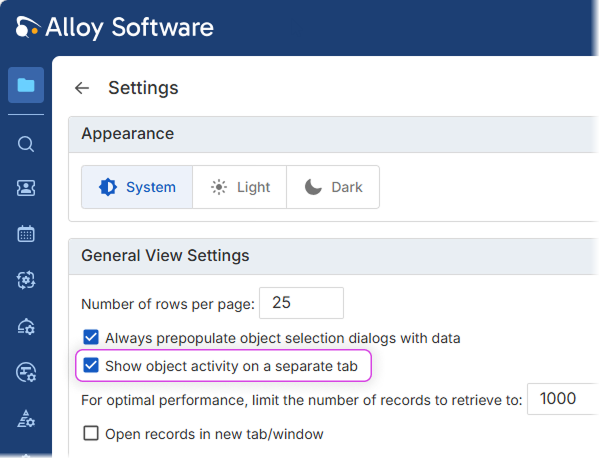
Standalone personal Activity viewUsers can now view activity logs for tickets in a dedicated tab, separate from the General tab. A new profile setting, Show object activity on a separate tab, gives the activity log its own space, improving readability and usability, especially on smaller screens. This is a personal preference setting and does not affect other users or shared layouts. By default, this behavior applies to tickets only, since activity logs for other objects are already displayed in separate tabs. If a custom form layout places Activity inside another tab for any object, enabling this setting will move it to its own dedicated tab. |
 clearly indicates whether an activity is visible to Self-Service Portal customers or remains internal.
AlloyScan Sync: More control over your inventory data
Two new options give administrators greater flexibility over what gets imported from AlloyScan and how outdated data is cleared up.
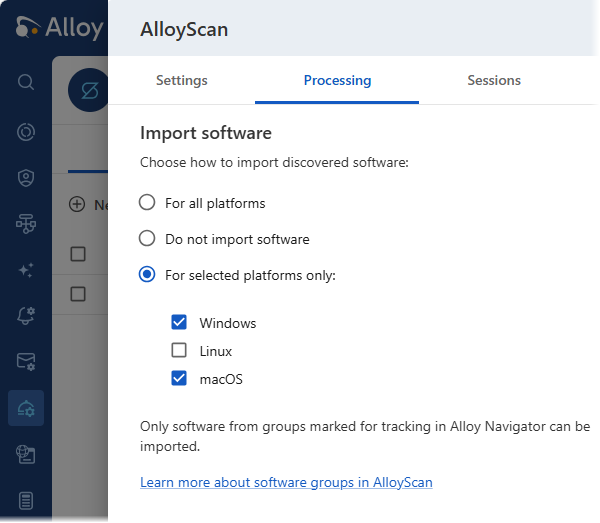
Selective software import by platformAlloyScan classifies discovered software into groups (Required, Forbidden, and Regular), allowing you to define which categories should be tracked in Alloy Navigator. In this release, platform-level filtering has also been added. In addition to group-based control, you can now select which platforms to import from on the Navigator side. You can choose any combination of Windows, Linux, and macOS from your tracked groups to keep your software inventory focused, relevant, and free of unnecessary data. |
|
|
|
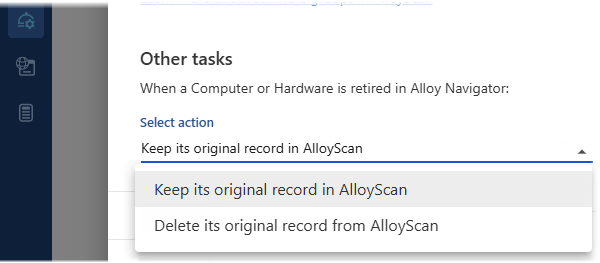
Automatic removal of retired assetsWhen a computer or hardware asset is marked as Retired in Alloy Navigator, you can now choose whether it should be automatically removed from AlloyScan. This provides greater flexibility in handling retired assets while keeping your inventory data accurate and aligned with your internal processes. After the upgrade, retired assets are kept in AlloyScan by default, maintaining consistency with previous behavior. Administrators can change this setting in AlloyScan Sync configuration if automatic removal is preferred. |
To get started:
-
Access the Admin Center.
-
Go to Services and Integrations > AlloyScan and open your synchronization.
-
Explore the new options on the Processing tab.
Updated workflow integrations
-
Microsoft Azure AD Sync: Flexible organizational mapping
Integration with Microsoft Entra ID (formerly known as Azure AD or Microsoft Azure Active Directory) now supports flexible organizational mapping, aligning its capabilities with the Active Directory integration. Administrators can now define how organizations are structured in Alloy Navigator using a new Organizational Structure workflow configuration parameter.
Available mapping options:
- Company Name\Department Name: Creates a hierarchical structure with companies as parents and departments as children
- Company Name: Creates a flat list organized by company
- Department Name: Creates a flat list organized by department (previous default behavior)
For details and instructions, see Integrations: Microsoft Azure AD integration.
If you are upgrading from a previous version, these updates will not apply automatically. You may need to modify your existing workflow to enable them. For assistance, please contact our Support Team.
-
Dell Warranty: Job summary in logs
The Dell Warranty synchronization job now includes a Job Summary at the end of the log. This summary reports the number of devices found, updated, and skipped, bringing it in line with the logging format used by other synchronization jobs and making results easier to review at a glance.
Administrators can access the log in the Admin Center, under Services and Integrations > Scheduled Tasks > Dell Warranty, on the Sessions tab.
For details, see Integrations: Dell Warranty integration.
Self-Service Portal: Faster Service Catalog navigation
Service Catalogs can grow large and difficult to navigate, especially when services are managed by multiple teams. This release makes it easier for users to find what they need quickly.
Search and filteringA search filter above the catalog lets users quickly narrow down results and locate the right service without scrolling through long lists. Category tags on cardsEach catalog item now displays its category directly on the card, providing immediate context and helping users identify relevant services at a glance. Hover over a category tag to see the full path — useful for navigating the structure. |
|
AI Integration: Updated models and connection testing
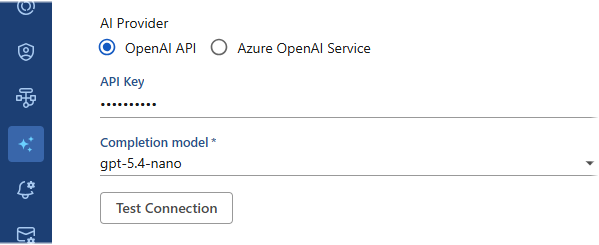
Stay current with the latest AI modelsAdmin Center & Settings App The list of available AI models has been updated to include the latest options, replacing older ones approaching end-of-support from their providers. As before, you can also enter a model name manually. After upgrading, your previously configured model remains active. To take advantage of the latest improvements, we recommend switching to one of the newly available models. We recommend switching to gpt-5.4-nano, now the default model, for the best experience with AI-powered features such as the Self-Service Portal AI Assistant. In the Admin Center, go to AI Integration > AI Configuration, and expand the Completion model list to select or enter a model. If you use Azure OpenAI Service, a new deployment may be required. |
|
|
|
Verify your AI setup in one clickAdmin Center only Configuring AI integration in the Admin Center is now simpler and more reliable. Use the new Test Connection button to instantly validate your API key and confirm connectivity to the AI provider. If there's an issue, detailed diagnostics help you identify and resolve it. Under AI Integration > AI Configuration, click Test Connection to verify that your API key is valid and the connection is working correctly. |
Expanded Admin Center: Growing configuration coverage
The Admin Center continues to expand, bringing more configuration options from the desktop Settings App into the web interface. This release adds new capabilities and moves additional settings to the browser, moving closer to a fully web-based administration experience.
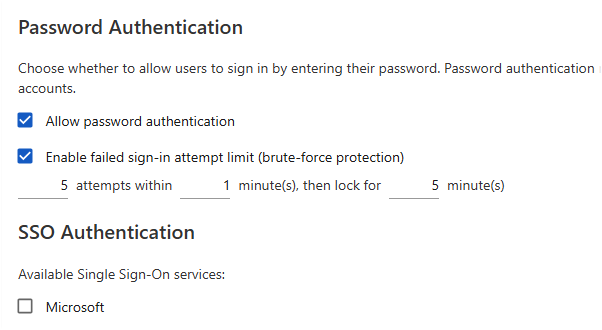
Brute-force protectionAdmin Center only Alloy Navigator now helps protect accounts against brute-force attacks by limiting consecutive failed sign-in attempts. You can configure:
Go to Apps and Portals > Web App > Authentication and turn on the Enable failed sign-in attempt limit option. |
|
|
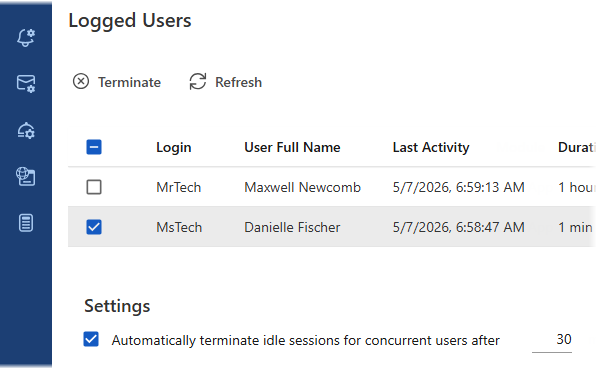
User session managementAdmin Center & Settings App View and manage active technician sessions. You can terminate sessions manually or configure automatic timeouts for idle sessions. Go to Users and Security > User Sessions. |
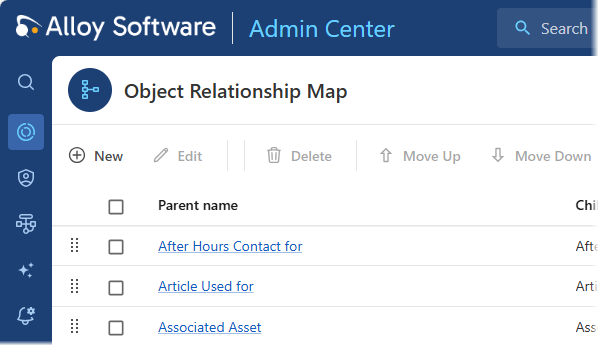
Object relationship mapAdmin Center & Settings App Control which relationship types users can apply when linking objects in Alloy Navigator. Go to General > Object Relationship Map. |
|
|
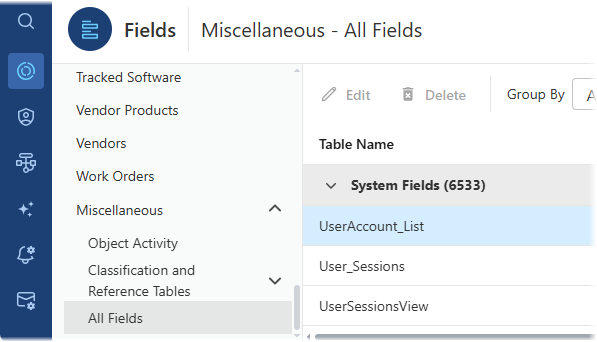
Cross-object field label managementAdmin Center & Settings App A new All Fields section provides a centralized place to manage field labels across all object classes and database views, helping maintain consistent naming throughout the interface. Go to General > Fields > Miscellaneous > All Fields. |
Other enhancements and resolved issues
Interface improvements
-
Uninterrupted workflows despite workflow changes
Workflow updates made by administrators no longer interrupt users who are in the middle of an action. Changes are now applied in the background, allowing users to continue working without losing progress.
Form submission is now blocked only when the Action Form itself is modified, ensuring data integrity. All other workflow updates are applied seamlessly.
-
The Related Objects tab renamed to Relationships
The Related Objects tab has been renamed to Relationships for improved clarity and usability. All functionality remains the same. You can still view and manage connections between items using either an interactive map or a list.

-
Quick Filter shortcut updated to "/"
Keyboard navigation in tabular data views has been improved. The previous Ctrl (⌘) + F shortcut has been removed to avoid conflicts with browser search. Native page search is now fully restored. Use the / (forward slash) key to quickly focus the Quick Filter box, following a common pattern used in modern web applications.

This change applies to the Web App and the Self-Service Portal. Support will be extended to the Admin Center in a future update.
-
Cleaner column header layout
Column headers have been refined for a lighter, cleaner appearance.
- Sorting arrows are now positioned closer to column labels
-
Filter icons on unfiltered columns appear only on hover, reducing visual clutter

Application access
-
Resolved an issue where Single Sign-On (SSO) authentication in the Web App could fail with a "Signature validation failed IDX10503" error when using a Microsoft Entra ID application configured to use application-specific signing keys. SSO authentication now works correctly in such configurations.
-
Resolved an issue where SSO authentication using custom identity providers such as Duo Security could fail with an "Object reference not set to an instance of an object" error, even when the identity provider was configured properly. SSO authentication with custom IdPs now works as expected.
-
Resolved an issue where the Web App, Admin Center, and the Self-Service Portal could return HTTP 405 errors in environments where the WebDAV Publishing module was installed in Microsoft IIS. Alloy Navigator web applications now work correctly in such environments.
Tabular data views
-
Resolved an issue in data views where records selected for an action could remain selected internally after the action is completed, even though the selection was cleared in the user interface. As a result, subsequent actions could unexpectedly include previously selected records in the same positions in the view. Record selection and clearing now works correctly.
Dashboards
-
Resolved an issue where Table widgets were not refreshed when using the widget Refresh
 button and required a full page reload to display updated data. The issue also affected several other widget types. Refresh functionality works correctly for all legacy dashboard widgets and is fully supported in all new dashboard widgets.
 -
Fixed the "Cannot read properties of null (reading 'startsWith')" error that could occur when opening dashboards after upgrading from earlier product versions. Dashboards containing invalid widget references in their configuration now open correctly and display data as expected.
-
Fixed a problem where My Tickets views selected in legacy Views widgets were replaced with the corresponding All Tickets views after saving changes in the Settings App.
We recommend replacing all custom legacy widgets managed from the Settings App, including Views widgets, with the new widgets managed directly from dashboards. For details, see Upgrade considerations: Transition from administrator-managed to user-managed widgets.
-
Resolved issues affecting dashboard management permissions for the built-in Administrator (Views/Dashboards) role. Users assigned this role can now create and manage dashboards as expected. Role permissions are now applied properly and handled consistently across both the web Admin Center and the desktop Settings App.
Purchasing
-
Resolved an issue where the Tax Rate and Shipping Tax Rate fields on the Purchase Order form did not support values with three decimal places. These fields now correctly support tax rates such as 7.125%.
-
Resolved an alignment issue affecting the Tax Rate field on the Purchase Order form. All values are now aligned correctly.
-
Resolved the "Invalid column name 'Category_ID'" error that occurred when adding the Category column to data views on the Assets tab of the Purchase Order form. Asset categories can now be added without errors.
Configuration Management
-
Fixed a problem where updating Hardware or Computer records could clear the Stock Room value of the related Asset. Existing Stock Room values are now preserved during record synchronization and updates.
Software Asset Management
-
Added support for selecting multiple Products when adding them to Tracked Software records, allowing multiple products to be added at once instead of one by one.
-
Resolved an issue where Tracked Software records could display incorrect Total License Qty and compliance values when licenses linked through the "Upgrade for" relationship were associated with different Tracked Software records (when upgrade licenses were associated with separately tracked software versions).
Tracked Software records are now calculated independently in such scenarios, so upgrade relationships no longer affect totals or compliance across different Tracked Software records. Existing upgrade license calculation rules continue to apply when related licenses are associated with the same Tracked Software record.
Self-Service Portal
-
Decoupled Node.js for on-prem customers
The Self-Service Portal no longer depends on a system-wide Node.js installation. It now uses a bundled, standalone Node.js runtime, simplifying deployment and eliminating confusion around ownership and version management. This also allows Alloy to manage updates and ensure compatibility. As part of this change, Node.js has been upgraded to version 24 LTS.
During the upgrade, the installer notifies you that a previously installed Node.js instance is no longer required for the portal. It can be removed if not used by other applications. Existing installations are not automatically uninstalled.
-
Immediate access to the user guide
A built-in user guide can now be accessed directly from the portal. Click Help (question mark) in the top-right corner to access documentation covering portal basics and key workflows.
-
Fixed an issue where the AI Control on some custom workflow action forms could fail with a "Sorry, an error occurred while processing your request" error. The error occurred when the form included both the AI Control and a logical field (checkbox).
-
Resolved an issue where quotation marks in Announcement titles were displayed incorrectly as HTML codes in the Self-Service Portal. Quotation marks in Announcement titles are now displayed correctly
-
Clicking a Service Catalog item in Self-Service Portal search results now opens the selected item correctly instead of returning users to the Service Catalog page.
-
Improved error handling for custom workflow forms for Service Requests. Workflow configuration issues now display a clear validation message instead of a generic page error.
Printable reports
-
Optimized reports for large databases
Performance of
The All time date range option has been removed, as it could cause timeouts in high-volume databases. Reports now open with a default Last 30 days range, ensuring faster execution, improved stability, and prevention of long-running queries.
-
Optimized the KPI Incidents Trend report to improve performance when generating reports on large databases and prevent query timeout errors during report generation.
-
Optimized the Asset Ownership History report to improve performance for large date ranges.
Branding
-
Updated Alloy Software logo
Alloy Navigator

Your custom company logo in the Web App and Self-Service Portal remains unchanged and continues to display as before.