Configuring Settings for Reporting Jobs
To create a reporting job, follow the steps below:
- From the Sidebar, go to the Services > Scheduled Reports > Reports section and click New. The Scheduled Report dialog box opens.
- If you have several reporting jobs for the same report, you may want to assign distinctive names to each job. Type in the job name in the Name field.
- Under Report, choose a report in the Report Name drop-down list.
- Choose the report output format in the Format drop-down list: PDF, HTML, Excel, etc.
- Under Parameters, specify report parameters.
- To automatically generate the list of report parameters:
- Click Build to bring up the Report Parameters dialog box.
- Choose a value for each report parameter.
- Click OK.
Now you can modify some values, if needed. For example, you can replace static values with macros for date range parameters.
- To manually specify report parameters, type as follows:
/parameter_name=valueTo specify several parameters, separate them with a space or type each parameter on a new line. If the parameter name or value contains spaces, enclose it in double quotes.
NOTE: Before you manually assign report parameters, you must find out what parameters the report has. For details, see Report Parameters.
- To automatically generate the list of report parameters:
- Under Destination, specify where you want the report to be sent.
- If you want to save the report to a file:
- Click Save report to file.
- Specify the path and name for the destination file on your local computer or in a network share. Each time the job generates a new report, this file will be overwritten.
NOTE: Make sure that the specified folder is accessible by the Automation Server startup account. For details, see Automation Server.
- If you want to broadcast the report via e-mail:
- Click Send report via e-mail.
- In the To field, specify the recipient's e-mail address. You can specify several e-mail addresses, comma separated.
- In the Subject field, type the message subject line text.
- In the Message field, type the text that will appear in the body of the e-mail message.
NOTE: Sending reports via e-mail requires that outgoing e-mail notification settings must be properly configured beforehand. For details, see Configuring and Controlling Outgoing Notifications.
- If you want to save the report to a file:
- Click OK to save your settings.
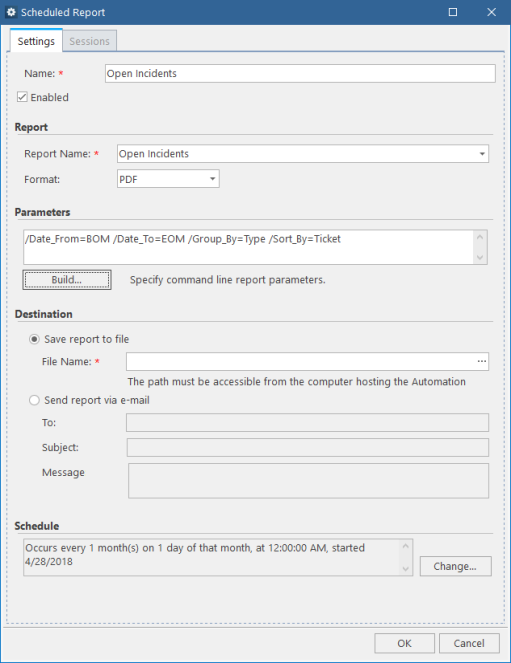
By default, reporting jobs generate reports on the first day of every month. If you want to change the schedule, see Customizing the Reporting Job Schedule.