Integrations
Integrations is a feature that enables you to launch PowerShell commands and scripts on audited or discovered computers or network devices right from the Network Inventory application. A collection of default integrations is available out of the box. For instance, you can connect to a computer using VNC, open a telnet session to that computer, or simply ping it. You can customize the default integrations, and you can add your custom scripts and commands.
The default list of integrations includes the following:
-
Screenshot - captures a screenshot of the entire desktop for the chosen remote computer on your network. You can then save the screenshot on your local computer. Alloy Remote Screenshot is an Alloy Software tool shipped with Network Inventory. For detailed information, see Capturing Screenshots on Remote Computers.
-
Telnet - connects to the chosen computer over the network by using the Telnet protocol.
-
Ping - pings the chosen computer to find out whether the destination responded and how long it took to receive a reply.
-
VNC (Virtual Network Computing) - controls the chosen computer via a network connection by using Virtual Network Computing. Note that this default configuration is for illustrative purposes only. Executing the VNC command requires that the VNC viewer is installed on the machine hosting Network Inventory, VNC server is installed on the chosen client machine, and the "VNC" integration is pointed to the executable file
vncviewer.exe.> -
Remote Desktop (RDC) - controls the chosen computer via a network connection by using Remote Desktop Connection.
-
Open in Windows Explorer - accesses the computer's shared resources using Windows Explorer.
-
Manage - opens the Computer Management console for the chosen computer.
-
Trace Route - determines the network path to the chosen computer.
-
Event Viewer - opens the Event Viewer for the chosen computer.
-
Path Ping - finds out the details of the network path to the destination computer and obtains the ping-like statistics for each node in the path.
-
Task List - shows a list of applications and services for all tasks running on the chosen computer.
-
Shutdown - shuts down the chosen computer. When the Shutdown command is sent, the chosen computer will display a message telling that the system is being shut down and counting time before shutdown. The user on the remote computer can cancel the shutdown process by typing
shutdown -aat the command prompt. -
Reboot - restarts the chosen computer.
-
WakeOnLan - turns on the chosen computer via a network connection by using the WakeOnLan utility included with Network Inventory. Note that executing the WakeOnLan command requires that the computer meets the technical conditions of the Wake on LAN (WOL) standard. Also, you may need to make some changes in the target computer's BIOS configuration.
NOTE: The default integrations require that their external programs exist on your computer.
Running Integrations
To launch an integration for a computer or device, select the target Node from any grid (All Nodes, Computers, or Network Devices), choose Tools > Integrations > [Command] from the main menu. Alternatively, select Integrations > [Command] from the pop-up menu.
Commands for running integrations are also available from the Preview Pane for computers and network devices (for details, see Network Inventory application).
NOTE: In order to allow for seamless integration, Network Inventory uses Alloy Integration Launcher. Users get this small program installed automatically
Configuring Integrations
To configure integrations, open the Integrations window by choosing Tools > Integrations > Configure Integrations. From this window you can add new integrations , edit existing integrations, and delete integrations that are no longer needed.
These commands are available in the Integrations window:
-
Add - adds a new integration to the list.
-
Delete - removes the selected integration from the list.
-
Edit - allows you to modify the definition of the selected integration.
TIP: You can also access Add, Delete and Edit commands through the pop-up menu that appears when you right-click any integration.
-
Move Up/Move Down - changes an integration's position in the list.
-
Close - saves the changes, if any, and closes the window.
Creating integrations and editing their properties
Clicking Add or Edit in the Integrations window brings out the Integration Properties window. Here, you can configure a particular integration.
When you select a computer and launch an integration, Network Inventory executes the PowerShell script or command specified in the integration's configuration. Command parameters specified by means of placeholders are replaced with actual values from that computer's audit snapshot. For example, a placeholder for IP address is replaced with the actual IP address of the client computer.
For example, see the "Test Connection" integration below. Using this integration, you can remotely test the connection to a computer by selecting it either in the Sidebar or Computer List and choosing Test Connection from the Integrations menu on the toolbar or from the Preview Pane for this computer.
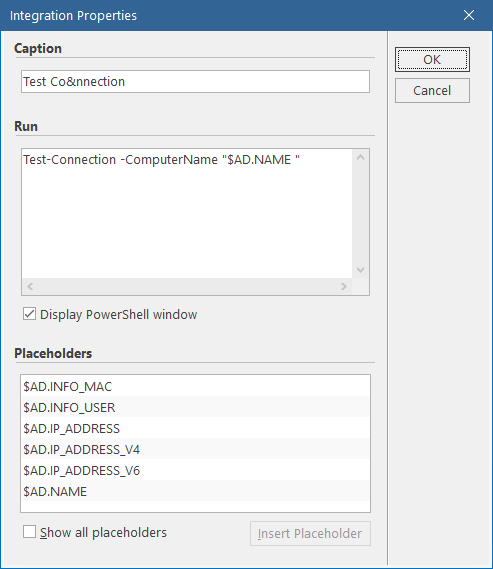
IMPORTANT: The version of PowerShell on your computer must match the version of your PowerShell script or command, or be higher. The screenshot above shows an example for PowerShell version 5, which comes preinstalled on Windows 10 and Windows Server 2016.
Enter the following parameters:
-
Caption - The command for running the integration, as it appears in the Tools > Integrations menu and in the Preview Pane. The caption must be unique, and can't be blank. To include a keyboard accelerator, which is the standard Windows ALT+<character> combination, include an ampersand (&) before the character. For example, to use the ALT+D combination as an accelerator for the Remote Desktop integration, enter the caption as Remote &Desktop. To display the ampersand character in the caption, use two ampersands (&&).
-
Run - The PowerShell commands or scripts to run. This can be a PowerShell cmdlet, a combination of cmdlets, a script, or any external program.
To enter a dynamic parameter, select a placeholder from the Placeholders section below. At runtime, all placeholders will be replaced by the actual data.
IMPORTANT: Add double quotation marks (") around placeholders, so all placeholders in your command are enclosed in quotes. For example:
"$AD.Name".INFO: For additional information, see Microsoft PowerShell documentation at https://docs.microsoft.com/powershell/.
-
Display PowerShell window - You may want to keep the PowerShell window open after the command is executed to review the information in this window. If so, you select this check box.
-
Placeholders -The list of placeholders that you can use to pass dynamic parameters to your PowerShell script or command. For example, use the $AD.NAME placeholder to pass the name of the currently selected computer as a parameter for the external command.
To insert a placeholder, click the location in the Run field where you want it inserted, and then double-click the placeholder to insert.
By default, only the most popular placeholders are shown. To display the full list of available placeholders , select the Show all placeholders check box.
NOTE: The full list includes placeholders for all fields available in Computer, Chromebook, and Network Device records. Placeholders consist of field names with the $AD. prefix, all caps.
INFO: For more detailed description, see Network Inventory User's Guide: Adding Integrations.
Click OK to save your changes.