Configure the Alloy Self-Service Assistant bot in Teams
Updated in 2021.1
See how to configure the Alloy Self-Service Assistant bot for your organization and connect it to Alloy Navigator Express.
PREVIOUS STEPS: Configure the Alloy Self-Service Assistant bot in Alloy Navigator Express and Obtain credentials from Alloy Navigator Express.
-
Add the bot for yourself to be able to start the configuration process.
-
Configure the bot in a Teams chat conversation in a private conversation with the bot.
Add the bot for yourself
You will configure the Alloy Self-Service Assistant bot in a one-to-one conversation with the bot, so first you need to add the bot to your Teams application.
-
Launch Microsoft Teams.
-
On the left side of Teams, click Apps.
-
Search for Alloy Self-Service Assistant.
-
Click Alloy Self-Service Assistant, review its description, and click the Add button.
Configure the bot in a Teams chat conversation
Now you can configure the bot by using configuration commands.
IMPORTANT: This step is the first interaction with Alloy Navigator Express via the bot. That interaction requires that you have a Person record in Alloy Navigator Express, and the primary email address in that Person record matches the primary email address in your current Microsoft Teams or Microsoft 365 account. Otherwise, the bot will throw an error. For details, see Reference: Alloy Self-Service Assistant bot errors and warnings.
-
In your Microsoft Teams, start a chat with Alloy Self-Service Assistant.
-
Type add config. The bot will reply with an interactive configuration card.
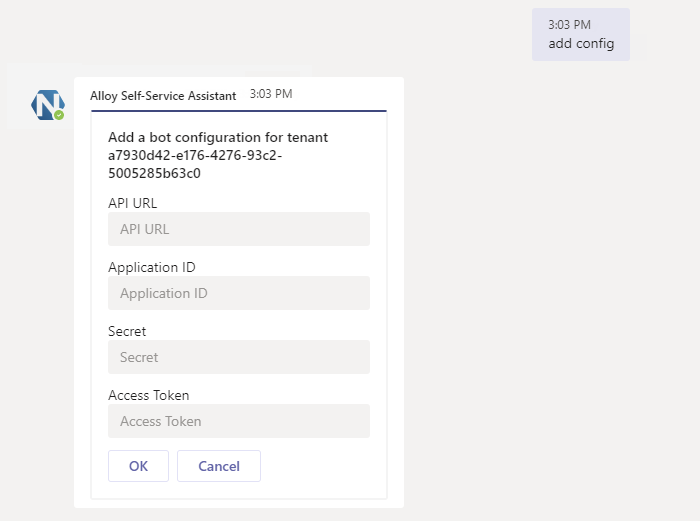
Fill out the configuration card:
-
API URL - the URL of your Alloy Navigator Express API. Your API must be publicly accessible from the internet. For details, see Alloy API.
TIP: You can view the API URL in the Settings App. Go to Workflow and Business Logic > Advanced > System Macros and copy the contents of the API Link field. For details, see Settings App Help: Customizing links to Alloy web applications.
-
Application ID and Secret - the credentials of the application account in Alloy Navigator Express for the bot app. For details, see Obtain credentials from Alloy Navigator Express.
-
Access Token - the access token that you obtained from your Microsoft 365 administrator. For details, see Access token.
Click OK to add your configuration.
-
INFO: For a complete list of bot configuration commands and their short forms, see Reference: Alloy Self-Service Assistant bot configuration commands.
What's next?
Now everything is ready to start using Alloy Self-Service Assistant in your org. You can test how the bot communicates with the Self Service portal, and invite your colleagues and customers to use it.
NEXT STEP: Use Alloy Self-Service Assistant bot in Teams.