Customizing "Create" Ticket Forms
The majority of Templates only assign starting values and allow the user to enter the details directly in the object’s details window. However, several pre-defined Ticket Templates also request user input through customizable pop-up dialog boxes, referred to as Create Ticket Forms. You can customize those Forms as needed: add new fields (including user-defined fields), remove unneeded fields, specify new labels for the displayed fields, or change their display order.
If a Form has many fields, you may want to group them into sections to make it easier to read and complete. Each section would have a caption and individual instructional text, if needed.
Alloy Navigator Express offers several Ticket Templates with customizable Forms:
- New Quick Request [#840] — the Template for submitting "Quick Request" Tickets in the Desktop App, Web App, and in the Mobile App.
NOTE: The New Quick Request is the only Template that is available not only in the Desktop App and the Web App, but in the Mobile App as well (see The Mobile App: Creating a Ticket with the “Quick Request” Template:). So if you want to customize the Form for submitting Tickets in the Mobile App, modify the Quick Request [840] Template.
- New Quick Task (Child) [#841] — the Template for submitting child "Quick Task” Tickets for "Quick Request" Tickets in the Desktop App and the Web App. The New > Quick Task command is available on the Child Tickets tab of the parent Ticket’s details window.
- Recurrent Task [#806] — the Template for creating Recurrent Ticket jobs in the Desktop App. Its Create Ticket Form is available to technicians on the Data tab of the Recurrent Ticket window.
INFO: For instructions on creating Recurrent Ticket jobs, see Help: Managing Recurrent Tickets..
To customize the default Create Ticket Form for a Ticket Template, follow these steps:
- From the Sidebar, navigate to Customization > Service Desk > Tickets > Workflow > Templates.
- Double-click the New Quick Request [840], New Quick Task (Child) [841], or Recurrent Task [806] Template. The Ticket Template dialog box opens. Note that the Form tab is available.
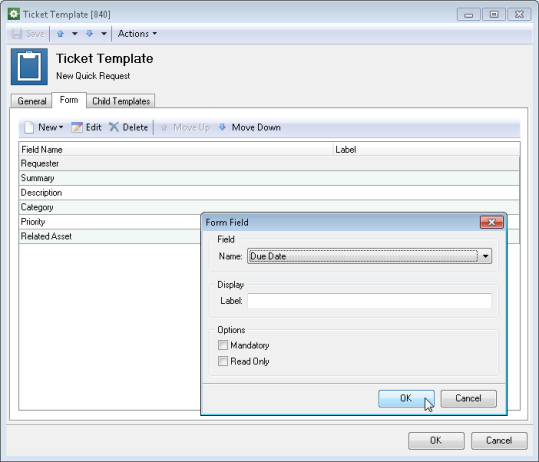
- Click the Form tab and review the default Create Ticket Form. If you want to add a new field to the Form, proceed as follows:
- Click New. The Form Field dialog box opens.

Adding an UDF to the “New Quick Request” Form
- Select a field name from the Name list.
- Type a field label in the Label field. If you want to use the default label, leave the Label field blank.
- To make the field either mandatory or read-only, select corresponding check boxes under Options.
- Click OK.
Repeat these steps to define all fields you want to appear on the Form. If you want to remove a field from the Form, select it and click Delete.
- Click New. The Form Field dialog box opens.
- If you want to group fields in a section:
- Select the field under which you want to add a section separator and click Add > Section. The Section dialog box opens.
- Type a section caption. To create a section with no caption, leave the Section field empty.
- Click OK.
Repeat these steps to add other sections. Each section includes fields between its separator and the next separator.
- If you want to add text or a hyperlink:
- Click the element (a separator or a field) under which you want the text or hyperlink to appear and click Add > Text. The Text dialog box opens.
- Type your text. To insert dynamic values, click Insert Placeholder and select a value using the Select Placeholder dialog box.
INFO: For details, see Inserting Placeholders.
- If you want this text to become a hyperlink, type the full path for the hyperlink in the URL field. To insert dynamic values, click the ellipsis button and select a value using the Select Placeholder dialog box.
NOTE: The Desktop App supports hyperlinks of all popular types, such as http, https, ftp, ftps, mailto, file, skype, etc. The Web App, Self Service Portal, and the Mobile App support only these types of hyperlinks: http and https, ftp and ftps, and file (in Google Chrome, links to local files are disabled).
- Click OK.
- If you want to change the display order of Form elements (fields, section separators, or text), use the Move Up and Move Down buttons.
NOTE: You can copy section separators or text elements using the Copy and Paste commands from the pop-up menu.
- When done, click OK.
NOTE: You can also customize other Template properties. For example, you can switch to the General tab and change the Template definition to specify how to initialize Ticket’s properties, particularly those that will not be visible on the Form. For details, see Creating Templates.