Administration Guide
Creating Escalation Policies
To create a new Escalation Policy for Ticket, Change Request or Approval Request, follow the instructions below.
INFO: For information on Business Policies, see Business Policies.
- From the Sidebar, navigate to Customization > Service Desk > Objects > Workflow > Business Policies.
- Click New > Escalation. The Object Escalation dialog box opens.
- In the Name field, type the policy name.
- Optional: Enter a description in the Description field.
NOTE: Keep the Enabled check box selected. Otherwise, this policy will not fire.
- Under When, specify your condition for the escalation. Escalation conditions consist of 2 parts:
- Time interval rules— here you specify matching criteria that involve time calculations to identify a subset of objects that fall within a particular time frame. For example, Tickets with only one hour left before their Due Date.
- Value based matching rules— here you specify matching criteria that allow you to compare field values with a specific constant or with a macro. This section is optional, it can be turned off.
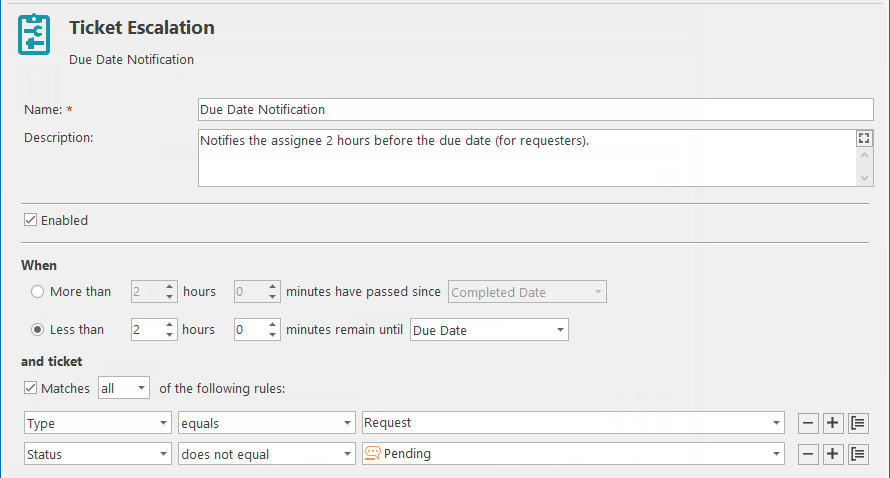
- Select one of the following options for checking the state of a Object's date field:
- To escalate the Object after a period of time past a certain date, click More than [Time] have passed since [Date] and specify the time interval and the Object’s date field.
- To escalate the Object within a period of time before a certain date, click Less than [Time] remain until [Date] and specify the time interval and the Object’s date field.
- If you want to specify a condition based on Ticket fields' values, select the check box next to Matches [all/any] of the following rules. This enables you to add rules and specify the logic for connecting them (all or any), if you are going to create more than one rule.
- Select a Object field or a macrowhose value should be checked.
- Select the operator. The field type determines what operators will be available. Some operators let you compare the chosen field's value to another value (such as: equals, is less than, is covered by calendar, etc.), others simply check the field's value (such as: is not blank, is unique, etc.).
- If you chose a comparison operator, specify the value to compare the field's value with.
To add another rule, click the plus button and repeat the steps above. To remove a rule, click the minus button next to the rule.
- If you want to add a new group of rules, click the ellipsis button. A new line with the default all logic operator appears. To apply the any logic, select any from the list.
Repeat steps Creating Escalation Policies-Creating Escalation Policies to add other rules to the group as needed.
- Under Then, specify how to update Object fields when the condition becomes true and the Object is escalated. The policy can update the following fields: Assignee, Status, Priority.
- If you want to generate a notification when the Ticket is escalated, select the Send e-mail notification check box. The E-mail Notification dialog box opens up.
INFO: For instructions, see Customizing E-mail Notifications.
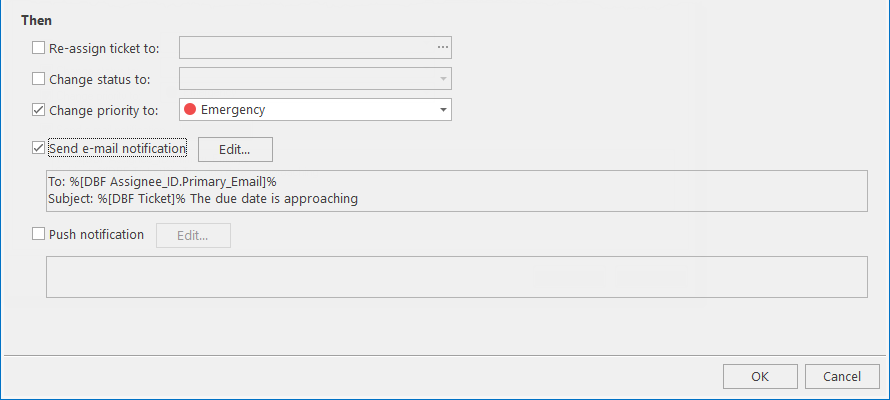
- If you want to generate a Push notification when the Ticket is escalated, select the Push notification check box. The Push Notification dialog box opens up.
INFO: For instructions, see Customizing Push Notifications.
- Click OK.