Configuring Alloy Discovery Synchronization Settings
Updated in 2023.1
This article describes how to configure Alloy Discovery Synchronization.
To configure an Alloy Discovery Synchronization job:
-
From the Sidebar, navigate to Services > Alloy Discovery Integration > Synchronization and click New. The Alloy Discovery Synchronization dialog box appears.
-
Leave the default job name or enter a different one in the Name field. If you plan to have more than one Alloy Discovery Synchronization jobs, you should assign distinctive names to each job.
-
Under Alloy Discovery Database, provide connection information.
INFO: For details, see Connection information for Alloy Discovery Synchronization.
-
If the Alloy Discovery database resides on the same SQL Server instance as the Alloy Navigator database, click The Automation Server database connection.
-
If the Alloy Discovery database resides on a different SQL Server instance, click This access key, click Import Key, and then select the desired database from the Database list.
TIP: For details on the Access Key Import window, see Installation Guide: Importing the Database Access Key.
INFO: For details, see Connection information for Alloy Discovery Synchronization.
-
-
Click Test Account Settings to make sure the Automation Server can run as specified.
-
If you want to customize the default schedule, click Change under Schedule and specify a new job schedule. You can set the occurrence (daily, weekly, monthly, or yearly), daily frequency, and duration (start and end date).
-
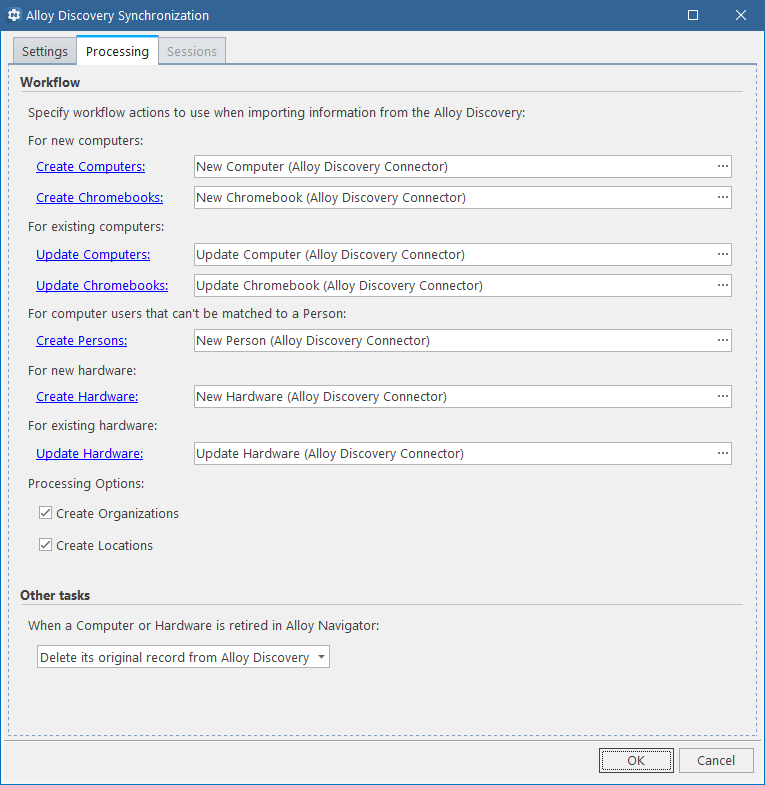
Switch to the Processing tab and specify how the Alloy Discovery Synchronization job should create and update Alloy Navigator objects.
-
Under Workflow, choose Service Actions for the Alloy Discovery Connector. We recommend that you use default actions having (Alloy Discovery Connector) in their name.
-
Specify a Service Action for creating Computers: Click the ellipsis button in the Create Computers field, select the Create Service Action for the Alloy Discovery Connector, and click OK. We recommend that you use the default "New Computer (Alloy Discovery Connector)" Action #2269.
-
Specify a Service Action for creating Chromebooks: Click the ellipsis button in the Create Chromebooks field, select the Create Service Action for the Alloy Discovery Connector, and click OK. We recommend that you use the default "New Chromebook (Alloy Discovery Connector)" Action #2266.
-
Specify a Service Action for updating existing Computers with audit data from AD8: Click the ellipsis button in the Update Computers field, select the Update Service Task for the Alloy Discovery Connector, and click OK. We recommend that you use the default "Update Computer (Alloy Discovery Connector)" Action #2270.
-
Specify a Service Action for updating existing Chromebooks with audit data from AD8: Click the ellipsis button in the Update Chromebooks field, select the Update Service Task for the Alloy Discovery Connector, and click OK. We recommend that you use the default "Update Chromebook (Alloy Discovery Connector)" Action #2267.
-
Specify a Service Action for creating Persons for computer users that cannot be matched to a Person in Alloy Navigator: Click the ellipsis button in the Create Persons field, select the Create Service Action for the Alloy Discovery Connector, and click OK. We recommend that you use the default "New Person (Alloy Discovery Connector)" Action #2268.
-
Specify a Service Action for creating Hardware: Click the ellipsis button in the Create Hardware field, select the Create Service Action for the Alloy Discovery Connector, and click OK. We recommend that you use the default "New Hardware (Alloy Discovery Connector)" Action #834.
-
Specify a Service Action for updating existing Hardware with audit data from Alloy Discovery: Click the ellipsis button in the Update Hardware field, select the Update Service Task for the Alloy Discovery Connector, and click OK. We recommend that you choose the default, ready-to-use "Update Hardware (Alloy Discovery Connector)" Action #800.
-
Under Processing Options, specify whether the job will also create Organizations and Locations for Person records:
-
To automatically create Organizations that are referenced by Persons records, select the Create Organizations check box.
Selecting this check box sets the "Create Organizations" system macro to True. This macro is used in Service Actions for creating and updating records. The default "New Person (Alloy Discovery Connector)" Action #2268 uses this macro to trigger a special Function. The Function creates Organizations for new Persons, when corresponding records have non-blank "Company" and "Department" attributes in the Alloy Discovery database. Default System Actions for creating and updating Chromebooks also use this macro to create Organizations.
INFO: For details on system macros, see System Macros. For information on conditional workflow operations, see Building Conditional Statements.
-
To automatically create Locations that are referenced by Persons records, select the Create Locations check box.
Selecting this check box sets the "Create Locations" system macro to True. Default Service Actions for the Alloy Discovery Connector use this macro in the same way as they use the "Create Organizations"macro described above, in the previous Step.
-
-
-
Under Other Tasks, choose what action to perform in Alloy Discovery when a Computer, Chromebook, or Hardware is retired in Alloy Navigator. By default, its original record is deleted from Alloy Discovery.
IMPORTANT: If you chose to keep original records of retired Computers and Hardware in Alloy Discovery, make sure to delete them manually. Otherwise, you may accidentally exceed the audit node limit of your Alloy Discovery license.
-
-
Click OK.