Adding E-mail Audit Sources
To add an E-mail audit source to a Site, follow these steps:
INFO: E-mail audit sources serve for the Remote Audit with e-mail delivery. For details, see Overview of Audit Methods.
-
In the Sidebar, right-click the Site and select Properties from the pop-up menu. The Site [Site Name] dialog box opens.
-
Click New > E-mail. The [Source Name] dialog box opens.
-
Type in a name for the Audit Source.
-
Select an Audit Profile for the Audit Source from the Audit Profile list.
INFO: For details, see Configuring Audit Profiles.
-
Click the E-mail tab and specify the e-mail address where to deliver audit snapshots over e-mail.
Some mail servers may reject messages with a blank "From" address. You can specify the "From" address that will appear on these e-mail messages.
- Click the Incoming Mail Server tab and configure the settings for the mail server that you want to handle the incoming audit results:
Choose the account type for incoming mail: POP3 or IMAP4.
Enter the name and port number of your incoming mail server.
For IMAP4:
In the Mail Box field, type in the name of the incoming mailbox folder. For IMAP accounts, the default is INBOX. You can specify a subfolder, for example, INBOX.Audit.
Enter the user name and password to connect to the mail server.
If your mail server requires Security Password Authentication, select the Require Secure Password Authentication (SPA) check box.
- In the Secure Connection section, select one of the following options:
None — This establishes an insecure (plain text) connection.
STARTTLS, if available — This establishes a secure connection using the STARTTLS extension if it is supported by the mail server. If the server does not support STARTTLS, an insecure connection is established.
STARTTLS — The audit agent will attempt to establish a secure connection using the STARTTLS extension. If the mail server does not support STARTTLS, a connection is not established.
SSL/TLS — The audit agent will attempt to establish a secure connection. If the mail server does not support SSL/TLS, a connection is not established.
To prevent communication with e-mail servers using an invalid certificate, select the Reject invalid certificates check box.
Click Test Connection to verify if
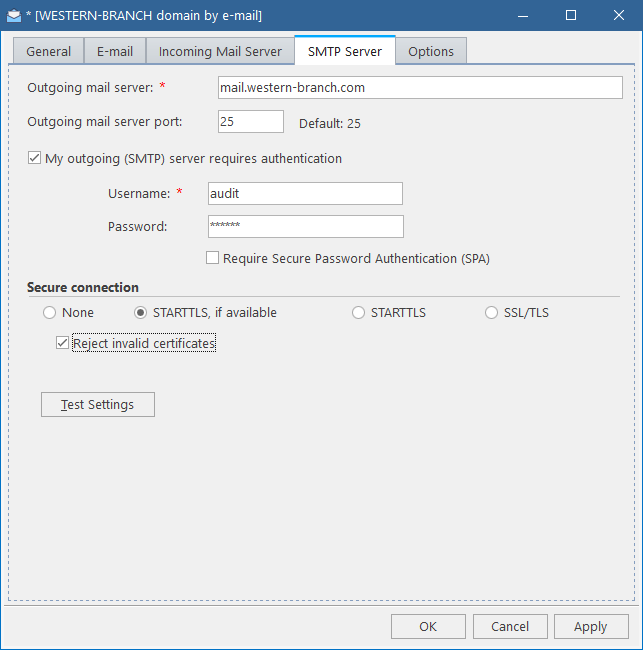
- Click the SMTP Server tab and configure the settings for the outgoing SMTP server, which the Inventory Analyzer will use for sending the audit results:
Enter the name and port number of the SMTP mail server that the audit agent will use.
If the SMTP server requires users to authenticate, select the My outgoing (SMTP) server requires authentication check box and provide a valid the user name and password.
If the SMTP server requires Security Password Authentication, select the Require Secure Password Authentication (SPA) check box.
- In the Secure Connection section, select one of the following options:
None— This establishes an insecure (plain text) connection.
STARTTLS, if available — This establishes a secure connection using the STARTTLS extension if it is supported by the mail server. If the server does not support STARTTLS, an insecure connection is established.
STARTTLS — The audit agent will attempt to establish a secure connection using the STARTTLS extension. If the mail server does not support STARTTLS, a connection is not established.
SSL/TLS — The audit agent will attempt to establish a secure connection. If the mail server does not support SSL/TLS, a connection is not established.
If you want to prevent communication with e-mail servers using an invalid certificate, select the Reject invalid certificates check box.
To check the outgoing mail server connection, click Test Settings.
-
If you are using an IMAP account for incoming mail:
By default,
-
By default,
-
Click Apply to save the Audit Source and go back to the General tab.
- Choose how to deliver the audit agent to the computers you want audited. You can use any or both of these options:
Create an installer and install the audit agent on every computer.
To create the installer right now, optionally change the default agent schedule, click Create Installer, and choose where to save your
AlloyAuditAgent.msifile.TIP: You can skip this step now and create the installer later. For details, see Installing the Audit Agent for E-mail Delivery.
Create an Inventory Analyzer package, deploy it to remote networks, and automate the audit using domain logon scripts or scheduled tasks.
To build the Inventory Analyzer package right now, click Create Package and browse to the destination folder.
TIP: You can skip this step now and build the package later. For details, see Deploying Inventory Analyzer Package for E-mail Delivery.
-
Click OK to close the [Source Name] dialog box. The E-mail Audit Source appears in the list of Site sources.
NOTE: When your E-mail Audit Source is configured successfully, the e-mail folder icon
 appears next to its name. If the
 is shown.