Creating Audit Profiles
To create an Audit Profile, follow these steps:
- Select Audit > Audit Settings from the main menu. The Audit Settings dialog box opens.
- Click New in the Audit Profiles section to bring up the Audit Profile dialog box.
- In the Inventory Options section, under Software Discovery, specify whether you want to discover installed software, and how to perform this discovery:
- If you want to collect only hardware inventory and you are not interested in information about installed software products, click No software discovery.
- If you want to collect software information as well, select one of these options:
- To discover only software applications that are known to the Operating System, click Discover installed software.
INFO: For details, see Audit Profile Options.
- To collect information about known software applications, all files on the local hard drive, and software products using File Condition Rules, click Discover installed software and recognize software in files.
IMPORTANT: In order to use this option, you must add Software Product records to the Software Catalog and configure recognition conditions based on information from files. For details, see Adding Software Products to Software Catalog.
NOTE: This option is only applicable for Windows computers; when auditing Linux and Mac computers it is ignored.
- To discover only software applications that are known to the Operating System, click Discover installed software.
- If you want to scan the registry for specific keys and report their values in audit snapshots, navigate to the Registry Keys section.
IMPORTANT: In order to have the Registry Keys options available, you must first add registry key fields using the Settings app.
- To enable the capture of a particular registry key, select the check box in the Include column. To disable the capture of a key, clear its Include check box.
- To view the capture parameters, double-click the corresponding record.
- If you want to specify options for capturing system Event Log entries, click Event Log in the navigation bar and proceed as follows:
- Keep the Enable Event Log scan check box selected. You can temporarily disable your configured Event Log options by clearing this check box.
- Under Event Categories, select appropriate check boxes to capture records from the following event logs:
- Application Log — This log contains events logged by Windows applications or programs.
- Security Log — This log contains records of login/logout activity or other security-related events specified by the system's audit policy.
- System Log — This log contains events logged by Windows system components.
- DNS Server Log — This log contains events logged by the Windows DNS service, which are associated with resolving DNS names to Internet Protocol (IP) addresses. Available only on computers configured as DNS servers.
- Directory Service Log — This log contains events logged by the Windows directory service. Available only on domain controllers.
- File Replication Service Log — This log contains events logged by the Windows File Replication service during the replication process between domain controllers. Available only on domain controllers.
- Under Event Types, select check boxes corresponding to the types of events you want captured: Error, Warning, Information, Audit Successful, or Audit Failed.
- Under Scope, specify the period length (in days) for which you want the specified Event Log information captured.
NOTE: Specifying a long period can significantly increase the size of audit snapshots and the time required to audit computers and process the audit data.
- If you want to capture only a limited number of most recent events in each of the selected logs, select the Capture only last check box and enter the number of events to capture.
- If you want to capture only events that satisfy certain criteria, select the Enable Filtering check box and define a number of filtering conditions as follows:
- Click New to bring up the Edit Log Event Filter dialog box.
- Define the parameter, operator, and value of the filtering condition. Events can be filtered by the following parameters:
- Source — the source of the event, i.e. the name of a program, a system component, or an individual component of a large program
- Category — the classification of the event, as defined by the event source
- Event ID — the event ID, as defined by the event source
- User — the user name if the event is attributed to a particular user
- Computer — the name of the computer where the event occurred
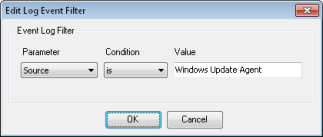
- Click OK.
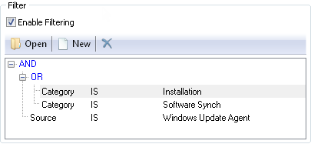
Repeat these steps to create other conditions as needed. All conditions are joined by AND, meaning that every condition must be satisfied in order for the filtering criteria to result in a match.
You can assign several conditions to a single parameter as follows:
- When you add a new condition with the "is" operator, the resulting logical expression for those two conditions becomes joined by OR, which means a positive match is detected if any of the specified conditions is satisfied.
- When you add a new condition with the "is not" operator, the resulting logical expression for those two conditions becomes joined by AND.
The screenshot illustrates an example of the filtering criteria for capturing Event Log events:
Source IS Windows Update Agent AND (Category IS Installation OR Category IS Software Synch)
- If you want to search for specific files or collect volume statistic on specific file types, click File Scan in the navigation bar, clear the Disable the File Scan globally check box, and follow the instructions.
NOTE: Since the hard disk scan may take a significant amount of time to run, the file scan is disabled by default.
- On the Files tab, specify the file types to scan and the level of detail you want.
The following options of the file scan can be configured independently:
- The Detailed Scan collects physical characteristics as well as the file version properties of individual files that match the search mask:
- Computer Name — the name of the computer where the file was detected
- User — the name of the user
- File Name — the file name
- Publisher — the name of the company that produced the file
- Product Name — the name of the product with which the file is distributed
- Product Version — the version number of the product with which the file is distributed
- Path — the full path to the file on the hard drive
- Size — the size of the file in bytes
- File Version — the version number of the file
- Description — the file description
- Date — the date and time when the file was last modified
- The Summary Scan produces pre-folder volume statistics for all files that match the search mask, broken down by folder location.
NOTE: We recommend that you use the Detailed Scan only for executable files, such as .exe, .dll, .sys, or .com. The Detailed Scan of other file types typically produces no useful information. It will also dramatically increases the size of audit snapshots.
- To add a common file type (executable, graphic, multimedia, or archive files), click Add > [File Group] and then either select All [File Group] to add all file types from the group or select an individual file mask.
By default, a newly-added file mask has the Detailed Scan option enabled. To change it, double-click the mask, select the option as needed, and click OK. The default Audit Profile also includes pre-configured Detailed Scan for *.EXE file mask. To delete it, select the file mask and click the Delete button.
- To add a custom file mask or a specific file name, click Add > New, type in the file name in the File Mask field. Next, specify the scan detail level you want by selecting the Summary Scan and/or Detailed Scan check boxes, and click OK.
NOTE: You can use wildcards to define a file mask: the asterisk (*) substitutes for any number of characters, the question mark (?) substitutes for any single character.
- To add a common file type (executable, graphic, multimedia, or archive files), click Add > [File Group] and then either select All [File Group] to add all file types from the group or select an individual file mask.
- The Detailed Scan collects physical characteristics as well as the file version properties of individual files that match the search mask:
- If you want to exclude certain file groups or files from the file scan, click the Excluded Files tab. The same file mask can be added to both lists — Files and Excluded Files. However, the latter takes precedence over the Files list, which allows you to temporarily exclude certain masks from the scan without modifying the contents of the Files list.
Configure the list of excluded items as follows:
- To exclude files of one of the four predefined groups (executable, graphic, multimedia, or archive files), click Add > [File Group] and then choose either all files of the selected group or a particular file format.
- To exclude a file mask or a specific file from the audit, click Add > New, type a file mask or a file name in the File Mask field, and click OK.
NOTE: You can use wildcards to define a file mask: the asterisk (*) substitutes for any number of characters, the question mark (?) substitutes for any single character.
- If you want to limit the scope of the file scan to particular disk drives or directories, click the Drives/Directories tab, clear the Scan all hard drives check box, and specify the desired scope as follows:
- To add a particular directory or drive, click New, type the full name of a directory or disk drive in the Directory/Drive Name field, and click OK.
You can use environment variables (such as
%WinDir%or%CommonProgramFiles%) to specify pre-defined system directories, or you can enter a full path (such asC:\Program Files\Common Files\).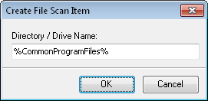
Repeat this step to add other directories or drives as needed.
- To add a particular directory or drive, click New, type the full name of a directory or disk drive in the Directory/Drive Name field, and click OK.
- If you want to exclude certain drives or directories from the file scan, you can do so on the Excluded Directories tab. The same directories can be added to both lists — Drives/Directories and Excluded Directories — however, the latter takes precedence, which allows you to temporarily exclude certain locations from the scan.
There are four predefined locations that are excluded from the file scan by default:
- Windows Directory — The Windows system directory stores system files that are not usually changed and may be excluded from auditing. Depending on the OS you’re running, the system's root directory can be
C:\WindowsorC:\WINNT.If you want to include the Windows system directory in the audit, clear the Skip the Windows folder check box.
- Browser Cache Directory — The Internet browser cache directory stores the contents of many web pages, graphic files, etc. loaded from browsed sites and usually is of little interest.
If you want to include the Internet browser cache directory in the audit, clear the Skip the browser cache directory check box.
- System Volume — The System Volume Information directory is a hidden Windows system folder used by the System Restore tool to store its information and restore points. There is a hidden System Volume Information folder on every partition of the disk.
This data is protected by the system and is excluded from the audit by default. If you want to include the System Volume Information directory in the audit, clear the Skip the System Volume check box.
To exclude a specific directory from the file scan, click New, type in the full name of the directory or the disk name in the Directory/Drive Name field and click OK.
You can use environment variables (such as
%WinDir%or%CommonProgramFiles%) to specify pre-defined system directories, or you can enter the full path. However, the latter method requires that the excluded directory has the same location on all computers you want audited.Repeat this step to exclude other directories as needed.
- Windows Directory — The Windows system directory stores system files that are not usually changed and may be excluded from auditing. Depending on the OS you’re running, the system's root directory can be
- On the Files tab, specify the file types to scan and the level of detail you want.
- If you want to add custom values to the SMBIOS Filter with your custom values, click SMBIOS Filter and follow the instructions.
INFO: For details, see Audit Profile Options.
- To add a new custom value to the SMBIOS Filter, under Add/Edit/Remove Value, type in the value in the text field and click Add.
INFO: The SMBIOS Filter is case-insensitive.
NOTE: You can use the standard wildcards: an asterisk (*) to represent any number of characters, including zero, and the question mark (?) to represent any single character. For example, to filter out both "No Information" and "No Info" values, you can use a single filter rule for "No Info*".
- To modify a custom value, select it, edit the value in the text field , and then click Replace.
- To delete a custom value from the SMBIOS Filter, select it and click Remove.
- To add a new custom value to the SMBIOS Filter, under Add/Edit/Remove Value, type in the value in the text field and click Add.
- If you want to retrieve information about all tasks scheduled on audited computers, you can click Miscellaneous in the navigation bar and select the Scheduled Tasks check box.
INFO: For details, see Miscellaneous.
- If you are configuring an interactive audit, you can click Progress Indicator in the navigation bar and specify whether to show the progress indicator during the audit.
- To enable the progress indicator, select the Show Progress Indicator check box.
- If you want to customize the default greeting text, enter it in the Display Text field.
NOTE: For the interactive audit, the greeting message will appear on the Windows Inventory Analyzer start screen.
NOTE: For non-interactive audit, the greeting message will appear on the Audit Progress dialog box.
- If you are configuring an interactive audit, you can specify interactive controls that are available to the user on the Windows Inventory Analyzer splash screen.
INFO: For details, see Audit Profile Options.
Click Available Controls in the navigation bar and proceed as follows:
- To enable users to cancel the audit session, select the Cancel check box. The Cancel button will appear on the screen.
- To enable users to redirect the output to another folder, select the Save To check box. The Save Snapshot to button will appear on the screen).
IMPORTANT: Enable the Save To option only when the audit is performed manually by technicians — for example, in the Portable Audit scenario — and keep it disabled in all other audit scenarios. For details, see Overview of Audit Methods.
- To prompt users to enter their first and last name, select the Username check box. The First Name and Last Name mandatory fields will appear on the splash screen. However, if the Inventory Analyzer is able to obtain the name of the currently logged on user from the Active Directory, these fields will appear pre-populated and read-only.
- To prompt users to enter their e-mail address, select the E-mail Address check box. The E-mail mandatory field will appear on the splash screen. However, if the Inventory Analyzer is able to obtain the name of the logged on user from the Active Directory, this field will appear pre-populated and read-only.
- If you are configuring an interactive audit, you can navigate to the Custom Input Fields section to prompt users for additional information.
IMPORTANT: In order to have custom input fields available in the Audit Profile, you must first add them using the Settings app.
- Custom fields will appear on the Inventory Analyzer splash screen, in a separate section. The default caption of the section is Additional Information. You can customize the caption as needed in the Custom Input Fields group title field.
- Select check boxes in the Include column for those custom input fields that you want to display. To hide a field, clear its Include check box.
To view the field’s definition, double-click the corresponding record.
- If you are configuring the Network Folder, Remote Audit (FTP delivery), or Remote Audit (e-mail delivery) and want to specify user accounts that should not trigger the audit, click Bypass Rules and proceed as follows:
INFO: For details, see Audit Profile Options.
- To add a user account to the bypass list, type the user name in the text field at the bottom and click Add.
NOTE: You can use the standard wildcards: an asterisk (*) to represent any number of characters, including zero, and the question mark (?) to represent any single character.
Repeat this step to add other user accounts as needed.
- To add a user account to the bypass list, type the user name in the text field at the bottom and click Add.
- Click OK when done. The newly created Audit Profile appears in the list.