Configure Alloy Discovery to Capture Registry Keys
You may need to configure Alloy Discovery to scan Windows computers for specific registry keys and report their values in audit snapshots. To do so, just add a number of registry key fields for Computer records using the Settings app. Registry key fields are special database fields for Computers where Alloy Discovery stores captured registry key values. As soon as you add such a field, Alloy Discovery automatically enables the capture of the target registry key for all your Sites and reports its values after the first audit.
INFO: For details, see Audit Profile Options.
Adding Registry Key Fields
IMPORTANT: When adding registry key fields, you change Alloy Discovery database’s structure. We recommend that no users access the Desktop App at that time.
To add a registry key field, follow the steps below:
- In the Settings app, navigate to General > Fields > Computers.
- Click New > Registry Key Field. The Edit Registry Key dialog box appears.
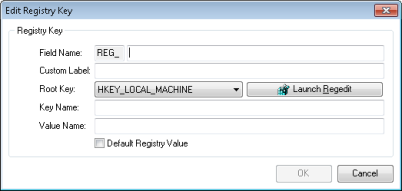
- In the Field Name field, enter a physical name of the field. The name is prefixed with
REG_.IMPORTANT: The field name must be unique.
NOTE: Alloy Discovery allows you to enter in this field English letters, numbers, and low line characters (_). Additionally, you cannot end the name with the
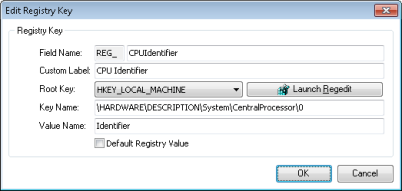
_idsequence. - In the Custom Label field, type in a label for the registry key field where Alloy Discovery will store captured registry key values.
- Specify the exact path to the registry key that you want to capture on Windows computers:
- If the registry on your local computer contains the target key, you can just paste it from your Microsoft Registry Editor as follows:
- Open the Registry Editor. For example, you can just click Launch Regedit in the Edit Registry Key dialog box.
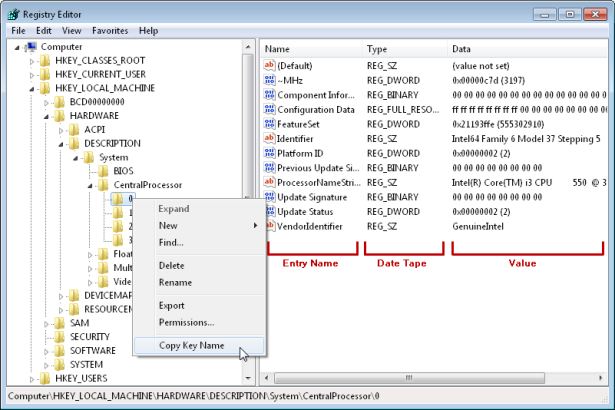
- In the navigation area of the Registry Editor, locate the key to query during the audit, right-click it, and choose Copy Key Name from the context menu.
- Switch to the Edit Registry Key dialog box in Alloy Discovery and paste the copied value into the Key Name field. The value of the Root Key field will be set automatically to match the selected registry hive.
- Open the Registry Editor. For example, you can just click Launch Regedit in the Edit Registry Key dialog box.
- If your local registry does not contain the target key, just enter the exact path to the key in the Key Name field. The best way is to copy and paste it from a reliable source. The value of the Root Key field will be set automatically to match the selected registry hive.
IMPORTANT: Make sure that you enter the exact path to the registry key.
- If the registry on your local computer contains the target key, you can just paste it from your Microsoft Registry Editor as follows:
- Specify the entry to capture:
- To query the default key value, select the Default Registry Value check box.
- To specify a non-default key value, enter it in the Value Name field. The most reliable way is to copy and paste it from the Registry Editor. For example, to copy a value to the clipboard, right-click its name in the Registry Editor, choose Rename from the pop-up menu, press CTRL+C, and then press ESC to exit the replace mode.
IMPORTANT:
The following data types are currently supported:
REG_SZ
REG_DWORD
REG_MULTI_SZ
REG_EXPAND_SZ
REG_DWORD_LITTLE_ENDIAN
NOTE: On 64-bit Windows, registry entries for 32-bit applications are stored under a special registry node Wow6432Node:
HKEY_LOCAL_MACHINE\Software\WOW6432NodeNOTE: If you want to retrieve a 32-bit registry key value from the
HKEY_LOCAL_MACHINE\SOFTWAREsection on 64-bit versions of Windows, make sure to include the Wow6432Node node in your registry path. For example:HKEY_LOCAL_MACHINE\SOFTWARE\WOW6432Node\Adobe\Adobe Bridge CS6\Installer\InstallPathNOTE: If there are both 32-bit and 64-bit versions of Windows in your audit scope, you can use this solution to capture 32-bit application data on both 32-bit and 64-bit versions using the same registry path, because Alloy Discovery automatically removes the Wow6432Node node from the path when running on 32-bit Windows.
- Click OK.
IMPORTANT: For your changes to take effect, you and other users must restart the Desktop App.
By default, Alloy Discovery automatically includes your newly added registry key field in all audit profiles and will capture this key on all Windows computers in all your Sites. If you do not want to capture this registry key in a particular profile, you must review this profile and disable the registry key field in the profile’s Inventory Options section.
INFO:
Captured registry key values will be available in the Alloy Discovery database after the first audit with enabled registry key capture.
NOTE: By default, registry key fields are not included in any grid views for Computers. To show the column in a particular view you should modify the view configuration and add registry key fields as needed.
Modifying Parameters of Registry Key Capture
To modify the parameters of a registry key capture, follow these steps:
- In the Settings app, navigate to General > Fields > Computers.
- All registry key fields are listed in their own Registry Key Fields section. Click the section name to expand it and double-click the desired field.
- Modify the capture parameters as needed.
- Click OK.
IMPORTANT: For your changes to take effect, you and other users must restart the Desktop App.
Deleting Registry Key Fields
-
-
NOTE: When you delete a registry key field, capture of this field will be deleted from all associated audit profiles.
IMPORTANT: For your changes to take effect, you and other users must restart the Desktop App.