Managing your IT inventory
This article explains in detail how to manage your IT inventory in AlloyScan. Learn how to scan your network and audit IT assets on a regular basis, subscribe to important notifications, and generate reports to gain valuable insights into your network.
The Inventory section provides a number of pre-configured groups that allow you to organize the assets at your convenience. The structure is easily customizable: you can create additional groups with custom criteria as needed.
As soon as a device is added to the inventory, you can schedule its regular audits.
With AlloyScan you can run various reports and subscribe to smart notifications for essential alerts.
Computer detail form
The computer details form provides a thorough overview of each computer in the network. It's organized into four tabs, each offering specific types of information.
-
The General tab gives a snapshot of the computer, including basic information like the computer's name, user, and operating system.
-
In the Details tab, you'll find more in-depth data such as hardware specifications, installed software, and network settings.
-
The Audit tab records information about previous audits and allows creating an audit schedule.
-
The Change History tab is a dynamic record of all changes made to the computer's configuration over time, including hardware changes, software updates, and adjustments in system settings.
For more information refer to Collected data overview.
Scheduling audits
IT assets need to be audited on a regular basis in order to reveal technical concerns, security risks, configuration changes, and any other issues that may require attention. The Inventory section allows you to schedule regular audits for any device.
To create a new schedule:
-
Open the Inventory section.
-
Navigate to a device group.
-
Select the device(s) for which you want to create an audit schedule. To include all the devices in the current group or sub-group, check the box in the leftmost column's header.
-
Click
 . The Schedule List window is displayed.
 -
Click
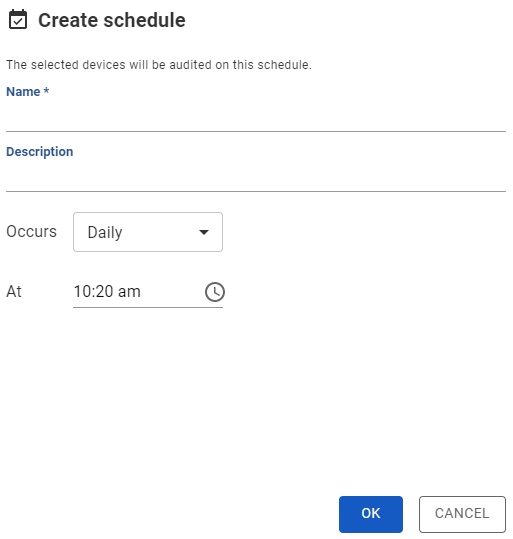
 . The Create schedule dialog is displayed:

-
Configure your schedule:
-
Provide a meaningful Name and an optional Description of the new schedule.
-
Using the Occurs list, choose an audit periodicity: Daily, Weekly, or Monthly. Then specify the additional options. These options change based on the selected periodicity. For example, for a weekly job, specify on which days of the week to run the audit.
-
Under At specify the exact time when the audit should be launched.
-
-
Click OK. The newly created schedule is added to the Schedule List.
Scheduling audits per device
To streamline audit scheduling, a policy has been established that limits each device to a single audit schedule. This setup is managed in the Audit tab of the device details pane, in the Audit schedule section. Here's how it works:
-
Click the Assign schedule button to link an existing schedule to a device or to create a new one. Once a schedule is linked to a device, it's displayed as an interactive link.
-
Clicking this link reveals a table that enumerates all available schedules. The table is organized into three columns:
-
Schedule: Displays the name of each schedule.
-
Devices: Lists all devices associated with that schedule, along with the timestamp of their most recent audit.
-
Edit: Offers options to reassign a different schedule to the device or to modify the current schedule.
-
Additionally, there's an option to Unassign schedule if you prefer to temporarily remove the device from any audit schedule.
Subscribing to alert notifications
To be timely informed of various events, you need to subscribe to alert notifications. The templates for these notifications are configured in the Admin Center, under Notification > Notification templates.
To subscribe to an alert notification:
-
Click
 next to your name in the top-right corner of the main screen. The Notifications pane is displayed.
 -
In the Notifications pane, click
 Manage alert subscriptions at the top. The Alert subscriptions section opens. This section lists all the standard and custom notifications available.
 -
Click on a notification you want to subscribe to.
-
In the dialog that opens select the appropriate delivery channels: Web browser or Email or both. Web browser notifications will appear as pop-up messages in your web browser. Email notifications will be sent to your email address.
Generating reports
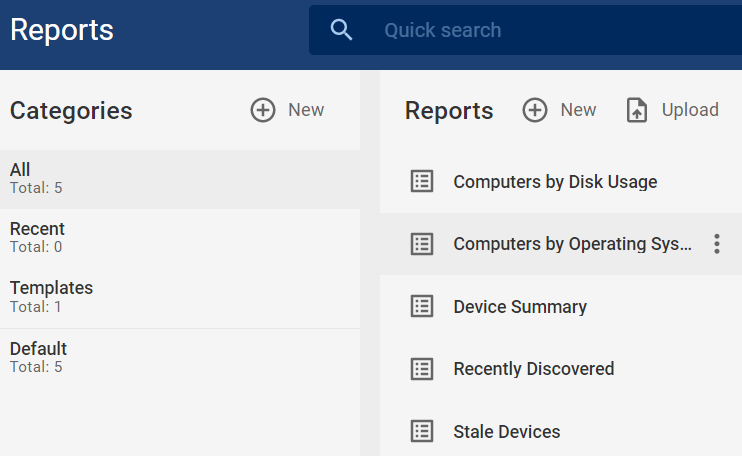
The Reports section enables you to generate various reports in your preferred format.

When you open the Reports section for the first time, only a number of out-of-the-box reports are available. All of them are based on the same template and grouped into the Default category.
You can customize the existing reports, create new ones, and organize them at your convenience by adding new categories. You can also add an external report by uploading a previously exported report file.
Each report that you modify or create can be defined as a template, so that more reports with similar characteristics can be created from it.