Identity and access management
This article describes how administrators can control user access to AlloyScan resources using the Admin Center. Learn how to create user accounts, register external apps, configure Single Sign-On (SSO), and ensure secure, controlled user identity management.
Users
The Users page under My Organization > Identity and access management provides an interface for administrators to create, modify, and delete user accounts. The primary purpose of this section is to ensure that users have the appropriate access to the resources necessary to perform their jobs, while also maintaining the security of the system.
Creating a new user account
Creating a new account is a simple process that involves providing basic user information, activating the account, and setting a password.
To create a new account:
-
Click New Account.
-
In the side panel that appears, provide the required information: user's full name, role (Admin or User), and email address. The user will sign in using their email address.
INFO: For detailed information about permissions granted by different roles, see User and admin permissions.
-
To activate the new account, check the Active check box to activate the new account. If the Active check box is not selected, the new account will be created, but the user will not be able to log in until an administrator marks the account as Active.
Leaving an account inactive is useful if the account activation needs to be delayed. For example, when the user is starting their job in several weeks, the administrator may create the account and leave it inactive until the user is ready to begin. This can help streamline the onboarding process and ensure that the user has access to the resources they need when they begin working.
-
Enter a password for the new account in the Password field and confirm it in the Confirm Password field.
-
Optionally, upload a user avatar by dragging and dropping an image file or clicking to browse and select an image.
-
Click OK to finish. Once the account is created, AlloyScan sends a verification email to the new user.
The new user should then check their email inbox and click on the verification link provided in the email. This redirects the new user to the platform, where they are prompted to enter and confirm a new password.
Viewing user details
Clicking on a user’s name on the Users page opens a sliding pane with two tabs: General and Subscriptions.
-
The General tab allows administrators to manage user details, including updating the full name, selecting a role, and verifying the email. It also provides options to reset the user’s password and upload or update a profile picture.
-
The Subscriptions tab displays the notifications the user is subscribed to and the selected delivery channel, email or web. Clicking on a notification opens a Subscription details dialog showing the notification name, user name, and the selected delivery channel (Web browser or Email). To change the delivery channel, select the required option and click Save.
Administrators can also track and manage user subscriptions in the Notifications > Subscriptions section that provides a clear view of who is subscribed to each notification (see Subscriptions for more details).
App registrations
The App registrations page under My Organization > Identity and access management is used to register external applications that will interact with AlloyScan and manage the access of these applications to the resources within AlloyScan.
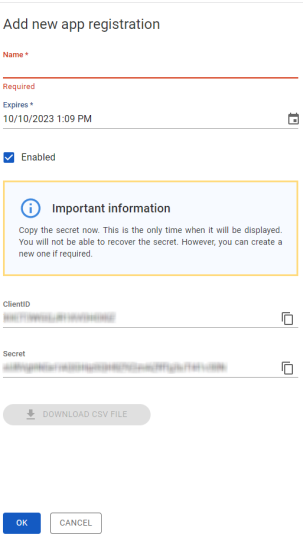
When an administrator registers a new application, they can configure parameters such as the application's name, expiry date, client ID, and secret. These parameters are used to identify the application and to establish a secure connection between the application and AlloyScan.
To register a new application:
-
On the App registrations page click
 . The Add new app registration sliding pane is displayed.
-
Provide the following parameters:
-
Name: The application's unique identifier within AlloyScan.
-
Expires: The expiration date for the application's access. This ensures that the application's access to AlloyScan will be automatically revoked after a certain period of time for security reasons.
-
Enabled: Select this check box to immediately make the new registration operational (default). If the Enabled check box is not selected, the new application will be registered, but the integration will remain disabled until an administrator selects the Enabled check box.
-
The ClientID and Secret parameters are generated automatically when the application is registered. ClientID is used by the application to authenticate with AlloyScan and to request access to resources. The Secret parameter is a key that is only known to the application and AlloyScan and is used to establish a secure connection between the two.
In addition to configuring these parameters, administrators can also download a CSV file that contains information about the registered applications.
SSO providers
To enhance both security and user convenience, Single Sign-On (SSO) allows users to log in using their existing accounts from trusted providers, such as Microsoft or Google.
NOTE: This feature must be activated by our development team for your specific site before it can be configured by site administrators. Please contact your support representative to request activation.
To configure SSO, proceed as follows:
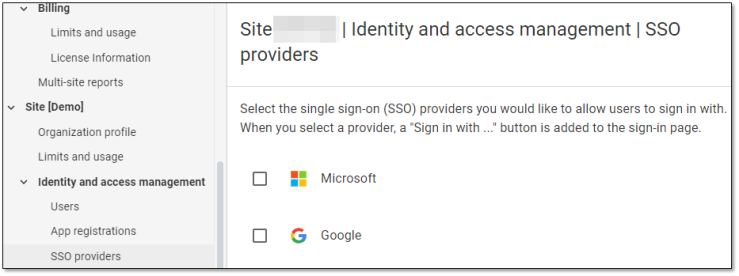
- In the Admin Center, navigate to Identity and Access Management.
- Open the SSO providers page.

- Enable one or both providers by selecting the checkboxes next to Microsoft and/or Google. If both options are selected, users will be able to choose between signing in with Microsoft or Google when accessing the site.