Customizing detail form layouts
Introduced in 2023.2
When you open an object record, such as
This article focuses on the structure of forms. To adjust how elements are displayed (for example, column widths), see Customizing detail form styles.
System layouts
Alloy Navigator comes with system layouts, one for each object class. All objects' detail forms employ these system layouts by default. They also serve as a safety backup, allowing you to easily revert any changes back to the system defaults.
System layouts are immutable and cannot be modified or deleted; they consistently exist within the system.
Custom form layouts
System form layouts are a good fit for most scenarios. However, there might be certain situations where you would want to customize them. You have the flexibility to relocate fields, introduce new sections and tabs, mark some fields as mandatory or read-only, or eliminate unused UI elements. A common use case is strategically placing user-defined fields in a more visible and logical location.
TIP: 
In order to customize a form layout, you first need to create a custom layout, make sure that everything works as expected, and then set your custom layout as default to apply your changes.
To create a custom form layout for an object class:
-
In the Admin Center, go to form layouts for the target object class: Workflow and Business Logic > [Object class]. Note the "System" layout; it is the system layout we discussed earlier.
-
Click the plus button to create a new layout. Your new layout is a copy of the system one.
-
Make the required changes. For the JSON structure description, see Form layout format.
TIP: You can always revert your changes by restoring the default settings in the System layout.
-
Preview the new layout by making sure that schema and skeleton look as expected.
-
Save your custom layout.
-
Set the custom layout as Default to apply the changes.
You can export your custom layouts as JSON files. You can import external layout definitions, provided they match the proper application version. and object class. Please find a detailed description of the form layout format below.
Examples
Moving a field
You can move a field from one panel to another panel or tab by following the procedure described below.
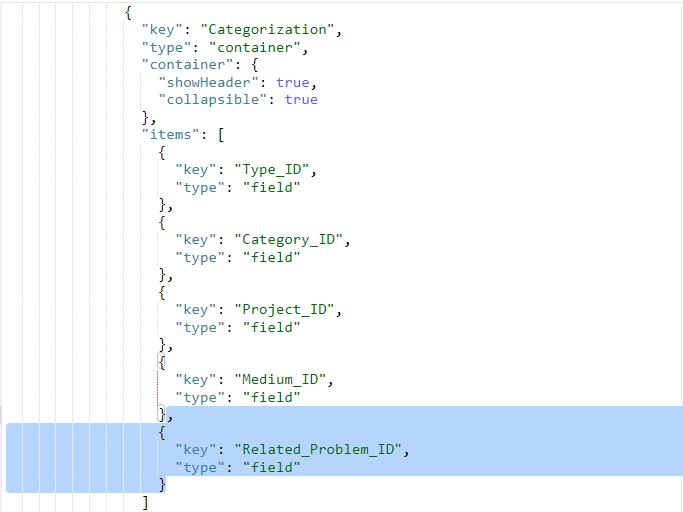
Let's suppose you need to move the Related
-
Locate the Related
keyrefers to the field name, whiletypedenotes the element type. -
Select the element as shown below:
{
"key": "Related_Problem_ID",
"type": "field"
}

-
Cut the selected element from the layout.
-
Paste the selection into the desired position in the
itemslist of the targetCategorizationcontainer.
- Save the layout.
Removing an element
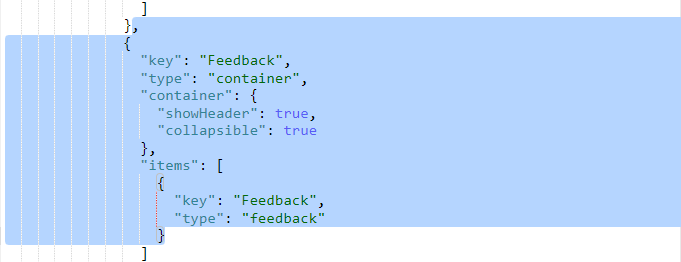
Now let's remove an entire element from the detail form for
-
Locate the element by its key in JSON.
-
Select the element with all its attributes as shown in the example below:
-
Delete the selected code.
-
Save the layout to apply the changes.
Moving a user-defined field (UDF) to a custom location
By default, user-defined fields appear either on the Custom Data tab or in the Custom Data panel on the General tab. If you want to move your UDF to a custom location, so that it is easily visible, follow these steps.
-
Identify the name of your UDF. Typically, the name consists of the field label with the
UDF_prefix. In our example, the field name isUDF_Test.TIP: You can check the field name in the Settings App: Go to
-
Identify the desired location within the layout where you want to place the UDF field. In our example, we will add the UDF to the Details panel on the General tab.
-
Insert the following JSON code snippet into the target location in the layout:
,
{
	"key": "UDF_Test",
	"type": "field"
}
For example, see how we've added our
UDF_Testfield to the Details panel on the General tab.
- Save the layout to apply the changes.
NOTE: After you move a UDF field to a custom location, it will no longer appear in its default location.
Adding a tab with a user-defined field (UDF)
You can create a separate tab for a user-defined field (UDF) when you want the field to be more prominent or keep it separate from other information on the form.
Before adding the tab, make sure that the required UDF exists for the respective object class. You can check it in the Admin Center, in either of these locations:
-
General > Fields > [Object Class]
-
Workflow and Business Logic > [Object Class] > Fields
If the required UDF does not exist, create it as described here.
IMPORTANT: The UDF field name must be used as the key of the field element in the layout definition. The value of the UDF's Field Label parameter will be displayed as the placeholder on the form.
Add a new tab element to the form layout and include the UDF in its items list.
{
	"key": "udf",
	"type": "tab",
	"component": "layout",
	"items": [
		{
			"key": "UDF_string",
			"type": "field"
		}
	]
},
For clearer visual separation, it is good practice to place the UDF inside a container. The container presents the field against a grey background, making it easier to distinguish from other content on the tab.
For example:
{
	"key": "udf",
	"type": "tab",
	"component": "layout",
	"items": [
	  {
		"key": "any",
		"type": "container",
		"items": [
			{
			  "key": "UDF_string",
			  "type": "field"
			}
		  ]
		}
	]
},
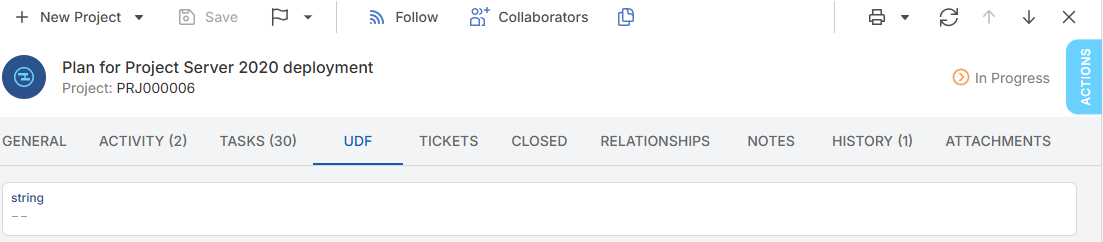
Save the layout. The new tab appears on the detail form and displays the UDF.
NOTE: A UDF can be included only once in the same form layout. When you explicitly place a UDF on a custom tab or elsewhere in the layout, it is no longer displayed by the built-in Custom Data component. If you later remove it from the custom location without placing it elsewhere, it appears in Custom Data again.
Adding a tab with a filtered data view
You can create an additional tab based on an existing system data view and apply a fixed filter to it. This is useful when you want to display different subsets of the same related records on separate tabs.
For example, suppose a Project form has a Tickets tab that displays all tickets related to the project. You can create another tab called Closed that is based on the same data view but displays only closed tickets. To do it, proceed as follows:
-
Locate the existing Tickets tab definition in JSON.
-
Duplicate the entire tab definition, keeping the original
key.If you replace
keywith an unsupported value and try to save the layout, the editor warns that the layout definition may not be valid and suggests usingcaptioninstead. -
To change the tab name, use
captionproperty. In this example,"caption": "Closed"changes the displayed tab name without changing the key., { "key": "Tickets", "caption": "Closed", "type": "tab", "customMarking": true, "component": "layout" } -
Add the
filterproperty to the copied data view. The filter value is a string expression. The layout editor does not provide IntelliSense for this property, so it does not suggest fields, operators, or values as you enter the expression.The specified filter is applied in addition to the filter already defined for the original system data view. In this example, the data view continues to display only tickets related to the current project and further limits the results to tickets whose status is Closed.
, { "key": "Tickets", "caption": "Closed", "type": "tab", "customMarking": true, "component": "layout", "items": [ { "key": "ProjectTicketList", "type": "grid", "filter": "[Status] = 'Closed'" } - Save the layout to see the changes.
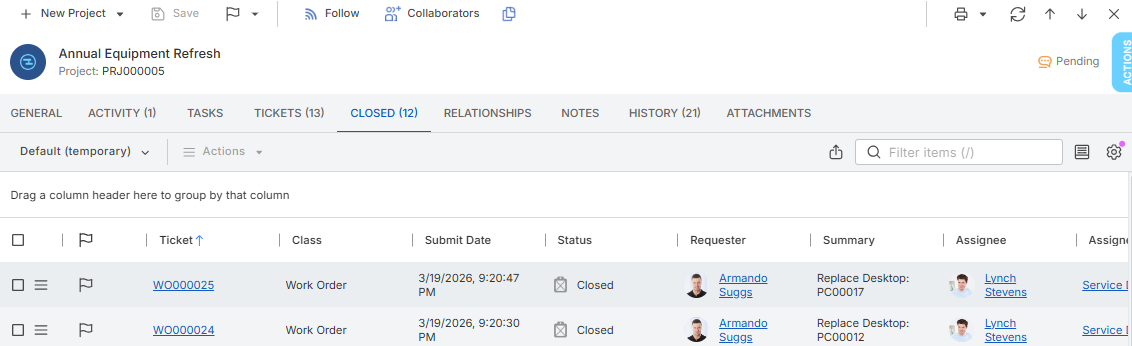
If you reopen the layout, you'll notice that Alloy Navigator automatically added a uniqueId to the copied data view. Do not add or modify uniqueId manually. The generated uniqueId gives the copied data view its own view configuration. You can customize the new data view independently without affecting the original one.
For example, you can remove a column from the Closed data view while keeping that column visible on the original Tickets tab. You can also configure other view settings, such as column order and sorting, independently.
The fixed filter, however, is an exception: you cannot change it in Customize View > Filter. To change this filter, edit the filter property in the form layout definition.