Microsoft AI Foundry integration
Introduced in 2024.2
Updated in 2026.1
This article explains how to integrate Alloy Navigator with Microsoft AI Foundry (formerly Azure OpenAI Service). AI integration enables AI-powered features in Alloy Navigator, helping IT specialists and end users work more efficiently. Available features include AI writing assistance, AI-generated suggestions, flexible workflow AI actions, and the AI Assistant for end users in the Self Service Portal.
INFO: For details on AI features, see Admin Center Help: AI capabilities.
The integration process includes creating Azure AI resources, deploying AI models, and configuring to use them. Some steps are performed in your Azure AI Foundry workspace, while others are completed in Alloy Navigator.
In your Azure AI Foundry workspace:
- Step 1: Create Azure Foundry resources
- Step 2: Deploy AI models
- Step 3: Find your Azure AI credentials
In your Alloy Navigator:
After completing these steps, review the final checklist:
Step 1: Create Azure Foundry resources
-
Sign in:
-
Go to https://ai.azure.com
-
Sign in with your Microsoft account.
-
-
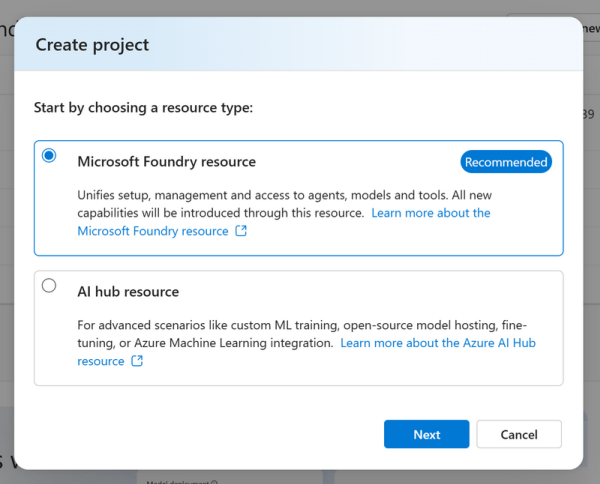
Create a new Foundry resource:
-
Click Create new.

-
Select Microsoft Foundry Resource.
-
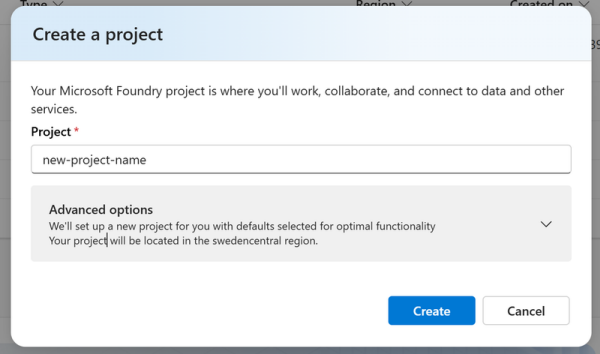
Enter a Project name.
-
Confirm and create the resource.
-
Step 2: Deploy AI models
You must create a separate deployment for each model you plan to use and specify the correct deployment for each feature during configuration.
The Completion model deployment is required. Text-to-Speech and Transcription deployments are optional and only needed if you plan to use those features. Embeddings are highly recommended because they enable access to your organization's Service Desk data and improve the relevance of AI responses.
INFO: For details, see Supported OpenAI models for AI integration.
-
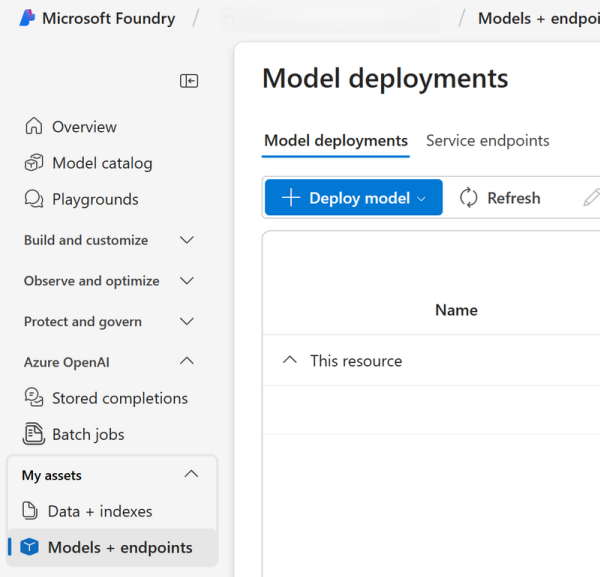
Open your Foundry resource.
-
Deploy the models you need (one deployment per model).
Fir instructions, see https://learn.microsoft.com/en-us/azure/foundry/foundry-models/how-to/deploy-foundry-models
-
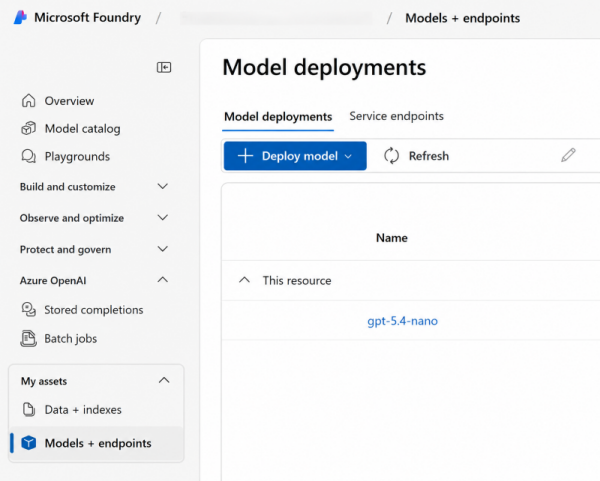
After deployment, note down each Deployment Name.
Example: gpt-5.4-nano
Step 3: Find your Azure AI credentials
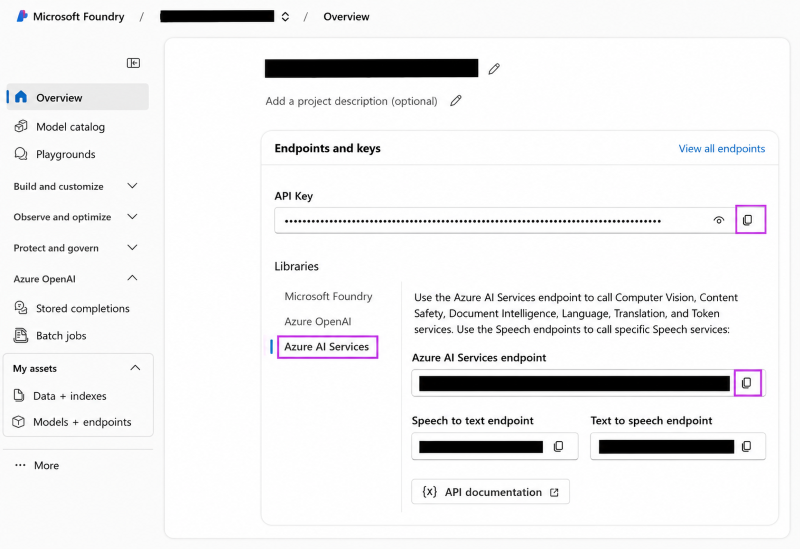
To get your endpoint and API key:
-
In Foundry, go to Foundry > [Your Resource Name] > My Assets > Models + Endpoints.
-
Copy these values:
-
Azure AI Services Endpoint
-
API Key
-
Step 4: Configure Alloy Navigator
To configure AI integration in Alloy Navigator:
-
In Alloy Navigator, access the Admin Center. You can also use the desktop Settings to perform this task.
-
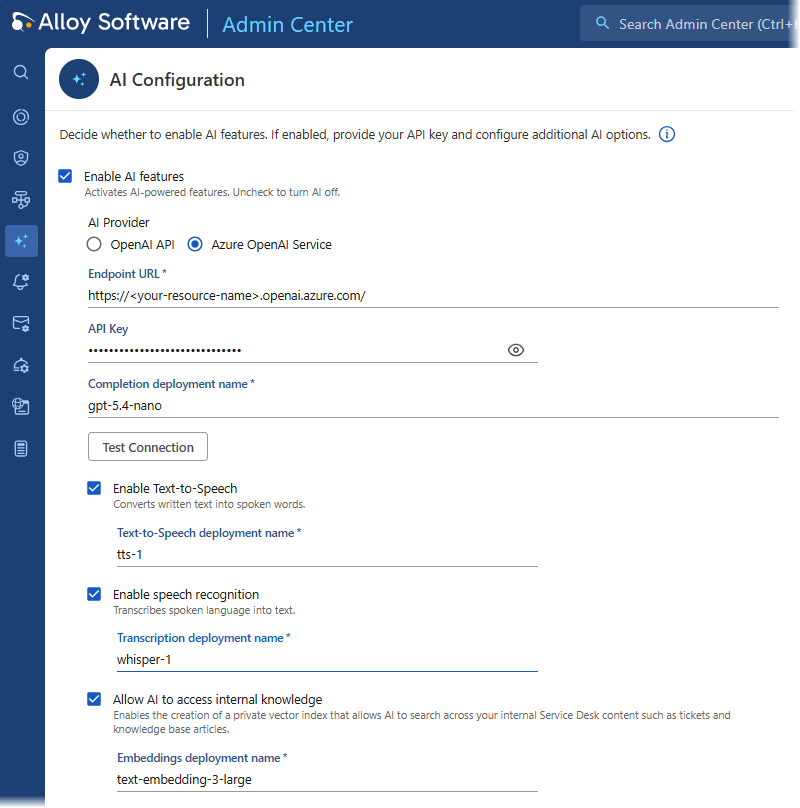
Go to AI Integration > AI Configuration.
-
Paste Azure credentials you copied in the previous Step.
-
Paste the following into the corresponding fields:
-
Endpoint URL: Paste your Azure AI Services endpoint
-
API Key: Paste your API key
-
-
-
Map deployments to models.
For each model (Completion, Text-to-Speech, Transcription, Embeddings), enter the correct Deployment Name you copied in Step 2.
You can find your deployment names here: Foundry > [Your Resource Name] > My Assets > Models + Endpoints.
Final checklist
After completing the configuration, review the following checklist to make sure the integration is set up correctly.
-
Your Azure AI Foundry resource is created
-
All required model deployments are configured and their deployment names are copied:
-
Completion deployment is configured (required for all AI features in Alloy Navigator)
-
Embeddings deployment is configured (highly recommended for access to your organization's Service Desk data and more relevant AI responses)
-
Text-to-Speech and Transcription deployments are optional and only required if you plan to use those features
-
-
The endpoint URL and API key are copied from your Azure AI Foundry resource
-
Deployment names are correctly mapped in Alloy Navigator