Evaluation Installation
Updated in 2023.2
The Evaluation Installation provides a quick installation option to understand the full benefits our solution has to offer. The product installer will automatically check prerequisites, install all necessary components, and configure the software automatically.
You will get access to the full functionality of the product with some minor limitations
The Evaluation Installation will install the following components:
- Microsoft SQL Server 2017 Express (optionally)
- Alloy Navigator 2024 server components and administrative tools
- Alloy Navigator 2024 Web App
- Alloy Navigator 2024 Self Service Portal
- Alloy Navigator 2024 API module
- Alloy Discovery 2024 server components and administrative tools
- Alloy Discovery 2024 Desktop App
INFO: For details, see Components of Alloy Navigator Enterprise.
Install Alloy Navigator Enterprise
TIP: You may want to consider conducting the Evaluation Installation on a virtual machine, ensuring that the product evaluation does not impact your production environment.
To perform the Evaluation Installation:
-
Run the Alloy Navigator Enterprise 2024 Installer.
The installation wizard is ready to extract installation files.
-
Review the path to the temporary folder for installation files in the Extract Alloy Navigator 2024 Installer to field. If needed, this folder and its content can be removed after the installation has finished.
By default, the installer extracts its installation files to the
C:\Alloyfolder. If this folder does not exist, the installation wizard will create it.TIP: To change the destination folder, click Browse and make a new temporary folder for installation files.
Click Extract. After the installation files are extracted, the Welcome page opens.
-
On the Welcome page, click
-
On the Evaluation Installation page, click Next.
The Evaluation Installation requires a Microsoft SQL Server instance to host an evaluation database.
You can let the installation wizard install a dedicated instance of Microsoft SQL Server (Microsoft SQL Server 2017 Express). Alternatively, you can choose to use your existing SQL Server instance.
-
On the SQL Server page, click Next to start the installation.
The installation wizard will automatically analyze your machine and test for prerequisites. If any of the tests fail, for example, if your computer has insufficient RAM size or hard drive space, or Microsoft .NET Framework 4.8 is missing, the wizard displays a warning message along with a hyperlink, which shows additional information about the encountered issue.
-
Information - Indicates missing software components that will be installed automatically.
-
Warning - Indicates missing software or partially met requirements that may
-
Error - Indicates not met requirements that prevent the installation.
-
-
Click Next to proceed with the installation after checking the prerequisites.
-
On the
-
The Installation Wizard begins installing all required software automatically:
Typically, the installation process may take between
NOTE: The Alloy Navigator Installer may prompt you to reboot your system during the installation.
-
Click Finish to complete the installation process.
-
Review the Evaluation Installation Summary page that opens. This document summarizes the information you need to access various components of Alloy Navigator. You can access this page at any time using the Evaluation Installation Summary shortcut on your desktop.
Activate Alloy Navigator
After the installation is completed, the Alloy Navigator Activation window opens and prompts you to activate the product. Online activation is a quick, one-time process.
During the online activation you will be asked for your registered e-mail address and the serial number received after submitting the request for product evaluation. Sign in to the Alloy Support Portal to have your license information ready.
NOTE: If you have any questions related to activation, please contact Alloy Software sales team at sales@alloysoftware.com for assistance.
To activate Alloy Navigator Enterprise:
-
In the Alloy Navigator Activation window, click Over the Internet.
-
Click Activate.
-
In the Activation over the Internet window, provide your e-mail address and the Alloy Navigator Enterprise serial number, then click Activate.
TIP: You can access this information at the Alloy Support Portal.
-
When the system informs you that Alloy Navigator Enterprise is activated, click OK.
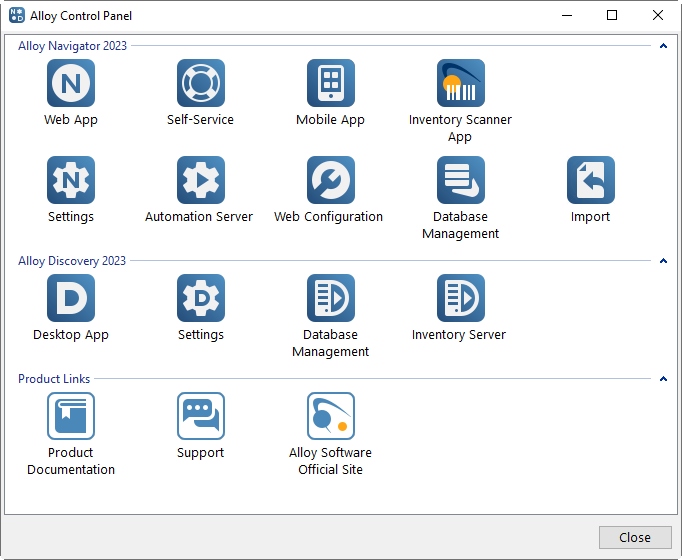
Launch Alloy Navigator Enterprise 2024 Components
All the installed modules and components of Alloy Navigator Enterprise 2024 are available from the Alloy Control Panel, an easy-to-manage utility for accessing all installed components and administrative tools. This panel also provides links to information resources, including the Evaluation Installation Summary page.
To launch the Alloy Control Panel, choose Start > Alloy Software > Alloy Control Panel from the Start menu or double-click its icon ![]() on the desktop.
on the desktop.
When you launch
You can safely proceed with using this administrative account. You can also create additional
INFO: For details, see Administration Guide: Creating Technician Accounts.