How to set up one-click workflows via the API
Introduced in 8.6
Updated in 2024.2
Learn how to enable and customize the default one-click workflows for submitting satisfaction surveys and approval responses. Users trigger these actions by clicking a hyperlink in an email, and their input is submitted via the API.
NOTE: To learn how to create a custom one-click workflow and understand the underlying mechanism, see How to set up custom one-click workflows via the API.
Ready-to-use graphical one-click workflows
By default, Alloy Navigator includes these ready-to-use one-click workflows for two common scenarios:
-
Satisfaction surveys
-
The workflow automatically sends users an email with clickable emoji-style faces representing different satisfaction levels, from Great to Bad, as shown below
-
Users select their response with a single click, no forms to fill out, no sign-in required
-
Their feedback is submitted instantly via the API

-
-
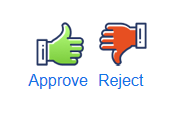
Approval requests
-
Deliver approval requests via email with two clickable emoji-style buttons for Approve and Reject
-
Recipients respond directly from the email without opening any additional pages
-
Their decision is sent via the API and immediately recorded in the system
-
These workflows are referred to as graphical one-click workflows because they use graphical elements to capture user input.
By default, both graphical one-click workflows are disabled. In that case, the system sends standard email notifications with instructions to open the application and respond there. To activate the graphical workflows, enable them as described below. Once enabled, graphical notifications will replace the standard emails.
NOTE: When you enable graphical one-click workflows, you may also want to customize the web pages shown to users after they submit their response from an email. At the very least, replace the Alloy Software logo with your company logo. For details, see Customizing the Success and Error web pages below.
To enable ready-to-use graphical workflows:
-
Open the Admin Center or start the Settings App, and navigate to Workflow and Business Logic > Workflow Configuration.
-
Under Workflow Configuration, enable the corresponding workflow parameters:
-
Satisfaction survey submission
Go to Satisfaction Surveys and select the Enable Graphical Survey Submission checkbox. This turns on sending survey emails where users can respond using emoji-style faces directly in the message. You can also review and adjust other survey-related parameters in this section.
-
Approval submission
Navigate to Misc Automation > Approvals > General and select the Enable Graphical Approval Submission checkbox. This enables approvers to approve or reject requests by clicking emoji-style buttons directly in email notifications. Additional approval settings can also be fine-tuned here.
-
Customizing the Success and Error web pages
On-prem only
When users submit feedback or approvals via a graphical one-click workflow, the API displays a web page confirming the result. These are the Success and Error pages, used to show a success message, such as "Thank you for your feedback" or an error like "The link has expired."
You can customize these pages to match your branding. At a minimum, we recommend replacing the default Alloy Software logo with your company logo. You may want to also adjust the HTML layout or styling to better fit your needs.
FOR CLOUD CUSTOMERS: Please note that configuring web page templates is only available for on-premises deployments. Contact our Support Team for assistance with this task.
The HTML templates for the Success and Error web pages are located in a special folder under the API installation directory:
[PhysicalPathToAPIfiles]\HtmlTemplates\By default, this path is C:\Program Files\Alloy Software\Alloy Navigator\WebApps\API\Alloy Navigator Site\api\HtmlTemplates\
NOTE: To view the physical path to the API files on the computer hosting the API, start the Web Configuration tool on the web server and navigate to API in the sidebar. The path will be displayed in the main pane on the right hand side, among other configuration information
This folder contains:
-
ExecuteActionSuccessTemplate.html: Success page template -
ExecuteActionErrorTemplate.html: Error page template -
\images\logo.jpg: Logo image shown on both pages
The actual result message shown to users is inserted dynamically; you can configure the text of this message in your workflow settings if needed.
IMPORTANT: It is recommended to back up the default templates before making any changes.