Network mapping
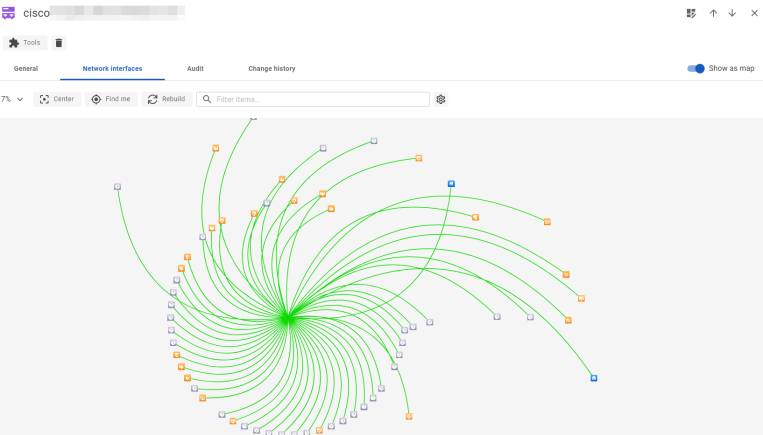
This topic explains how to use the Network Mapping feature that helps you visualize your network by automatically creating detailed maps for each switch in your inventory. These maps show all devices connected to each switch port, including computers, servers, virtual machines, printers, and other switches. With these visual maps, you can easily see how devices are connected, making it simpler to manage your network and fix problems.
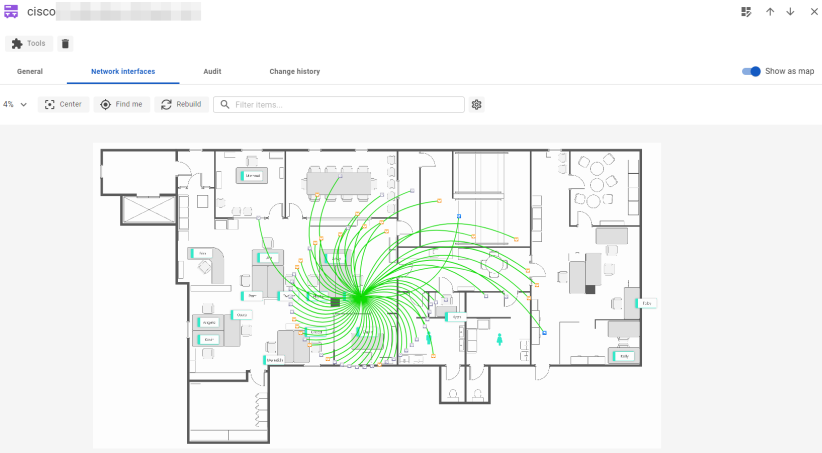
Devices on the map are clickable, allowing quick access to their details. You can also upload floor or site plans to position devices accurately and obtain a realistic view of the network’s physical layout.
To access the Network Mapping feature, follow these steps:
-
Navigate to Inventory and select SNMP devices.
-
Click on Switches.
-
In the list of switches, click on the switch you want to view.
-
In the switch details, go to the Network interfaces tab.
-
Enable the Show as map toggle to display the network map for that switch.

Navigating and managing the network map
The network map shows a visual representation of connected devices and switches. The items are color-coded to indicate their type and status:
-
Grey icons represent devices that have been scanned but not fully audited. Only their MAC addresses are displayed.
-
Blue icons represent switches. These are central to the network map, with connections to various devices shown branching out from the switches.
-
Icons of any other color represent scanned devices. Zooming in allows you to view the device's type, operating system, and name directly on the device card. Clicking on a card will open the corresponding device's details in the Inventory.
In the toolbar above the network map, several controls are available to help you navigate and manage the network map:

Click on the arrow icon next to the zoom level value to expand the menu with the following options:
-
Zoom in: Increases the zoom level, allowing you to get a closer view of the devices and connections on the map. This can be also done using the mouse scroll wheel, the Fn + key combination in Windows, or the Command + (⌘ +) combination in macOS.
-
Zoom out: Decreases the zoom level, providing a wider view of the entire network layout. This can be also done using the mouse scroll wheel, the Fn - key combination in Windows, or the Command - (⌘ -) combination in macOS.
-
Zoom to fit: Automatically adjusts the zoom level so that all devices and the entire map fit within the visible area of the window.
-
Center: Brings the map back to the center of the canvas. If the map has been moved aside or zoomed out, this option repositions it to the original central view.
NOTE: Alternatively, use the Center button.
- Find me: Automatically zooms to 50% and centers the map on the initially selected switch.
NOTE: Alternatively, use the Find me button.
-
Zoom to 50%: Adjusts the zoom level to 50%, showing a more zoomed-out view of the map.
-
Zoom to 100%: Sets the zoom level to 100%, giving a more detailed, closer view of the network devices and connections.
-
Links: Toggles the visibility of the connection lines (links) between devices. When checked, the links are shown; when unchecked, they are hidden.
Additional controls include:
-
Rebuild button: Updates the map to reflect any changes in device auditing status. If there are devices that were scanned but not yet audited (displayed in grey with only their MAC address visible), and these devices are later audited, the map will not update until you click Rebuild. Hovering over Rebuild shows the last time the map was last updated.
-
Filter items field: Allows you to search for a specific device by entering its name or MAC address, either fully or partially. The map will zoom in on the device that matches your search, making it easier to locate specific items in large networks.
You can also interact with the network map as follows:
-
Drag the map: Hold down the left mouse button and drag the map to move it around and explore different areas of the network layout.
-
Right-click to select a link: Right-clicking on a link between two devices will select that specific connection.
-
Right-click on an item with connected devices: Right-clicking on a device that has connected devices will select all the links associated with that item.
Customizing network map settings
To customize the network map view, use the Settings panel. The panel opens by clicking the cog icon. The following options are available:
-
Links color: Defines the color of the connection lines between devices.
-
Selected links color: Specifies the color of the connection lines when selected.
NOTE: For both Links color and Selected links color, clicking on the colored circle next to the option opens a color picker window. This allows you to choose a custom color for the connection lines on the map. Once you've selected your desired color, click OK to apply it or Cancel to discard changes.
-
Curvature of links: Adjusts how curved the connection lines are between devices. It ranges from 0 for straight lines to 1 for fully rounded lines.
-
Show links: A checkbox to toggle the visibility of the connection lines between devices on the map.
-
Background image: Allows uploading a floor or site plan to be used as the map's background, helping to visualize device locations in their physical context. You can drag and drop an image or click to browse and upload it. For more details, see Positioning devices on the uploaded map.
-
Background image scale: Controls the size of the uploaded background image, starting from 1 (original size) and allowing larger scales as needed.
-
Save: Saves any adjustments made in the settings.
-
Cancel: Discards any changes and closes the settings.
Positioning devices on the uploaded map
When a site map or floor plan is uploaded as a background image, it appears behind the network devices on the map.

After uploading, you can manually drag and drop each device to its correct physical location on the map.
The arrangement of devices is saved automatically, so once you've positioned them, the layout remains unchanged unless a new device is added to the network. If a new device appears, you will need to manually move it to the appropriate location on the map.