How to add security headers to Alloy Navigator Express web apps
Web App
Self Service Portal
API
Security headers are HTTP response headers that define whether a set of security precautions should be activated or deactivated on the web browser when accessing a website. To prevent security vulnerabilities, you can add security headers to the website hosting your Alloy web applications![]() .
.
This article describes two methods of adding the most commonly used security headers. You can use either of them. However, it is convenient to use a combination of two methods: start with Method 1 to create the web.config file, and then edit that file using Method 2.
Method 1: Using the IIS manager
-
Select Start, select Administrative Tools, and then select Internet Information Services (IIS) Manager.
-
In the connections pane, expand the node for the server, and then expand Sites.
-
Select the site hosting Alloy web applications. Typically, it is Alloy Navigator Site.
-
In the site pane, under IIS, double-click HTTP Response Headers.
-
Use these steps to add the missing security headers. For a list of all the headers, see the table below.
-
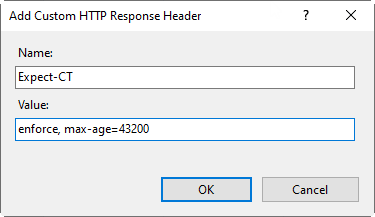
In the Actions pane, click Add to reveal the Add Custom HTTP Header dialog box.
-
In the Name box, type in a header name. For example,
Expect-CT. -
In the Value box, type in a header value. For our
Expect-CTexample, enterenforce, max-age=43200. -
Click OK.
-
TIP: After you have added one of the headers, you can use Method 2 to copy and paste all the remaining headers to the web.config file.
The table contains the HTTP response headers and the values that have been tested for use with the current 2026 version Alloy web applications![]() .
.
TIP: If you need to specify other values for those headers or add other custom HTTP response headers, please contact our Support Team.
| Name | Value | Description |
|---|---|---|
| Expect-CT | enforce, max-age=43200 |
The HTTP Expect-CT header lets sites opt in to reporting and/or enforcement of Certificate Transparency requirements, to prevent the use of misissued certificates for that site from going unnoticed. |
|
Content-Security-Policy |
default-src *; style-src 'self' http://* 'unsafe-inline'; script-src 'self' http://* 'unsafe-inline' 'unsafe-eval'; img-src 'self' http://* data:; |
The HTTP Content-Security-Policy response header allows website administrators to control resources the user agent is allowed to load for a given page. With a few exceptions, policies mostly involve specifying server origins and script endpoints. This helps guard against cross-site scripting attacks (XSS). |
|
Feature-Policy |
fullscreen 'none' |
The HTTP Feature-Policy header provides a mechanism to allow and deny the use of browser features in its own frame, and in content within any The header is being replaced with the Permissions-Policy header (see below). |
| Permissions-Policy | fullscreen=() |
The Permissions-Policy HTTP header replaces the existing Feature-Policy header (see above) for controlling delegation of permissions and powerful features. |
|
Referrer-Policy |
no-referrer |
The Referrer-Policy HTTP header controls how much referrer information (sent via the Referrer header) should be included with requests. |
| Strict-Transport-Security | max-age=31536000; includeSubDomains; preload | The HTTP Strict-Transport-Security response header lets a website tell browsers that it should only be accessed using HTTPS, instead of using HTTP. |
| X-Content-Type-Options | nosniff | The X-Content-Type-Options response HTTP header is a marker used by the server to indicate that the MIME types advertised in the Content-Type headers should not be changed and be followed. This is a way to opt out of MIME type sniffing, or, in other words, to say that the MIME types are deliberately configured. |
| X-Frame-Options | SAMEORIGIN | The X-Frame-Options HTTP response header can be used to indicate whether or not a browser should be allowed to render a page in a <iframe>, <iframe>, <embed>, or <object>. Sites can use this to avoid click-jacking attacks, by ensuring that their content is not embedded into other sites. |
| X-XSS-Protection | 1; mode=block |
The HTTP X-XSS-Protection response header is a feature of Internet Explorer, Chrome, and Safari that stops pages from loading when they detect reflected cross-site scripting (XSS) attacks. Although these protections are largely unnecessary in modern browsers when sites implement a strong Content-Security-Policy that disables the use of inline JavaScript ('unsafe-inline'), they can still provide protections for users of older web browsers that don't yet support Content-Security-Policy. If you do not need to support legacy browsers, it is recommended that you use Content-Security-Policy without allowing unsafe-inline scripts instead. |
NOTE: Some of the headers may not be supported on the web browsers that your employees and customers use. Check out the compatibility before the implementation.
Method 2: Editing the web.config file
-
Locate the web.config file that is associated with the website hosting your Alloy web applications.
-
Select Start, select Administrative Tools, and then select Internet Information Services (IIS) Manager.
-
In the connections pane, expand the node for the server, and then expand Sites.
-
Select the site hosting Alloy web applications. Typically, it is Alloy Navigator Site.
-
Right click the site and select Explore.
-
In the File Explorer window that opens, get to the web.config file.
TIP: If no web.config file exists for your website, use Method 1 to add a header from the list of headers above. This will create the web.config file. Then you can proceed with these steps.
-
-
Edit the web.config file in a text editor. For example, in Notepad++.
NOTE: To be able to save your changes, you may need to run your text editor as administrator.
-
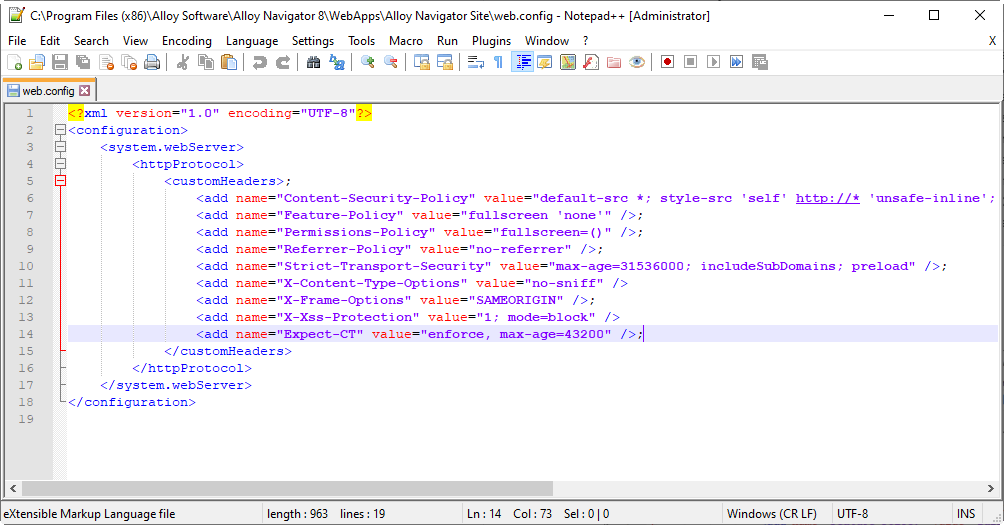
At the end of the web.config file, above the closing
</configuration>tag, add or edit the<customHeaders>configuration section so that it includes all the security headers from the table above.To be on the safe side, start with Method 1 and add the first header, as suggested. This will create the web.config file, if needed, and add the
<customHeaders>section where needed. Then copy the contents of the<customHeaders>section from the sample below and paste it to your web.config file.<customHeaders> <add name="Expect-CT" value="enforce, max-age=43200" />;
<add name="Content-Security-Policy" value="default-src *; style-src 'self' http://* 'unsafe-inline'; script-src 'self' http://* 'unsafe-inline' 'unsafe-eval'; img-src 'self' http://* data:;" />;
<add name="Feature-Policy" value="fullscreen 'none'" />;
<add name="Permissions-Policy" value="fullscreen=()"/>;
<add name="Referrer-Policy" value="no-referrer" />;
<add name="Strict-Transport-Security" value="max-age=31536000; includeSubDomains; preload" />;
<add name="X-Content-Type-Options" value="nosniff" />;
<add name="X-Frame-Options" value="SAMEORIGIN" />;
<add name="X-Xss-Protection" value="1; mode=block" />;
</customHeaders> As a result, your web.config file may look like this:
-
Save the web.config file.
-
Restart IIS to apply the changes.
TIP: For example, open the IIS Manager, navigate to the web server node in the tree, and then click Restart in the Actions pane.
-