Adding User Defined Fields
IMPORTANT: When creating UDFs, you alter the database’s structure. We recommend that no users access the Network Inventory console at that time.
To create a user-defined field, follow the steps below:
- From the Side Bar, navigate to the object records where you want to add a UDF. For example, for Computer records, go to Network Inventory > Fields > Computers.
- Click New > User Defined Field. The User Defined Field window appears.
- In the Field Name field, enter the name of the new field. The name is prefixed with UDF_.
IMPORTANT: The field name must be unique within the object class.
NOTE: Network Inventory allows you to enter in this field English letters, numbers, and low line characters (_). Additionally, you cannot end the name with the _id sequence.
- Choose the field type from the Field Type list.
- The Custom Label field is automatically populated with the field name. You can keep this label or customize it.
- For a Lookup field: Under Lookup Values, add drop-down list items:
- Click Add to add a new line.
- Type in a value.
Repeat these steps to add as many items as needed.
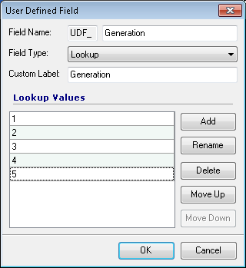
- To arrange items in the list, use Move Up and Move Down buttons.
- Click OK.
IMPORTANT: For your changes to take effect, you and other users must restart the Network Inventoryconsole.
NOTE: By default, user-defined fields are not included in any grid view. To show the column in a particular view you should modify the view configuration and add UDFs as needed. For details, see the Network Inventory User’s Guide: Working With Data Views.