File Scan
The Windows Inventory Analyzer provides options for searching the hard drives of client computers for individual files or collecting volume statistics on certain file types, such as multimedia. Since the hard disk scan may take significant time, the file scan options are turned off by default.
NOTE: The File scan feature is only applicable for Windows computers. When auditing Linux and Mac computers, the File Scan options are ignored.
If you want to include file scan results into the audit data, enable the file scan and specify the files or/and directories you want scanned, and the level of detail you want in the File Scan section. The Disable file scan globally check box allows you to enable or disable the file scan functionality for all audits.
NOTE: The file scan provides data shown on the Discovered Installations tab, File Find tab, and File Statistics tab of the Computers grid.
The file scan options are available on individual tabs: Files, Excluded Files, Drives/Directories, Excluded Directories.
Files
The Files tab allows you to add file masks that will be used for scanning files and determine what type of scan will be applied for individual file masks.
The Add menu gives you access to common file types. Clicking Add > [File Group] > All [File Group ] adds a whole group of common file types to the Files list (all executable, all graphic, all multimedia, or all archive); the other menu items let you access the lists of individual files masks.
To add a specific file name to the list, such as acme.exe, or a custom file mask such as acme.*, click Add > New. The Create File Scan Item window opens.
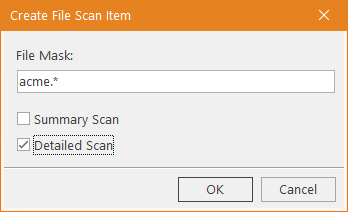
Specify a file mask and select a level of details
To edit a particular mask, double-click it. Alternatively, select the mask and click Open to edit it.
To permanently remove a mask, select it and click the Delete icon.
There are two types of scan, either of which can be enabled for the added masks:
-
SummaryScan (or non-detailed): The summary file scan produces volume statistics for all files that match the search mask, broken down by folder location.
By default, the Summary Scan is disabled. You can enable it by selecting the Summary Scan check box within the Edit File Scan Item window, appearing when you modify a mask.
NOTE: The results of the Summary Scan will be used for file statistics calculation. For details, see File Statistics.
-
Detailed Scan: The detailed scan collects physical characteristics as well as the file version properties of individual files that match the search mask:
-
Computer Name - the name of the computer where the file was detected
-
User - the user name on whose computer the file was detected
-
File Name - the name of the file
-
Publisher - the name of the company that produced the file
-
Product Name - the name of the product with which the file is distributed
-
Product Version - the version number of the product with which the file is distributed
-
Path - the full path to the file on the hard drive
-
Size - the size of the file, in KB
-
File Version - the version number of the file
-
Description - the description of the file
-
Date - the date and time when the file was last modified
By default, a newly-added file mask has the Detailed Scan enabled.
NOTE: The results of the Detailed Scan will be searchable within the File Find tab of the Computers grid.
We recommend that you use the Detailed Scan only for executable files, such as .exe, .dll, .sys, or .com. The Detailed Scan of other file types will not typically produce useful information. It will also dramatically increase the size of audit snapshot files. Ultimately, this may adversely affect the performance of Network Inventory.
NOTE: The default Audit Profile includes pre-configured Detailed Scan for *.EXE file mask. To enable it, clear the Disable file scan globally check box. To delete this file mask from the enabled Detailed File Scan option, select the file mask and click the Delete button.
Excluded Files
The Excluded Files tab allows you to exclude individual files or whole file groups (all executable, all graphic, all multimedia, or all archive from the file scan.
To exclude a file or a file mask from the audit, click Add > New and enter a file name or a file mask, such as *16.dll.
To exclude a whole file group, click Add > [File Group] > All [File Group ]. To exclude a common type file, click Add > [File Group ] and than click a menu item with the appropriate file extension. To remove an item from the list, select it and click the Delete icon.
You can temporarily exclude from the scan certain file masks without having to modify the contents of the Files tab. The same file mask can be added to both lists Files and Excluded Files but the latter has a higher priority than the Files list. In this case, such a file mask will be grayed-out on the Files tab; this instructs the Inventory Analyzer not to scan the grayed-out files during the audit until you re-enable them by removing from the Excluded Files list.––
Drives / Directories
The Drives / Directories tab allows you to specify which drives and directories you want to audit. By default, after you have enabled file scan, the Inventory Analyzer scans all hard drives (the Scan all hard drives check box is checked). To limit the scope of the file scan to particular drives or directories, clear the Scan all hard drives check box and use New to specify the directories to scan. To include a particular drive or directory in the audit, click New and specify the scan item.
You can use the Windows environment variables for specifying the directories. For example, in the Create File Scan Item window, enter the %PROGRAMFILES% variable to scan for files in the Program Files folder.
To include all hard drives in the file scan, select the Scan all hard drives check box.
Excluded Directories
The Excluded Directories tab allows you to exclude specific directories from the audit. By default, file scan is disabled in these directories:
-
Skip the Window folder The Windows system directory stores system files that are not usually changed and may be excluded from auditing. Depending on the OS you’re running, the system's root directory can be C:\Windows or C:\WINNT. –
-
Skip the browser cache directory The Internet browser cache directory stores the contents of many web pages, graphic files, etc. loaded from browsed sites and usually is of little interest. –
-
Skip the System Volume - The System Volume Information directory is a hidden Windows system folder used by the System Restore tool to store its information and restore points. There is a hidden System Volume Information folder on every partition of the computer.
To enable file scan in a directory, clear the corresponding check box.
To exclude a specific directory from the file scan, click New., type in the full name of the directory or the disk name in the Directory/Drive Name field and click OK. You can use environment variables (such as %WinDir% or %CommonProgramFiles%) to specify pre-defined system directories. For example, enter %USERPROFILE%\Application Data directory path provided with the %USERPROFILE% environment variable to exclude the Application Data folder of the current user profile. Alternatively, you can enter the full path. However, the latter method requires that the excluded directory has the same location on all computers you want audited.
To remove an excluded directory from the list, select it and click the Delete icon.
You can also temporarily exclude from the file scan certain directories without having to change the contents of the Drives/Directories. The same directories can be added to both lists - Drives/Directories and Excluded Directories - but the latter has a higher priority than the Drives/Directories list. In this case, such a directory will be grayed-out on the Drives/Directories; this instructs the Inventory Analyzer not to scan the grayed-out directories during the audit until you re-enable them by removing from the Excluded Directories list.