Configuring SSO authentication with AD FS
Introduced in 2021.1
This article explains how to integrate Alloy Navigator with Microsoft's Active Directory Federation Service (AD FS) for single sign-on, so your users can sign in to Alloy Navigator with their AD domain credentials.
PREVIOUS STEP: Before you begin, see Managing single sign-on (SSO) providers for basic information and prerequisites.
Register Alloy Navigator in AD FS
First, you need to create an integration for your Alloy Navigator apps in
You will need this information for creating OIDC app integration. Other parameters are set by default, you can change them as required.
| Parameter | Value |
|---|---|
|
Sign-in redirect URIs The sign-in redirect URI is the location where your |
Alloy Navigator web apps (the Web App and Self Service Portal):
Alloy Navigator mobile apps (Alloy Navigator, Alloy Inventory Scanner, and Alloy Self-Service):
|
| Application Credentials |
Generate a shared secret Copy and save the secret! It will not be available after you complete the registration. |
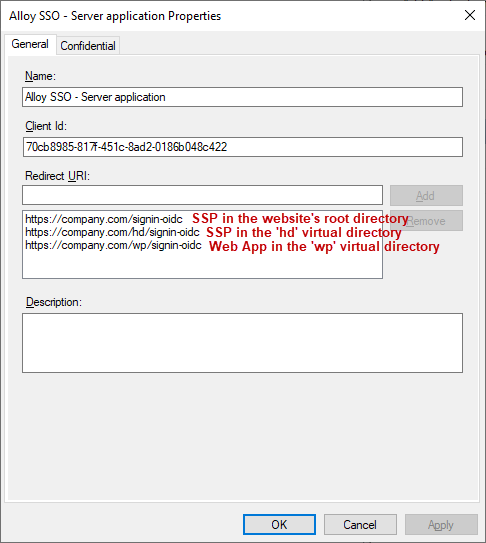
Note that a single "Server application" group serves all your Alloy Navigator web apps, as shown in the screenshot below. Add a redirect URI for every Alloy Navigator web app instance you want to use SSO.
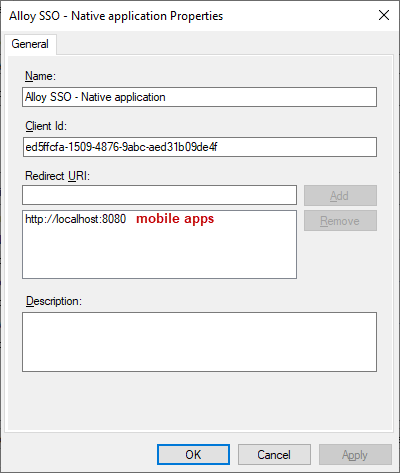
Configuring SSO for Alloy Navigator mobile apps requires creating a separate "Native application" group, as the screenshot below shows.
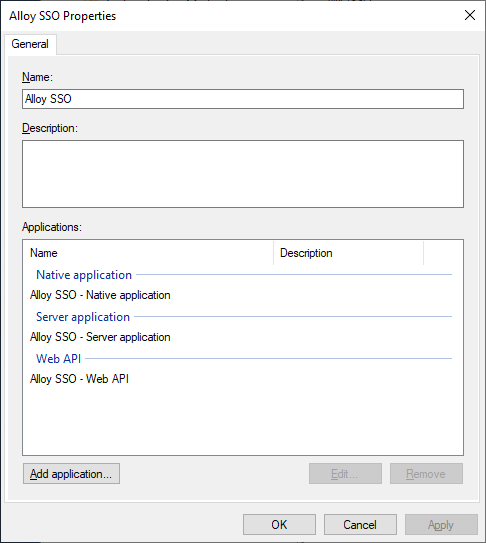
You will also need to add a "Web API" group, as shown below.
Note the Client Identifier and Secret values. You will use them later in the Alloy Navigator Settings App.
Create an SSO Provider record for AD FS in Alloy Navigator
To store
-
Client ID - the OpenID Connect client ID provided by
-
Client Secret - the client secret for the Alloy Navigator app provided by
-
Full Name Claim - the claim where
name. -
User Name Claim - the claim where
unp, for "User Principal Name."
To add an SSO Provider record for
-
In Alloy Navigator Settings, go to Accounts and Roles > SSO Providers and select New >
-
In the Name field,
-
In the ADFS Domain field, enter the
adfs.companyname.com. -
In the Authority field,
https://, because secured protocol is requited -
Provide the credentials of your Alloy web apps from
-
Client ID - the unique identifier that Alloy apps will use when requesting an access token from
-
Client Secret - the secret string that the Alloy apps will use to prove its identity when requesting an access token from
-
-
When users sign in, their user information from
Typically, you can keep the default values in the Full Name Claim and the User Name Claim fields.
-
Click OK to save your record.
NEXT STEP:Step 3: Configure the Alloy Navigator apps to use SSO.