Managing Lifecycle Stages
To provide a clear understanding of where your users are within a business process, Alloy Navigator offers a graphical progress indicator showing lifecycle stages and outlining the stage where each ![]() or purchase order
or purchase order
NOTE: The graphical progress indicator appears only in Alloy Navigator web applications, i.e. in the Web App and in the Self Service Portal.
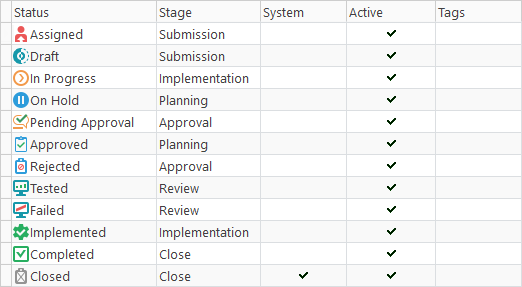
- Submission: Assigned, Draft
- Approval: Pending Approval, Rejected
- Planning: On Hold, Approved
- Implementation: In Progress, Implemented
- Review: Tested, Failed
- Close: Completed, Close
Each stage is mapped to a set of Change Requests' statuses. You can use the default stages or customize them to better suit your needs.
By default, each stage is mapped to a set of object's statuses as follows:
.
You can create new stages, rename them, and map stages to statuses. You can also change the order of stages and delete stages that are no longer needed.
To add a stage:
-
In the Settings App, navigate to the Workflow and Business Logic >
-
Click New. The New Change Request Lifecycle Stage dialog box opens.
-
Type in a stage name.
-
You may want to be able to filter out some items when displaying this drop-down list to technicians as they perform certain steps within workflow. In this case, tag the list item: click Manage in the Tags section and specify tags associated with this stage.
-
Click OK.
After you create and configure a new lifecycle stage, map this stage to the appropriate Change Request statuses.
IMPORTANT: A status can be mapped to a single stage. A stage can contain several statuses.
To map a status to a stage:
-
In the Settings App, navigate to the Workflow and Business Logic >
-
Choose a stage from the Stage drop-down list.
-
Click OK.
To change the order of stages:
-
In the Settings App, navigate to the Workflow and Business Logic >
NOTE: This order is used to display lifecycle stages on the progress indicator for the Change Request object record (see How to track the Change Requests' progress).
-
Select a stage and use the Move Up and Move Down buttons to change its position. Repeat this step to reorder other stages as needed.
To delete a stage:
-
In the Settings App, navigate to the Workflow and Business Logic >
-
Select a stage and click Delete.
TIP: Just like Change Requests, you can manage lifecycle stages for