Administration Guide
Adding Physical Fields on Forms
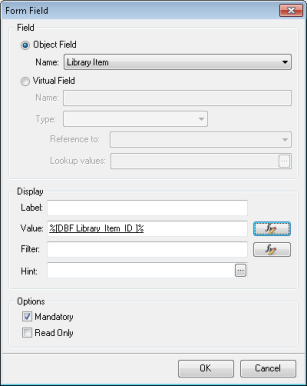
Physical fields represent object properties and are directly related to database fields. You can add a physical field on the Action Form as follows:
- Under Fields, click New > Field. The Form Field dialog box opens.
- Click Object Field and select a field name from the Name list.
NOTE: When the field label is customized, the custom label is displayed instead of the name. For details, see Customizing System Fields.
- Type a field label in the Label field. If you want to use the field name as the label, leave the Label field blank.
- To assign an initial value to the field, enter the value in the Value field:
- To assign a static value, depending on the field type:
- select a value from the list,
- select a date and time from the calendar,
- calculate a value using the pop-up calculator.
- To specify a dynamically calculated value, click the Build Expression button to bring up the Build Expression dialog box. Then use the Expression Builder to specify how the calculated value should be formed.
For example, you can use a placeholder for an object field value, as illustrated below.
NOTE: The expression or script must return a value of the same data type as the field type. For details and instructions, see Using the Expression Builder.
NOTE: If the initial field value is specified in the Form definition and in the Template, the Form definition takes precedence.
- To assign a static value, depending on the field type:
- When you choose a Reference field, which appears on the Form as a drop-down list where the user should select a single value, you may want to filter out some items. Click the Build Expression button in the Filter field and create a filtering expression.
INFO: For details and instructions, see Filtering Out Lookup List Items on Forms.
- To specify a hint, enter your text into the Hint field (for illustration, see Window Style: Dialog Box or Wizard).
- To make the field either mandatory or read-only, select corresponding check boxes under Options.
- Click OK.