Administration Guide
Configuring Table Widgets
If you want the dashboard to display tabular data, add the Table widget. This widget helps users to visualize important information, such as their overdue
To configure a Table widget, follow the steps below:
- Create a new Table widget or open an existing one. The Table Widget Properties dialog box appears.
INFO: For instructions on adding or modifying dashboard widgets, see Creating and Modifying Dashboard Widgets.
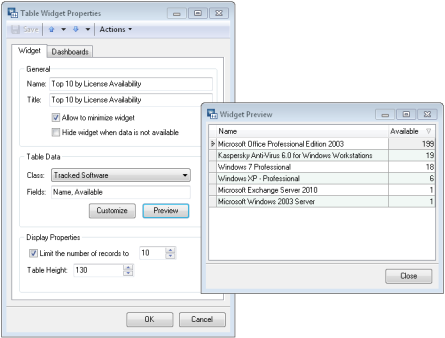
- Specify the widget’s name in the Name field.
- Specify the widget’s title in the Title field. The title will be displayed in the widget's title bar on dashboards.
- If you want to allow technicians to collapse this widget, select the Allow to minimize widget check box.
- If you want to hide this widget when there is no data to display, select the Hide widget when data is not available check box.
- Under Table Data, specify what content will fill the table:
- In the Class drop-down list, select the object class whose records you want to display. For example, select
- In the Fields field, select the fields to display in the grid. If you want to customize these columns, apply sorting on data records, or specify filtering and highlighting conditions for retrieved data, click Customize and make your changes using the Customize Table dialog box. The steps are very similar to customizing data views.
INFO: For instructions on customizing the table, see Help: Customize Table window.
NOTE: Click Preview to see the result of your customizations.
- In the Class drop-down list, select the object class whose records you want to display. For example, select
- The resulting data set may contain a significant number of records and be unnecessarily large. To limit the number of displayed records, in the Limit the number of records to, specify the limit.
- By default, table widgets are 175 pixels high. You can adjust the height in the Table Height field.
- To see how the widget will look like, click Preview.
- Click OK.