Managing Software Manufacturers
When the Inventory Server adds Software Products to the Software Catalog, it populates the list of Software Manufacturers using the publisher information of recognized software products. You can modify manufacturers’ records as needed.
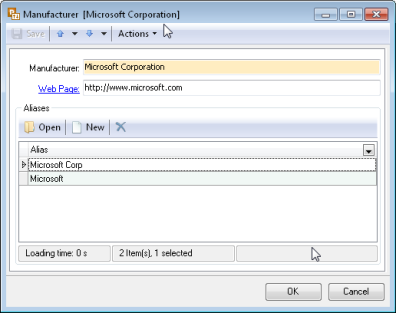
Modifying Software Manufacturer Properties
- In the Settings app, navigate to General > Software Catalog > Software Manufacturers.
- Double-click a Software Manufacturer record. The Manufacturer [Manufacturer Name] dialog box opens.
- Make your changes as needed. The following properties are available:
- Manufacturer — The manufacturer’s name (required, auto-populated).
- Web Page — The manufacturer’s website address. This field is maintained manually. When this field contains a web URL, you can open the website in your default Internet browser by clicking the Web Page link.
- Aliases — The list of alternative names, or aliases, for the manufacturer’s name. To add an alias, click New, type in a name, and click OK.
- Click OK to save your changes.
Merging Software Manufacturers
Some software publishers may use different names, or aliases, in the installation information of its software. For example, you can encounter the following names in your Software Manufacturers list: Microsoft, Microsoft Corp., and Microsoft Corporation. You can merge alternative spellings of the same company to a single Software Manufacturer and track its software products using only that combined manufacturer record.
Before you begin, make sure the Software Catalog contains the Software Manufacturer that will provide the primary spelling for its alternative variations. If this record has not been created automatically, add a new manufacturer.
INFO: For details, see Adding Software Manufacturers
To merge several manufacturers into one master record, follow these steps:
- In the Settings app, navigate to General > Software Catalog > Software Manufacturers.
- Select manufacturer records that you want to merge. Make sure not to select the manufacturer's record which will become the master, otherwise it will be unavailable for selection within target manufacturer drop-down list.
- Right-click any of selected records, and choose Merge with from the pop-up menu. The Merge Manufacturers dialog box opens.
- Select the target Software Manufacturer from the Target Manufacturer drop-down list, then click OK.
Alloy Discovery adds all selected names (including their existing aliases) to the alias list of the master record, then deletes original records.
Adding Software Manufacturers
You can add a Software Manufacturer record manually as follows:
- In the Settings app, navigate to General > Software Catalog > Software Manufacturers.
- Click New on the Module menu. The Manufacturer [Manufacturer Name] dialog box opens.
- Type in the manufacturer’s name in the Manufacturer field (required).
- Optionally, enter the manufacturer’s website address in the Web Page field.
- If you want to add an alias, under Aliases, click New, type in the alias name, and click OK.
Repeat this step to add other aliases as needed.
- Click OK.
Deleting Software Manufacturers
- In the Settings app, navigate to General > Software Catalog > Software Manufacturers.
- Select the records you want to delete and click Delete on the Module menu.
Configuring the Default Software Group
You can specify the default group for all newly created Software Products as follows:
- In the Settings app, navigate to the General > Software Catalog > Settings section.
- Under Software Discovery Options, choose the default group from the drop-down list.
- Click Save.