Administration Guide
Resolving Conflicts
NOTE: To manage a conflict, you can also open Conflict Resolution section by double-clicking the conflict record from the Task Progress window.
To resolve a conflict, complete the steps below.
- In the Settings app, navigate to Services > Conflicts and Errors > Conflict Resolution.
- Under Conflict List, double-click the conflict to resolve. The Conflict Details window opens.
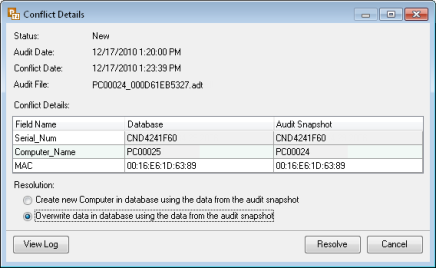
- Under Conflict Details, review the conflicting parameters. If you want to take a look at the log file, click View Log.
- Under Resolution, select the resolution method:
- To add a new Computer record, click Create new Computer....
- To overwrite the Computer record with the data from the audit snapshot, click Overwrite data....
- Click Resolve. The conflict status changes to “Scheduled” and a new “Check for Conflicts” task appears in the Task List. If you have scheduled more than one conflict, they can be resolved within the same “Check for Conflicts” task. When Inventory Server updates the data in the database according to the specified resolution method, the task is finished and the conflict status will change to “Resolved”.