Adding FTP Audit Sources
To add an FTP Audit Source to a Site, follow these steps.
INFO: FTP audit sources serve for the Remote Audit with FTP delivery. For details, see Overview of Audit Methods.
-
In the Sidebar, right-click the Site and select Properties from the pop-up menu. The [Site Name] dialog box opens.
-
Click New > FTP. The [FTP Audit Source Name] dialog box opens.
-
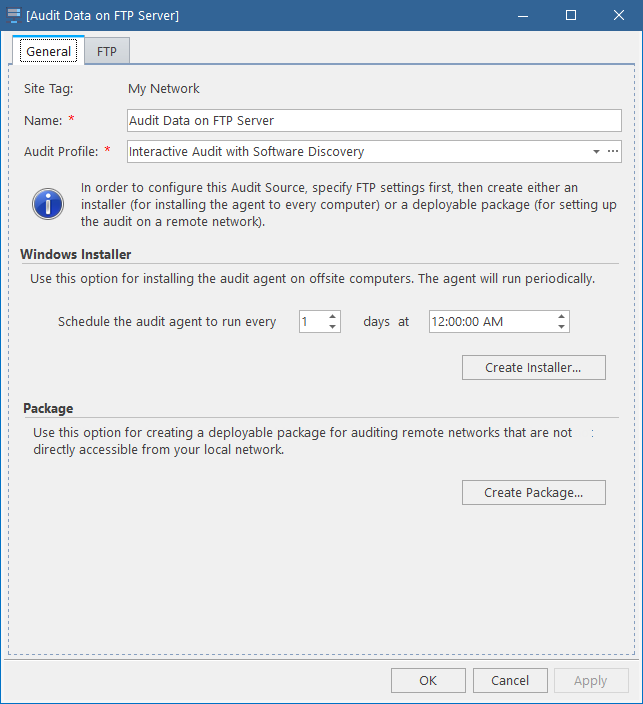
Type in a name for the Audit Source.

-
Select an Audit Profile for the Audit Source from the Audit Profile list.
If you do not have Audit Profiles yet, click the ellipsis button in the Audit Profile field, click New in the Select Audit Profile dialog box, and then follow the instructions on creating Audit Profiles.
INFO: For details, see Configuring Audit Profiles.
-
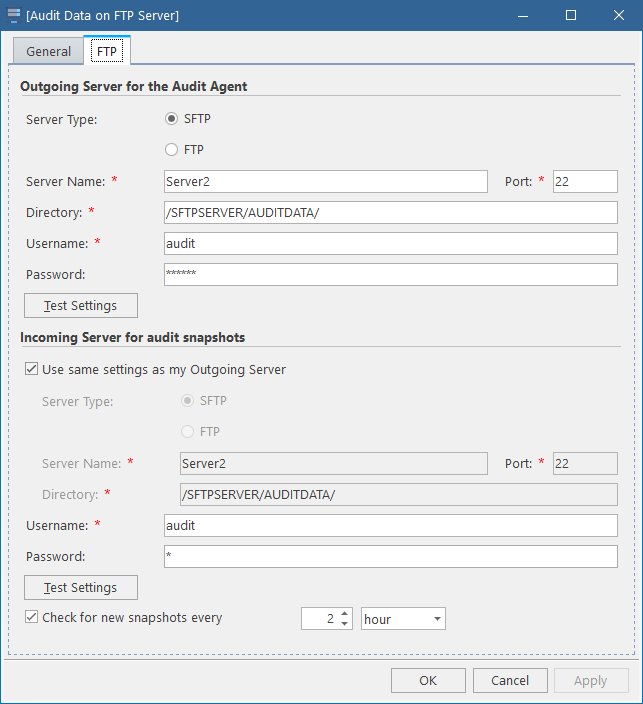
Click the FTP tab and configure the settings for the FTP / SFTP server in the remote network, which the Inventory Analyzer will use for sending the audit snapshots to the database:
-
In the Outgoing Server for the Audit Agent, choose the server type: SFTP or FTP.
-
For FTP: If your server uses secure connection, select the Use SSL/TLS check box. If your server has the passive mode enabled, select the Passive Mode check box.
-
Enter the name and port number of the server.
-
Enter the directory for sending the audit snapshots.
-
Enter the username and password to connect to the server.
-
Click Test Settings to verify if Alloy Discovery can connect to the specified server.

-
-
In the Incoming Server for audit snapshots section, configure the settings for the server that will handle the receiving audit snapshots:
-
If you want to use the same server as for receiving audit snapshots, you can select the Use same settings as my Outgoing Server check box and proceed to step 7. Otherwise, proceed with the following:
-
Choose the server type : SFTP or FTP.
-
For FTP: If your server uses secure connection, select the Use SSL/TLS check box. If your server has the passive mode enabled, select the Passive Mode check box.
-
Enter the name and port number of the server.
-
Enter the directory of your server where the snapshots will be received from.
-
Enter the username and password to connect to the server.
-
Click Test Settings to verify the specified server settings.
-
By default, Alloy Discovery checks the FTP Audit Source for new audit snapshots every hour and uploads the audit data if new snapshots have arrived. If you want to change this setting, specify another upload interval.
-
-
Click Apply to save the Audit Source and switch to the General tab.
-
Choose how to deliver the audit agent to the computers you want audited.
Use any or both of these options:
-
Create an installer and install the audit agent on every computer.
NOTE: This option works only for Windows computers.
To create the installer right now, optionally change the default agent schedule, click Create Installer, and choose where to save your
AlloyAuditAgent.msifile.TIP: You can skip this step now and create the installer later. For details, see Installing the Audit Agent for FTP Delivery.
-
Create an Inventory Analyzer package, deploy it to remote networks, and automate the audit using domain logon scripts or scheduled tasks.
NOTE: This option works for all supported platforms.
To build the Inventory Analyzer package right now, click Create Package, select the audit agents your package will include, and browse to the destination folder.
TIP: You can skip this step now and build the package later. For details, see Deploying Inventory Analyzer package for FTP delivery.
-
-
Click OK to close the [FTP Audit Source Name] dialog box. The FTP Audit Source appears in the list of Audit Sources.