Adding Direct Network Scan Audit Sources
To add a Direct Network Scan Audit Source to a Site, follow these steps:
INFO: For details, see Overview of Audit Methods.
- In the Sidebar, right-click a Site and select Properties from the pop-up menu. The Site [Site Name] dialog box opens.
- Under Audit Sources, click New > Direct Network Scan. The Direct Network Scan Audit Source [Source Name] dialog box opens.
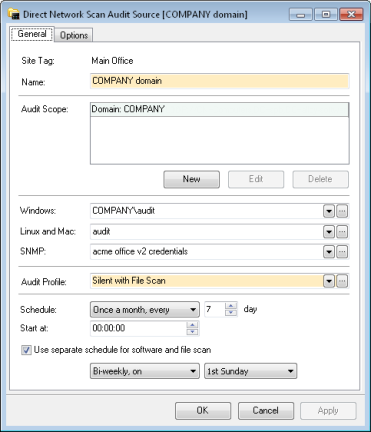
- Type in a name for the Audit Source.
- Specify the scope of computers and network devices you want audited as a combination of the following options:
- To add a Windows domain or workgroup:
- Click New > Domain to bring up the Select Domain dialog box.
- In the Discovery Method list, choose how to discover computers within a Windows domain:
- If you want to enumerate computers registered in the Active Directory, select Active Directory. As long as the information in the Active Directory is accurate, you can discover computers disconnected at the time of the device discovery.
- If you want to query the physical network and discover computers and network devices that respond to ping requests, select Network Browser.
- If you want to query the physical network and discover computers and network devices that respond to ping requests, select Network Browser. There are two prerequisites for the Network Browser option:
- The WS-Discovery (Web Services Dynamic Discovery) protocol must be enabled on computers you want to discover and also on the computer hosting your Inventory Server.
- Make sure that the Inventory Server is running under a Windows domain user account. For details, see
- To use both methods, select Both Active Directory and Network Browser.
- If you want to query the physical network and discover computers and network devices that respond to ping requests, select Network Browser. There are two prerequisites for the Network Browser option:
- To use both methods, select Both Active Directory and Network Browser.
- Double-click the domain or workgroup. The selected domain/workgroup appears in the Audit Scope list.
- To add an organizational unit:
- Click New > Organizational Unit to bring up the Browse for Container dialog box.
- Browse through Active Directory containers, select the desired one (typically, the Computers container), and click OK. The LDAP path to this organizational unit appears in the Audit Range section. For example:
LDAP://CN=Computers,DC=toronto,DC=company,DC=com
- To add a particular computer or a network device:
- To specify a computer by name, click New > Computer, type in the computer name or click the ellipsis button, browse the network for the desired computer, and click OK. The computer appears in the Audit Scope list.
- To specify a computer or network device by IP address, click New > IP Address, type in the IP address, and click OK. The IP address appears in the Audit Scope list.
- To add an IP address range:
- Click New > IP Address Range to bring up the IP Address Range dialog box.
- Specify the IP range as follows:
- To specify the IP address range manually, do one of the following:
- Select the IPv4 address range option, enter the Start IPv4 Address and End IPv4 Address of the range.
- Select the IPv6 address range option, enter the Start IPv6 Address and End IPv6 Address of the range.
- Select the IPv6 network option, enter the IPv6 prefix and IPv6 mask.
- To determine the IP address range of your network automatically, select the IPv4 address range, IPv6 address range or the IPv6 network option and click My Network.
IMPORTANT: Depending on your network configuration, clicking My Network may produce an unreasonably large IP address range so that the discovering and auditing computers takes a long time. In this case, you can manually edit the start and end IP addresses to restrict the range to include only those IP addresses that are in use. If the IP address range of your network consists of several segments, you can cover the whole range by adding IP address ranges corresponding to each segment one by one.
- Click OK. The selected IP range appears in the Audit Scope list.
NOTE: The IP address of your
Repeat these steps to add other domains, organizational units, computers, or IP ranges you want to audit. If you want to modify an item in the list, double-click it. To remove a list item, select it and click Delete.
- To add a Windows domain or workgroup:
- Provide the credentials that
- Specify the credentials for auditing computers running Windows:
- All the Windows audit credential records that you have previously created are displayed in the Windows list. To choose an existing record, select it from the list.
- To create a new Windows audit credentials record, click the ellipsis button in the Windows field, click New in the Select Audit Credentials (Windows) dialog box, and then follow the instructions on adding Windows audit credentials.
INFO: For details, see Adding Windows Audit Credentials.
- Specify audit credentials for auditing computers running Linux or Mac OS:
- All the Linux and Mac audit credential records that you have previously created are displayed in the Linux and Mac list. To choose an existing record, select it from the list.
- To create a new Linux and Mac audit credentials record, click the ellipsis button in the Linux and Mac field, click New in the Select Audit Credentials (Linux and Mac) dialog box, and then follow the instructions on adding Linux and Mac audit credentials.
INFO: For details, see Linux and Mac Audit Credentials.
- Specify audit credentials for auditing computers running ESXi/vSphere/Citrix hypervisors:
- All the ESXi/vSphere/Citrix audit credential records that you have previously created are displayed in the ESXi/vSphere/Citrix list. To choose an existing record, select it from the list.
- To create a new ESXi/vSphere/Citrix audit credentials record, click the ellipsis button in the Linux and Mac field, click New in the Select Audit Credentials (ESXi/vSphere/Citrix) dialog box, and then follow the instructions on adding ESXi/vSphere/Citrix audit credentials.
INFO: For details, see ESXi/vSphere/Citrix Audit Credentials.
- Specify SNMP credentials for accessing SNMP data on network devices:
- All the SNMP credential records that you have previously created are displayed in the SNMP list. To choose an existing record, select it from the list.
- To create a new record of SNMP audit credentials, click the ellipsis button in the SNMP field, click New in the Select Audit Credentials (SNMP) dialog box, and then follow the instructions on adding SNMP credentials.
INFO: For details, see Adding SNMP Credentials.
- Specify the credentials for auditing computers running Windows:
- Select an Audit Profile for the Audit Source from the Audit Profile list.
If you do not have Audit Profiles yet, click the ellipsis button in the Audit Profile field, click New in the Select Audit Profile dialog box, and then follow the instructions on creating Audit Profiles.
INFO: For details, see Configuring Audit Profiles.
- You can run the Direct Network Scan on demand, or you can schedule it to run automatically on a regular basis.
- To automate the Direct Network Scan, specify the schedule in the Schedule field. You can also specify the exact time when the audit will start in the Start at field (by default, the start time is 00:00:00, i.e. the audit starts at midnight).
- If you plan to run the Direct Network Scan on demand, select Never from the Schedule drop-down list.
- If the Use separate schedule for software and file scan check box is available, you can set an individual schedule for scanning computers’ hard drives.
The hard drive scan may take a significant time, and you may want to run it less frequently. To set a different schedule for this time-consuming operation, select the Use separate schedule for software and file scan check box and specify the scan schedule.
NOTE: The Use separate schedule for software and file scan option appears when the Audit Profile has at least one of the two options for the hard drive scan enabled: You have set the Inventory Options > Software Discovery option to Discover installed software and recognize software in files; You have enabled the Inventory Options > File Scan option.
- If the audit scopeincludes an IP address range and you want to change the default options for discovering IP addresses, click the Options tab.
By default,
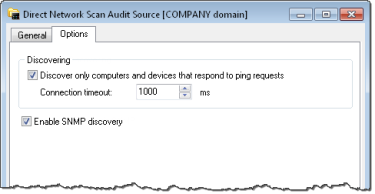
- You may not want to discover network devices via SNMP within the specified audit scope. To disable SNMP discovery, click the Options tab and clear the Enable SNMP discovery check box. You can re-enable SNMP discovery by selecting this check box.
- Click OK. The Direct Network Scan source appears in the list of Audit Sources.